
Thank you! Your comment has been submitted successfully. You should be able to view your question/comment here within a few days.
Error submitting comment. Please try again momentarily.


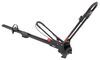
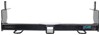
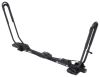
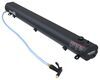
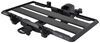
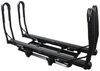
This custom fit kit lets you mount Inno XS300, XS350, XS400, XS450, INTR, or INXR roof rack feet to your vehicle's factory fixed mounting points, flush rails, or tracks. Kit includes all hardware necessary for mounting feet to your roof.
Features:
Specs:

Videos are provided as a guide only. Refer to manufacturer installation instructions and specs for complete information.
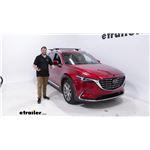
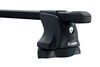
Hey everybody, Cooper here from etrailer. Today, we're going to be taking a look at the INNO Roof Rack System on our 2022 Mazda CX-9. Now, if you want to carry around some accessories on your roof, like maybe a kayak carrier, a bike rack, or maybe some sort of cargo bin up on top of our roof, the first thing we're going to need is a roof rack system like we have on here today. Taking a quick look at it, we can tell that we do have some arrow crossbars here, which does mean that they just start off a little fatter in the front and kind of taper off towards the back. This is just to help cut down on that wind noise and drag that comes with putting something on top of your roof. Now, with some roof rack systems, they are kind of more flexible in their placement, so you can move them around your roof.
Depends on the kind of system you have. The one we have here today is a fixed point system, meaning that our crossbars do sit in this one location and they cannot move from that location. Our crossbar spread for this is going to be roughly about 28 inches. So whenever we buy accessories, we just need to make sure that it is accommodating to a 28-inch crossbar spread. Some other important measurements to know is: How much height are we adding onto the top of our vehicle By putting our tape measure down, we can see that we're adding on about three inches.
Now, that's important to know just in case you've tried to drive into any low-clearance areas. Is there enough room for your CX-9 plus the three inches we're adding on top of the roof And then also remember that you might be adding on additional items on top of that. If you are adding on additional items, usually they come in two different forms. The first one being the kind that are T-track, which just means that we're going to mount it directly into our crossbars. The second kind are usually clamps that find themselves attaching to the bottom and the top of the crossbar and kind of squeezing in place.
Now, how much clearance do we have from our roof to the bottom of our crossbar And that looks like it's going to be about two inches. So these are pretty low-profile crossbars. And with only two inches, I would make sure that if you are using any clamping accessories, you just are very careful when putting the item down through to make sure you're not dragging on your roof and causing any unnecessary damage. The last measurement we're gonna talk about is overhang, and that's just how much of our bars are past the feet of our roof rack system. And by taking our tape measure, we can see that that's about four inches.
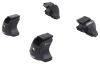
Now, that just means that if we have any T-track accessories or any clamp-on accessories, there's enough room for it to be mounted on the other side of our feet, which does typically need for something like a ski or snowboard carrier or maybe a rooftop basket. It is a little bit easier to access since we have all this extra room for bars. They are 51-inch crossbars on our roof rack system here today, which I think is honestly probably about the perfect size. They kind of line up with the side of our vehicle pretty nicely. If we we're to go to the next size up, I would start to worry about possibly hitting my head, maybe getting inside and out in the vehicle. We do have a 165-pound weight capacity for our roof rack system, which is important to remember just because our roof is going to have its own individual weight capacity, as well as any items that we mount on top are not only going to add weight, but have their own weight capacities. So we just wanna keep this all in mind, so that way we're not overloading any of our components and causing any unnecessary damage to anything. Coming down from our crossbar down to our foot here, we can see that it is made of a nice ABS plastic, which just means it's going to be very durable through all the elements that you might be taking it through when driving. And it does come with a metal lock core included, so that way you know that your roof rack system is pretty secured onto your vehicle, knowing that all the mounting hardware is locked behind a key. Now, the installation process for this roof rack system is pretty involved and has some tricky steps to be aware of. Thankfully, we're about to show you how to put it together. Now, to start our installation process, I like to go ahead and take everything out of containers and kind of separate them by kit. We went ahead and installed our back crossbar already, so the steps are going to be exactly the same for the front crossbar. So we went ahead and separated out our tower kit, our fit kit for our vehicle, and our crossbar. The first step we're going to want to do is make sure that we have our crossbar facing the correct direction. You can tell this by kind of looking at on the side. The front of your crossbar is going to be a little bit more rounded, and it kind of tapers off towards the back, meaning that this side is going to be our front. So, I'm gonna go ahead and lay it out like that in front of me and kind of roll it over. So now, I know that the front of the crossbar is now facing my direction. Now, coming over to our feet, this is how it's going to come directly out of the box. So the steps I'm about to do are the same steps you're going to do when you get it out of the box. We're going to take one of our keys and plug it into our core here, and that will go ahead and release the front plate of it, revealing the insides. Now, do notice this, and it points it out in the instruction manual. For our clamp, it kind of is seated inside of this plate that I'm about to drop out, but whenever you put this on the roof rack and we'll point out later again too, you don't want the clamp over this. You want it to sit inside of it. But then as we go ahead and just loosen this, you'll see that does kind of drop out of place. It's important to note the orientation of this, and we'll talk a little bit more about that later. Now, with the plate going and dropped out, we are going to fully loosen our tower here. And then there is a lever on the back that we're going to go ahead and gauge, and that actually loosens up the top of our foot here. And this is what's going to slide into our crossbar here in a second. Now, we're gonna go ahead and get our crossbar ready. We go ahead and slide this whole track back. Seeing that there's a stopper, go ahead and press that down, and then we'll kind of have this exposed area with a gap here. Then, we're gonna go ahead and grab our tower, pull that lever down, and we can see that with a little bit of force, especially when we turn upside down, it helps that this raises out and this is what's going to be essentially holding it to a crossbar. Now, we wanna go ahead and install this with our locking mechanism facing out, and I found it best to kind of keep some pressure on the bottom. That way, it does stay out and doesn't want to kind of come back up. But, after that, you should see that it will slide right back out. And now, with that stopper back in place, you do have this in the correct position. And we do wanna leave it a little bit loose 'cause when we go to install it on the crossbar, we're going to be walking down onto this plate. And now, with it installed on both sides, our crossbar is ready. So we're gonna go ahead and turn to prepping our roof. Now, after we've grabbed our fit kit and two bolts, we can come over to our flush rails here and see on the inside, there are two holes, and those two holes are gonna line up with the two holes of our fit kit, facing the rest of the system in towards the roof. We're just gonna kind of hold it into place, grab our bolts, and kind of secure them into place loosely, and we can tighten it by hand. Now, when you start to get tighter, you will notice there is a little bit of sliding here with our fit kit. So what I would recommend doing is simply choose either all the way forward or all the way back, and make sure you are mirroring it on that side. Now, once you have your fit kit in place, we're gonna go ahead and grab the cover from big fit kit as well. And then also, this piece that we had fall out of the clamp earlier. And we're just gonna go ahead and take that and kind of put it over our cover. And remember that little notch that we said that sticks up We wanna make sure that is facing towards the inside of our vehicle to set up for our clamps later on. And then again, we're just gonna kind of line this up with these holes and hand tighten these down a little bit until they're in place. And then, we're gonna go ahead and secure them down with that Allen key later to kind of finish it off and make sure that they're nice and tight. With everything tightened down on both sides, I did just wanna go ahead and point out that your kit is going to come with some of these plastic covers. Now, if you we're to go through something like a car wash or want to take your roof rack off for some reason, maybe a clearance issue of some sort, you can go ahead and just remove the feet and the crossbar, leaving this part that we just went ahead and installed. And these plastic covers here do just kind of clip on the top here. Now, to go ahead and install our crossbar, I would recommend doing it with somebody if you had a friend available. But, if you have it on your own, it's still pretty easy. You just have to be a little more careful as we reach our crossbar across and kind of gently set it to roughly where we're going to install it and doing the same over on this side. And we just kind of pull the crossbar to where we need it until it's sitting in this hole. And then we can go ahead and just walk around the other side and make sure that it is secured in that same spot. So now, with our crossbar set in place, we're gonna go ahead and cress up on this lever here, and that just kind of holds the top into place. And then, we'll come to the front of it right here and just simply kind of twist on this knob to essentially tighten on that clamp and put it into place. And as we pointed out earlier, whenever you do install it, we wanna make sure that the front of our clamp is sitting inside of these two ridges, not clamped on over them. Now, with everything secured down, we can do the final finishing steps. Our first one is actually going to be to remove the end cap of our tower here, exposing the insides of it, and loading on our foam wind trip that we have down here in the bottom. If you find yourself having some overhang, you can go ahead and trim that to size. But since this isn't a permanent install we're doing today, we're not gonna go ahead and do that. And then we just go ahead and put that cap back. Once we are done with our included Allen tool, we can actually can rest this here on any of our towers. So while this isn't a totally tool-free install, I do like the fact that we can include our one tool needed somewhere. That way, we're not going to lose it. And to make sure that our tower is kind of in this square configuration or else our cap will not fit over it, you can just go ahead and squeeze this into place. And once we have that in place, we can go ahead and take our included key, turn it sideways, and that means that we are in this locked position. Now, with everything installed and secured down, we're gonna go ahead and just give it a little bit of a shake test just to make sure nothing's moving at all. And it looks like we're all good, so we're ready to hit the road. Overall, I would say that the INNO Roof Rack System is a pretty nice roof rack system. The fact that it sets so low-profile and doesn't take up too much additional space on the top of our vehicles is a really nice pro to that. Now, the flip side of that being that there isn't very much space between our roof rack and our roof to mount any clamping accessories. So, I'd say that's maybe about the only downside to that aspect of it. The installation process is pretty involved, but it might only be something that you have to do once and never have to do again. So, while it might be kind of a pain in the butt for the first time, that's the only time, so you don't really have to worry about that. So overall, I would say it's pretty good roof rack system. And that was a look today at the INNO Roof Rack System on our 2022 Mazda CX-9. My name's Cooper, and thanks for watching.

Easy to install on my Mazda CX-5. No is sues.
The Inno fit kit and roof rack feet were easy to install and provide a very stable mount for the cross bars on my Mazda CX-5.
Nice product !!! Easy to install ! E-trailer was VERY helpful !!!!
Arrived intact and on time. Easy to put together.

Do you have a question about this Accessories and Part?
Info for this part was:
At etrailer we provide the best information available about the products we sell. We take the quality of our information seriously so that you can get the right part the first time. Let us know if anything is missing or if you have any questions.


Katrina B.
10/10/2022
If you would like to provide more information about your experience I am more than happy to assist you in getting your review updated.