
Thank you! Your comment has been submitted successfully. You should be able to view your question/comment here within a few days.
Error submitting comment. Please try again momentarily.


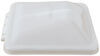
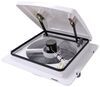
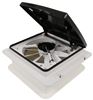
Replaces the lid assembly for your MaxxFan Plus roof vent on your RV.
Features:
Fits:
Videos are provided as a guide only. Refer to manufacturer installation instructions and specs for complete information.
Hi everyone. Steven here with etrailer.com. Today we're looking at a replacement lid assembly for the Maxxfan Plus Roof Vents in white. Now folks, this replaces the lid assembly for your Maxxfan Roof Vents on your RV. It is again, a white color. Fits a couple different options of the Maxxfan Plus Roof Vents.
I'll put them on the screen. You've got one, two, three, four tabs down here. Looks like your pin would go right through there for installation. And then you got the two metal brackets here, with holes in them as well, to aid in that installation and operation of the unit. (Steve knocking on vent) Hard plastic construction.
It's a direct replacement from the manufacturer. Let's get some quick dimensions on this guy. Now I'm going, it's kind of curved on the outside edge. I'm going at the widest point possible. I get outer outer, 15 and a quarter inches this way.
And if I count this back tab here, outer, outer, I get 15 and one eighth inches that way. Now, that being said, inside to inside, I got about 14 and five eighths, by 14 and a half, 14 and five eighths that way. So again, that's the outer and inner dimensions on this particular unit. And again, I put the model numbers that it works with, on the screen for you as well. So you can be sure it works with those particular models.
And that's gonna wrap it up folks, for a quick look together. I'm Steven. Thanks for watching.

Very easy install….exact fit. Phillips head and very thin metal rod are all you need. Open all of the way , gently pull 2 side lift arms out being careful as the heads are not secured with screw the remove 2 end screws and metal rod inserting thin rod to push other out, then reassemble. 10 minutes.
Easy replacement

James

3/8/2026
No issues working great
Product is an exact replay of the original. Quality is the same as original part. I had cracks at the connection post base. This a problem with how hard the motor pulls the lid closed, not the lid itself. My RV is a 2023, so it’s not due to age. I have no control over the motor that closes the vent lid. Zoom in to see cracks (right of black support).
This is the second one I’ve purchased. The quality seems to be good. The last one cracked at the top of the mounting post. This lid goes on the power operated model. When it closes the arms pull the lid very tightly this causes it to crack over time and I mean a very short amount of time. 6 months is not a long time. If there was a metal version of this lid I would purchase it. This cracking only occurs on the powered model.
My husband replaced our broken roof vents and said it was very easy and took less than 10 minutes and they fit perfectly. Thanks!
Received the product as described. Was kept updated via email the entire time. First time do it yourselfer, so only thing I would have liked is installation directions, but it was pretty simple. Would definitely order from this company again.
Thicker nicer plastic and doesn’t allow as much light through as the factory ones
perfect fit, easy install
Fit perfectly. Easy to install. Great service from etrailer.
Easy enough
fast shipment and quality product.
Great product
I’m satisfied
Fit perfect.
Right cover. Enough said.
Info for this part was:
At etrailer we provide the best information available about the products we sell. We take the quality of our information seriously so that you can get the right part the first time. Let us know if anything is missing or if you have any questions.


Fred
4/16/2026
Part is working perfect. I am glad to see that the review is helping others. Excellent product.