
When your rig's loaded for the long haul, this tank delivers pressurized water without eating up space. And it bolts about anywhere you have mounting space for it. Roll into camp and rinse off the day - boots, bikes, dishes, whatever's dirty.
Fill it, then pressurize it your way: garden hose for quick pressure, a pump cap for manual pressure, or even a bike pump or air compressor through the Schrader valve. However you roll, this tank brings the pressure without the drama.
Showers, dishes, gear cleanups - the Overlander handles it all without tipping the scales. A tank with 5 gallons is the sweet spot: not too big, not too small, and just enough to make rinsing off at camp feel like a little luxury in the wild.
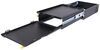
This isn't some rack-specific setup - it's a universal mount system with a bracket that bolts to platform racks, crossbar channels, MOLLE panels, or anything else with solid anchor points. If you have a spot on your rig, you should be able to make this tank fit.
Thanks to a pair of aluminum extrusions that attach to the bracket, the tank slides right over and pulls tight - letting the tank sit flush against the bracket. It keeps things low-profile and solid, which is great for tight builds, compact storage, and anyone who hates wasted space.
The 8' hose gives you freedom to rinse off whatever's dirty without needing to twist yourself into weird angles. It's long enough to rinse off you, your gear, and maybe even your dog if they hold still long enough.
Made from BPA-free, food-grade plastic, this tank is safe for cooking, cleaning, and refilling bottles. The black finish helps warm the water naturally, and the tough construction shrugs off UV rays, trail dust, and that surprise hailstorm in the middle of nowhere.
California residents: click here
Videos are provided as a guide only. Refer to manufacturer installation instructions and specs for complete information.
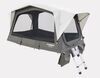
(water dripping) Oh hey there. Matt here with etrailer. I just thought I'd take a quick little shower. It's been a long day here at etrailer. It's pretty hot out here and that's what this is perfect for. This is gonna be the water port overlander, portable shower.
It's pretty nice, but before I get into all the details, lemme dry off. Now one of the really nice things about this specific one is gonna be that it's portable. So if I move this hose right out of our way, you can see we have a handle here at the very top. That's gonna be perfect if you need to lug it around. But me personally, I'm probably just gonna keep it here mounted to the molly panel 'cause I like having it in one spot.
It's just a little bit more convenient. So if I got done with a hike, maybe I walk through some sand, I can easily get that off my shoes. Or if I get down a bike ride, I just come back over here, got some mud on my tires, I can spray that off real quick. And we're gonna have a lot of different settings to these. Right now I'm on jet setting, but let's take a closer look at the rest of them.
So that's what the jet kinda looks like. If you need a little more power, just come over here, give it a few pumps. Now the pressure in this is gonna have a max of 35 PSI. So that's good to know if you have a type of compressor putting air into this and there that's a little bit better. And we're gonna have a flat setting.
We're gonna give you more of a wide grouping. We have center that's also pretty wide, but a little more light and misting. Misting is gonna be pretty nice if you just wanna cool off and relax with your family. And then shower, of course you saw that earlier. It's good for a shower. Now between me taking a quick little shower and showing you guys off all the features of this, we're running a little bit low in water, so we're gonna have to fill it up. This will be two ways that I suggest throwing it up by. And the first way is gonna be just putting water up, just the manual way, putting it through this blue little tap here. Now if you have it in the vertical position with this black cap facing up, you have to fill it up from there instead. Now there's a quicker way and that's gonna be the quick connect way so I can show you that now. Now my preferred way of filling this up is gonna be through the quick connect method. And all you have to do is grab your regulator. Now this is gonna connect directly to your hose or faucet. We're gonna take the larger end and we're gonna just screw that into place. And with that on we're gonna grab your hose. We're just gonna click connect it. So pull on that tab some, push up on it until you hear it click. And then we can connect the other side. And from there we're gonna grab the other one. This is gonna be a much shorter one. This isn't gonna be a regulator. And with this we're just gonna find this port way over here and just thread it on. And we'll grab the other end of that hose, grab that quick connect, push it on there. Hear it click. And from here we're just gonna turn off or turn those valves on by that little switch over here. Be a little bit tight sometimes we reach it, there we have it. Now that this one's turned on, I'm gonna do the same thing for the other side and then send that water on through. And it should only take about 90 seconds to fill this up. One trick I typically do when I'm filling it up, it just come over here to this blue cap since it is at the very top. Undo that a little bit. Some air will probably come out. But eventually some water will start coming out from the top and I'll cinch it down so I know it's full. From there when I'm unhooking, what I'm gonna do is turn those valves we had earlier to the off position so all my water doesn't come back out on me. There's gonna be a little bit that will come out, that's gonna be the water just in this hose. But once both of those are in the opposition, you can remove this with a quick connect. And finally, let's talk about the construction a little bit. And that's what I really like about it too, is just hitting that this thing feels solid. It's not like your typical plastic casing that is very bendy or flexible. This, I can barely even move when I press down on it and it is gonna be black. So what that means is on those longer days when you've been out on your longer hikes outside, you're gonna be pretty sweaty when you get back. You want a nice warm shower. That sun's gonna be beating on this all day, kind of warming up that water a little bit. Now, in my opinion, I think I like this a lot. I mean it looks nice, especially with how it sits on our molly paneling and it's just easy to use. Now of course if you guys have any other questions, please let us know here at etrailer. But I think I'm gonna take me another shower 'cause it's getting a little bit toasty out here again. And I'm kind of sweaty.
Ratings & Reviews

Bought this item, because a freind had recently purchased one and i was impressed with its function and features. It was a fairly new item and was out of stock everywhere, but etrailer had it.very well constructed and i love the fact that it came with all the brackets and hard ware to mount it. I mounted the tank on the toyota factory deck rail, and im ok with it, but plan to make a custom bracket and move it down a bit more. Overall very happy with the purchase and the service and shipping on etrailers end. Thanks!
I'm sure the product will be fine. My review is on the company and my sales rep. Paula went above and beyond to get me taken care of. I look forward to more transactions like this. Now if only UPS was able to keep up lol
Info for this part was:
At etrailer we provide the best information available about the products we sell. We take the quality of our information seriously so that you can get the right part the first time.


Thank you! Your comment has been submitted successfully. You should be able to view your question/comment here within a few days.
Error submitting comment. Please try again momentarily.