


 Arrives before Christmas
 To see if this custom-fit item will work for you please tell us what vehicle you'll use it with.

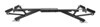
Make it easier to climb into your Jeep Grand Cherokee with running boards. The added step helps family and friends get into your Jeep Grand Cherokee independently, and can also assist you with accessing your roof. Sporty, streamlined boards are custom fit for your Jeep Grand Cherokee.
Features:
Specs:
Videos are provided as a guide only. Refer to manufacturer installation instructions and specs for complete information.
Hey everyone, Shane here with etrailer.com. Today I have a 2023, Jeep Grand Cherokee. And if you're looking for a way to upgrade your vehicle to add more style, to make it a little bit more comfortable for your passengers to get in and out of the vehicle. Take a look at the Romik Running Boards. This is what they're gonna look like when they're installed. You can see they're very nice, stylish running board.
They add a lot of style to the vehicle. They cover the passenger, front and back on both sides, so it's a full running board. Unlike tube steps, tube steps normally have a pad back here and a pad up there and it's just a bar. This is a full step that runs front to back. Construction is gonna be aluminum.
The end caps are plastic, however, there are replacement parts for those. So, if you have to happen to, you know, find a rock or something that kicks up and hits that plastic piece and cracks it, you can't get replacement parts for those, as well as brackets. Adding something like the insured vehicle, as I mentioned, is gonna add a lot of style. It looks really good on this Grand Cherokee. It's gonna make it a lot easier for your passengers to get in and outta the vehicle.
Especially for some folks that may have a hard time pulling theirselves up to sit in the seat. This gives 'em that extra step to help him get up in the vehicle a little bit easier. It's gonna have rubber little rubber plugs here that run from front to back. This is gonna add plenty of grit, so when it's snowing out or it's raining out, we don't have to worry about slipping on it. My foot is a 12 and you can see I have plenty of room, even with the door closed, to get my foot on that board.
As far as the installation process, pretty simple and straightforward. It's gonna come with all the brackets, all the hardware needed to get installed. There's not gonna be welding or drilling required. You're gonna use factory holes on the vehicle and you can get it done in a pretty short period of time in your driveway or garage with a few simple tools. If it's something you may not have the time or space to do, you can always check out our Dealer Locator, find someone near you that is able to put 'em in for you. If you want to give it a try, I promise you you can do it. Follow along with me now, and I'll walk you through how to get 'em installed. To start your installation, you need to come underneath the vehicle and take the cardboard panel off if you haven't. Most of these are gonna be 10 millimeter head bolts. You're gonna have one small one up here, that is, I believe it's an eight millimeter and you're gonna have one large one right here. That's an 18 millimeter. So, remove all the bolts of hardware you need to to get this cardboard panel down. You're gonna have some plastic nuts that are also 10 millimeter that run right along inside this edge here. (power tool whirring) Right about here, you're gonna take a flathead screwdriver, there is a, it's a keeper, it goes over top of a stud. Take the flathead screwdriver, stick it in there and kind of pull down on the panel and it will unthread from that, from that stud. (metal clunking) Like that. And I'll show you what that looks like here in a second. That's what that keeper looks like right there. So we'll set this aside for now, and then we'll start getting our brackets lined out and put in place. For our front brackets, we're starting on the passenger side. This edge right here on both brackets are gonna be smooth. It's also gonna look like this. This hole right here faces towards the front and it's gonna mount up in there just like this. Gonna make sure you have the correct bracket. There's a stud on this side, which is why this is cut out, there's a stud over there that passes by this. Your second front bracket is gonna look like this. You wanna make sure that this plate and opening is facing the back or this lip is facing the back and eventually it's gonna get installed just like this. So that's your front bracket. Center bracket, is gonna have a notch cut in it. It's gonna look like this. This portion here, is gonna be towards the back of the vehicle, so it'll install like that. Your center plate a notch, except this flange is in the face forward now. For your back one, same thing with this one as a center one, this flange right here faces forward. The back two brackets have like a square cut out of 'em. The back one's gonna look like this. This large hole is gonna be towards the back. There's a stud under here that fits right in here. So this is gonna slide up against the bottom of the vehicle and that stud's gonna pass just like that. And we're gonna come underneath the vehicle. We're gonna take the small bolts that look like this. We're gonna feed 'em through these two holes. Like that. We're gonna take our rear bracket, as I mentioned, set the notch and it's facing back. This is gonna line up with this hole here and that stud's gonna pass right here. And we're gonna slide this over, just like that. We're gonna take one of these M10 bolts that come in your kit, throw it up into this hole, put this loosely install that for now. These two, we're gonna put a small flange nut on each one. We've got our hardware on, we're gonna take our bracket, push it up and towards the pinch weld. (power tool whirring) 15 millimeter socket will tighten this one. (power tool whirring) And we want come back, and we wanna torque those to the specifications in the instructions. (tool beeps) Next we're gonna go to our middle bracket. We're gonna have a plate with a stud on it like this. This hole right here, we're gonna feed this in and drop it down. You're gonna have retainer ring. Take this and thread it on. That'll help keep that stud in that hole. If you have to, you can take a screwdriver, stick it in there. (metal rustling) If you can get it to push all the way up, go for it. We're gonna do the thing here. Same hardware here. We're gonna come up through the back, like that, for each of these holes. Take this guy, slide it over like that, like that. Take one of the nuts that comes in your kit, throw it on here, that'll hold our bracket up. Put a flange nut on each of these, (metal rustling) and we can come back, do the same thing we did with that one. Up, as far forward as we can get it. We tighten the hardware down and then come back and torque it. (tool beeps) Move to the front bracket, same thing with this hardware, and six bolts. (metal rustling) Flange nut. We are gonna take that factory bolt that you pulled out, we're just gonna loosely install this for now. Because we want it to stay lined up with that hole when we tighten it down. Eventually we're gonna pull this back up when we go and put our felt back up, because that's gonna hold that felt bottom in place. And we can come back and we will tighten and torque these two down. Push up and all the way against the pinch weld. (power tool whirring) (tool beeps) Once you get these tightened, you can pull this bolt back out and you can reinstall your felt. One thing to keep in mind, is when you put your felt back up, you are gonna cut a slit in it, so it will feed around this. And I will tell you, make sure you're getting it over the top of these, so that this stud right here, where you use the screwdriver, that will go back in place. You might have to actually trim your felt around this stud right here. I found on the other side there's a little bit of a pain to get that on with that stud so close. So, I recommend just trimming the part of that felt out or that cardboard there, so it doesn't make contact with that stud. Next thing we're gonna do is we're gonna loosely install our outside brackets. Bolthead comes from the front through. You want it to go on the flat side. We're gonna have two of these bolts for each bracket. These are M10s. Then we're gonna take our board, ff these are not installed, you're gonna need to install them. They we inchesre already installed on the boards when we got 'em here. You're gonna have two at one end, two in the middle, and two at the other end. What we're gonna do is gonna line them up with these flats. (metal rustling) Next thing you wanna do, is you wanna center your board. You might like a little more forward than you do back or a little back farther. I have it centered, just basically off the edge here to the edge of the step, same in the front. Once you got it centered where you want, push the board all the way in. Take a 13 millimeter socket, we're gonna tighten the nuts on the bottom of the board. (power tool whirring) Once you get those tightened, (tool beeps) come back, (tool beeps) and make sure there are torqued to the specs in the instructions. (tool beeps) We're gonna take the board, we're gonna push it in as far as we can go, so that these are going back in the bracket as far as possible. And we'll take a 13 millimeter socket and we'll come back and we'll tighten them up. (power tool whirring) (tool beeps) So now you can take your board, these two bolts on each one of these brackets are slotted, the holes are slotted, so, you can pull it all the way out. Just level up the back, so it matches the front. Or you can push it all the way back as far as it'll go, so this bracket slides up on the other one. I like it more like this myself, because it keeps it tucked up close to the bottom of the vehicle. Once you get it where you want, come back with a 15 millimeter socket and tighten those down. (power tool whirring) Once you get 'em tightened down, double check to make sure your board is sitting flat. Sometimes if you push 'em up all the way up in there, the edge of this board will sit up just a little bit. You may like it like that, I don't know. I've got it as flat as I can get it. Once you get that where you like it, then come back and you're gonna tar torque the bolts to the specifications and the instructions. (tool beeps) Once you get one side done, you're gonna repeat the process on the other side. It's gonna do it for a look at in installation of the Romik Running Boards on the 2023, Jeep Grand Cherokee.

Very nice , had them professionally installed at Ziebart and they look and feel great
Do you have a question about this Nerf Bars - Running Board?
Info for this part was:
At etrailer.com we provide the best information available about the products we sell. We take the quality of our information seriously so that you can get the right part the first time. Let us know if anything is missing or if you have any questions.


Thank you! Your comment has been submitted successfully. You should be able to view your question/comment here within a few days.
Error submitting comment. Please try again momentarily.