

 Arrives before Christmas
 To see if this custom-fit item will work for you please tell us what vehicle you'll use it with.
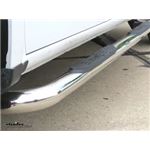
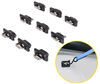
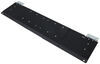
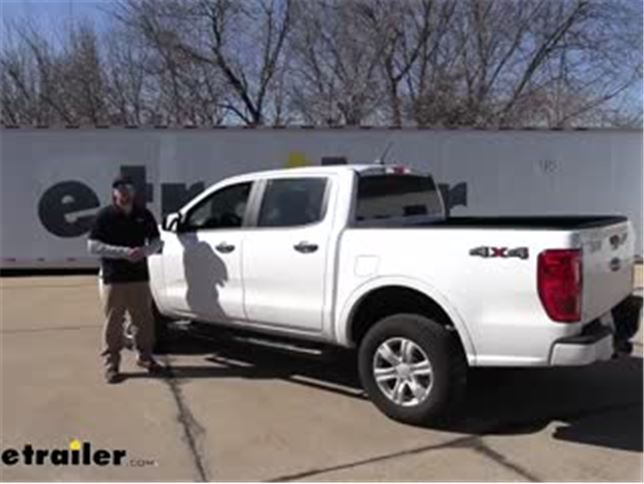
The curved ends on these affordably priced step bars give your Ford Ranger a streamlined look. The non-slip step pads in these powder coated steel, 3" diameter bars sit in recessed areas instead of cutouts to inhibit internal corrosion.
Features:
Specs:
The step pad areas in Westin's E-Series round nerf bars are indented instead of cut out, maintaining the structural integrity of the steel tubing and preventing internal corrosion.
As shown in the image above, these step bars have a U-style tubing, which ensures that each bar conforms perfectly to your vehicle. Installation is quick and simple - just bolt the mounting brackets to existing holes in your truck's frame. No drilling is required.

California residents: click here
Videos are provided as a guide only. Refer to manufacturer installation instructions and specs for complete information.
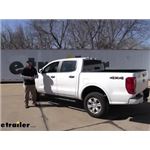
Hey everybody, Ryan here at eTrailer. Today on our 2020 Ford Ranger, we're going to be taking a look at and showing you how to install the Westin E-Series Nerf Bars. Now, originally these Nerf Bars we're kind of designed to, you know, keep the rockers and the underside of your truck a little bit more protected when you're off-roading and things like that. Well, as time goes on, things kind of evolved. And now, primarily these are used to enhance the appearance of your truck. And with these newer trucks sitting higher off the ground, it seems like every year they get a little bit bigger and bigger.
These are gonna make it a little bit easier to hop in and out of the truck. And today we actually have the black Nerf Bars on our truck. They're powder coated. I think it looks really good, kind of gives it that classic pickup truck look. But if that's really not your style there's also polished stainless ones available as well.
So either one you go with, I really think you can't go wrong. As I said, gives it that classic truck look that really does a great job of kind of enhancing the appearance of your Ranger. And not to mention too we're still going to be able to maintain that functionality. So it's not all about looks whenever we go to get in and out of the truck, it's going to give us that little bit of extra placement there where we can get our foot on and get in and out a little bit easier. So one of the things that kind of separates these from some of the other Nerf Bars is on the ends there, they're going to be turned in a little bit.
And to me, it kind of just goes with the contour of the Ranger a little bit better as opposed to the ones that are just cut straight. So this kind of blends and flows, and kind of gives us more of a factory type appearance. One thing I do like about these particular Nerf Bars is the pads here where you're going to step, the top portion here is actually flat. And that's not the case at all these round-type Nerf Bars. Sometimes they're just kind of a grip pad up there but it's still rounded.
So honestly it kind of defeats the purpose of helping you get in and out when it's round. No one wants to step on that. So having this flat here really gives you a solid surface to work with. And there's also going to be a design in here too to help give you a little bit more traction as well. So one of the ways I like to use Nerf Bars is on those snowy days, or, you know, you're working in the mud, you got wet boots and everything else. You can actually use these to kind of help clean your boots off before you get into the truck. That way you don't tear your carpet up. So for me, kind of clank them together. You can put one foot on there or even just hit them on the Nerf Bar itself. You're not going to hurt these Nerf Bars. They're very solid. And so it kind of just gives you a place to keep your feet while you get your boots clean. So the Nerf Bars themselves are going to be 3 inches in diameter, which to me for a Ranger is about the perfect size. It really does look good. And the pads themselves are going to be 3 inches wide as well. And they're going to be placed in a spot that makes sense. You know what I mean They're not going to be so far back here where you have to move your legs weird to get in and out of the truck they're right there where you would naturally want to climb up anyway. And not only for the driver, but also your passengers as well. Each entry point is going to have a pad there so everyone can stay a little bit safe. Now, something else I do just want to mention if you're someone that gets in and out of the bed of your truck a lot and you want to make it a little bit easier. You can actually pick up a step that will match nicely with the running boards that can go in your hitch and give you a good place to put your foot and get in and out of the bed. But at the end of the day, some Nerf Bars you really can't go wrong with, they're going to look good and function great as well. So what more can you really ask for Now as far as the installation goes, really not too bad. They actually just bolt right into some factory attachment points. So it really shouldn't give you a whole lot of trouble. Speaking of which, let's go ahead and pull into the shop and put them on together now. To begin our installation, we're going to be here on the side of our truck. And the first thing that we need to do is locate our attachment points. And there's going to be a total of three locations. One attachment point will be here in this area. The other one more towards the center. And the last one here towards the back of the truck. So what we'll do is run through these one by one. So we're going to start here towards the front of the truck. And if you look on this bottom side, we're going to see a couple of plastic covers. And so, we need to remove those. You can use a trim tool or a Flathead screwdriver, just pop those out. And that will expose a threaded weld nut underneath. So those two there. Even though these we're covered, I do suggest using a tube brush or something similar and just kind of running it through those threads, to clean out any potential dirt or debris that may be inside. And once you have those clean, what we can do is grab our bracket and loosely install it. Now these are specific as far as the location goes. So the front one is going to look a little different. These tabs here are going to be spaced apart a little bit more, and there's also a F stamped into the steel layer to indicate front. So those holes are gonna line up with those weld nuts there and we're just going to loosely secure this. So what we're going to do is hold our bracket up there. We're going to take a hex bolt, a split lock washer, and a flat washer. And this hardware combination is going to be the same for all of these attachment points of where our brackets get connected to the truck itself. So we'll hold this up, and just get them hand tight. We still want to have some adjustability. Now moving towards the center of the truck, we're going to have again two attachment points, a cover there and a cover on the inside portion of the rocker there. Again, we'll remove those plugs. Clean out the threads. And then we can grab our center bracket, which is going to look like this. It's also a stamped with a C and then we'll take the hardware combination that we talked about. And again, get it started hand tight. Now moving to the back, essentially, it's going to be the same exact thing as the center. There's our attachment points. Again we'll just pop these covers out, get the threads cleaned. That's what the rear bracket is going to look like. Again, it's stamped with an R. And we'll get it loosely secured. Grab our running board itself here, and these are size specific. The bag that they come in are labeled, so just to make sure you grab the right one And how these are gonna work, if we flip it over, you can see we're gonna have some nuts inserted there and those are gonna line up with our brackets. So what we're going to do is just set these on the brackets carefully. Make sure that they line up with the holes in the brackets. Then, we can take our hardware and get them loosely installed. So the hardware that we're going to use to attach the running board itself to the brackets is going to be a little different. We're going to be using the bolts like this. U-button head bolts with the Allen key inside there and we're going to take that bolt and take a star washer, and one of the smaller flat washers, put it on like this and we can thread it up in there. I want to mention if you have the stainless steel hardware, you want to be sure to apply anti-seize to the hardware threads like this, that way it'll prevent galling and things like that. But in our case, our hardware is not stainless, so we don't have to worry about it. So we're just going to line these up and get all of them started hand-tight for now. Now what we can do since everything is loosely installed is tighten down the brackets that bolt to the body of our vehicle. I like to start in the center and tighten these down first. And I do that to try to make sure everything is nice and level. That way the running board looks good and functions good. So I got this where I want it here and I'm gonna use a 16 millimeter socket just to snug everything down. I'll do that same thing for our other two ends. At this point what we can do, make sure you have the running board itself nice and level and in the position how you'd want it. And we can come back with our Allen key and tighten down the bolts that connect the brackets to the running board itself. Now what we can do is come back with a torque wrench and tighten down all of our hardware to the amount specified in the instructions. Once you have the side completely torqued down you're just going to repeat that same process over on the other side of the truck to get that one installed. And that'll finish up our look at and installation of the Westin E-Series Nerf Bars on our 2020 Ford Ranger..

no specific length on info
GOOD FIT, EASY INSTALL

very satisfied
Do you have a question about this Nerf Bars - Running Board?
Info for this part was:
At etrailer.com we provide the best information available about the products we sell. We take the quality of our information seriously so that you can get the right part the first time. Let us know if anything is missing or if you have any questions.


Thank you! Your comment has been submitted successfully. You should be able to view your question/comment here within a few days.
Error submitting comment. Please try again momentarily.