

 Arrives before Christmas
 To see if this custom-fit item will work for you please tell us what vehicle you'll use it with.
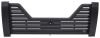
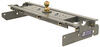
Industrial-style running boards built for real-world abuse. Gen-Ys heavy-duty, all-metal design shrugs off mud, ice, and daily punishment without the flex, rust, or cracked plastic that kills other steps.
Let's face it: most tube steps and boards are all show and no grit. Thin metal, hollow tubes, slippery rubber - and they look like junk after one winter. Gen-Y doesn't play that game. These are solid, powder-coated, all-metal boards that hold up to real use. No flex. No peeling chrome. No parts that fall off.
When you're hopping in after a long day at the job site or coming off the trail, traction matters. These Gen-Y boards have deep notches across the entire surface and an open design underneath - so mud, snow, and slush fall right through instead of caking up. It's grip where you need it and self-cleaning by design.
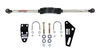
These aren't locked in place like most boards. You can tweak the height to match your needs - higher for a tucked-up look, lower for easier step-in. Plus, you get about an inch of side-to-side shift to fine-tune where your foot lands. Small changes, big comfort.
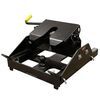
Don't waste your weekend under the truck. These boards bolt right to the existing studs with zero drilling. Once the brackets are loosely in place, test your position, snug everything down, and you're done. It fits clean, looks right, and works like it should.
With thick powder coat protection, these boards are made to outlast the cheap stuff. Gen-Y backs them with a limited lifetime warranty, so you can stomp, scrape, and step with confidence.
Videos are provided as a guide only. Refer to manufacturer installation instructions and specs for complete information.
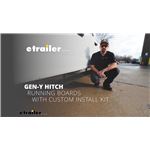
Hello neighbors, it's Brad here at Etrailer and today we're taking a look at installing the Gen-Y running boards on a 2017 Ford F-150 Gen-Y products are some heavy duty products that are built extremely well and very rugged, and these running boards are no different. They look fantastic. And the point of a running board is to be able to hop up in your vehicle even with wet or muddy or slippery feet. And that way you have a nice step into your vehicle, which is great not only for the driver, passenger, but if you have kids or anyone with mobility issues. This sure makes it a lot easier for them to get in. And if you're out on the job site with muddy boots, a lot of your factory running boards are just kind of plastic and molded, so there's really not a whole lot to bite into.
And these These are practically a boots scraper. They have notches along the entire thing that's full of grip as you step onto it. But it's also wide open, which is really nice because it's not really gonna allow anything to build up in here. So if mud or dirt is caked in here, it's wide open on the bottom. Same with snow, rain, ice, anything like that, you don't have to worry about that causing a slip issue.
Now these are solid steel, so they're pretty heavy, but that's kind of a good thing for something that you're stepping onto. And the black powder coat finish that they have is very heavy duty. All of Gen-Y's products have a really thick powder coating in the best way. So you know, being that it is steel, this is gonna hold up with that finish to rust, corrosion, anything like that long term and look really good. And as far as weight capacity, 400 pounds is pretty solid, I'm every bit of 200 pounds and there's really not a whole lot of flex at all.
They feel extremely solid and that's because it mounts up to factory spots. So even if I had another grown adult on the back side hopping into the back, that's still gonna hold up to that capacity. Now if you're looking at this and you say, well I don't want 'em that low, I need them a little bit lower for someone to get in, not to worry. Right now we have it in the middle height, but there's about an inch of adjustability up or down. You also have adjustability to be able to slide this out a little bit as well as side to side.
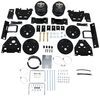
You can really get it dialed in exactly where you want it. I'm very happy with this. I'm still able to get my foot on there no problem. And I can use the whole board, but it doesn't look too bulbous by sticking out too far. So with that adjustability, you can make it exactly how you want. When it comes to the installation, super easy. This is a custom fit to this truck as well as any of the other fits from Gen-Y. So that means that it bolts up directly to factory spots where a factory running board would go. So the studs are already there, you just bolt up the brackets which fit really nice. And then continue on with bolting up your Gen-Y steps. Get it all aligned, snug it down, get it torqued down, and then just repeat on the other side. So really if you're doing this by yourself, you could probably have it knocked out and I would say give yourself maybe an hour. It's really not too bad to do. And for something that's a easy installation that you're gonna have grip and something that you'll use every time you get in and outta your vehicle, I think it's totally worth it. So if you're interested, follow along on the installation and I'll show you how to get 'em installed. To get our installation started, I recommend laying everything out on each side of the truck. So running board wise, you should see that some of these slant towards the back and that's kind of the way that we're gonna have it laid out, driver versus passenger side. So just make sure you have the right side ready to go. And we're gonna need three brackets that look like this on each side. Now these are not side specific, so just divvy those up. And then we're also gonna want to grab our side specific brackets. These will eventually bolt up to our brackets that go underneath the truck, but you'll see as I hold this up, it faces towards the back. We're gonna want this tab towards the rear of the vehicle and that's gonna be consistent along the entire driver's side. And then the passenger side is gonna be having this tab go towards the back as well. And then eventually we're gonna be bolting it all together using three brackets on each side. So have those ready. And let's begin. We will grab our bracket, head underneath the truck, and start bolting it up. Now head underneath your truck and you're gonna find that you have studs in three different locations and there should be three studs in each grouping. Our bracket is gonna be custom fit and you'll see pretty quickly why as we slide this over the studs, it is gonna fit perfectly against the truck. And you'll see, I mean right here we got a little bit of slot side to side. And that's something that's important because as we tighten this down, we don't wanna snug it up all the way. That's little adjustment is gonna make it to where we can really get this, you know, running board nice and in place with our brackets later on. So you'll see that we do have an opening up top that we're not using. That's because this is universal so you can use it on the other side. So we'll get these over the studs, we'll put washers over each of those studs. And then as far as hardware, you're gonna have two different nuts with your running board. So we'll have the lock nuts which have the three little notches in there. Those are gonna be used a little bit later. What we're gonna use is just the regular nuts, and we're just gonna hand tighten these on. You should be able to get them pretty easily. It's possible that your studs have a little buildup on 'em, but if you need to zip 'em down, a 13 millimeter socket is gonna be good and we're gonna just tighten it down enough. I'm gonna do this by hand to where it's snug, where it's not gonna be moving out like this, but we still wanna be able to maintain that side to side. So just tighten it down enough to where it's pretty well in place. But again, enough to slide laterally. At this point we'll just repeat for the other two brackets further up the truck. Now we'll grab our side specific brackets and you're gonna see that there's obviously a bunch of holes here and there's only three on our bracket, and that's to adjust the height that you want your running board. So if you know someone, maybe you have kids or someone with mobility issues, you may want to have this a little bit lower to make it easier for them to go into the vehicle. Or if you want it a little bit more tidy against the truck, you can go as high as you want. I'm gonna go for the middle ground here. So just put the one middle stud or hole here into the middle and then the other two should line up. So we wanna make sure that we're keeping it consistent across the brackets. And also for consistency's sake, I'm going to be putting it on the backside of the brackets towards the rear of the vehicle. So I'll get my one bolt in first. And then this is where we're gonna be using those lock nuts. So we'll just finish that up on the other side. I'm just gonna loosely get them in place and do the same thing for the rest of our brackets. We're gonna wait to tighten this down and especially too, 'cause as we put the running board up, you may start to notice, okay, maybe I do want it a little bit higher, a little bit lower, and then you can adjust it without this all being tightened down. So with those loosely in place, now we can grab our running board and kind of lay it on our brackets. And this is a great time to take a look at the height and if you're not happy with that, you can adjust it and then you know, test it again and see the difference between those heights. But another thing is we wanna make sure forward to back is gonna be at a spot that we like. So I try to picture people hopping in and also just take a step back and see what makes sense. A lot of times what I'll try to do is also follow a body line. So for instance, the end of this door, if I put our running board here, that makes it a lot easier when you get to the other side to have a reference. That way it's gonna be mirrored. And once you determine that you're happy with your set up, you're gonna have a little bit of adjustability here. But your brackets, you'll see there's a high side and a low side. This is gonna sit into the grooves and you want it aligned with the slotted hole that's on our bracket. So we'll get this one right here and once I'm happy with that, I'll take my bolt, I'm gonna drop this down through and then I'm gonna take my lock nut and we'll put that underneath here. So same thing, I'm just gonna hand tighten it so it holds in place and that way we can adjust how far out we want these. So at this point we'll just go to each spot and repeat this process. So that's why we left everything loose. There is some play here and there. Just make sure that it makes sense that you know this is lining up with that bracket accordingly. And once you're happy with the fitment, at this point we're gonna start snugging everything down. So I'm gonna start by doing the nuts that we had on our brackets. So that'll be that 13 millimeter socket. Just make sure that the brackets are, you know, nice and squared up or perpendicular I guess you'd say with the truck. So with that, you know you have that sliding, just get it to a nice happy spot and then you can snug them all down across the board. (power tool whirs) Now we're gonna be tightening up the three bolt and nut combo on each of our brackets and you'll find that you know it's not exactly square, with the weight of the running board, it's gonna wanna slant back. So what I'm gonna try to do is get this as level as possible. So if you need to, you could put something underneath here to support it. And it should get these brackets to where they're flush on the back side. It should line up nice and clean. And once you're happy with that, you'll just start tightening these down and make sure that it's nice and level across the board. Now to get these snug down, you're gonna need a box end or open end wrench, a half inch and as well as a half inch socket. And we'll get these all snug, just making sure that we still have it nice and level. (wrench rattles) And if you just snug it down and you have a little bit of adjustability still, it might be worth doing that and that way it's gonna kind of hold it in place, but you'll still have a little bit adjustability as you go through the rest of the brackets. Now we'll just repeat for the other sides. Now once you have them all in a good spot, you should be able to take a look at the running board and make sure that it's even across the board. And you know, once you're really happy with that, then you can really torque those down exactly where you need. But having it snug gives you a little bit more adjustability. Now the last piece that we're gonna need to adjust is how far out do we want it And that really comes down to do you want it sticking out for that extra grip or do you want it a little bit cleaner looking So not a ton of adjustment, about an inch or so, but it's enough to where you can really change the look and functionality of it. Once you're happy with where you have it in place, you're going to be tightening this down again with a half inch. Now you will probably need a socket up top to be able to gain access to the one in the bracket and just make sure that that bracket is sitting nice and flush in that groove where we placed it. (power tool whirs) So now I got everything snug down and again, this is a great time to really get some fine tuned adjustments. So I still have a little bit of wiggle room just from where I tighten it down. So we look at the side, kinda get the profile of it and really just make sure it's nice and level. And this is the most tedious part of any running boards, is really getting it dialed in to where it's perfect. But once you found that perfect happy medium where it looks great, everything looks level, all your brackets are seated, then you can torque down all of your hardware. And all that's left to do is repeat all the same steps on the other side of the truck. And that was a look at installation of the Gen-Y running boards on a 2017 Ford F-150.

nice steps but might help some people if steps had installation instructions
easy to install wish all were like this product
Installed in about 1 hrs with taking my time. Yes the instructions can be difficult to understand, since the instructions say curb side and roadside instead of driver and passenger side. The front is to the right on the page for the ram 3500 looking at the passenger side on the page. Pay attention to the frame bracket direction as you place it inside the frame. The front bracket has the nut to the front, the middle has the nut to the front and the aft bracket nut is to the rear of the truck. Used a level on the middle of each bracket to get everything aligned. Be careful when you tighten the bolts that hold the running boards down, slipped and got my hand one good time. Solid step, wife now enjoys getting and out the truck now.
Install was easy, gen y running boards are amazing. They look good and functioning just as good. I love that all the dirt falls right through them and can be used as a boot scrape. Love all gen y products
I like the step itself, the board is great, very sure footing. The brackets that hold the board are the worst!!! Total crap and because of this, they are driving me nuts. Imagine driving down the road and someone constantly poking you in the ear. It sounds exactly like a springy door stoper when you bend it over and let it go. Dong! every time you hit a bump so in the county...often.
This is so bad, Gen Y needs to retrofit this and send existing customers new brackets or shims. Before anyone asks if they are installed correctly, like the other commenter, I had to call etrailer for a PDF on Gen Y's site, I get it, who needs the paper, but at least put a QR code to your docs.
This should have been an easy perfect 5 stars and I'm being generous because I'm pissed every time I hit a bump. The short answer is the bracket surface is flat and the truck body is not, they are tight as shit, and still rock on the surface. Fix it and I'll happily give 5 stars!
Info for this part was:
At etrailer.com we provide the best information available about the products we sell. We take the quality of our information seriously so that you can get the right part the first time. Let us know if anything is missing or if you have any questions.


Thank you! Your comment has been submitted successfully. You should be able to view your question/comment here within a few days.
Error submitting comment. Please try again momentarily.