
To see if this custom-fit item will work for you please tell us what vehicle you'll use it with.


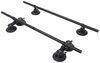
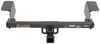
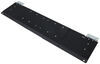
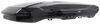
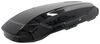
These straight-style step bars give your Dodge Durango a rugged look. 5-1/2" Wide step pads have stamped-grid tread design for excellent traction. All-aluminum construction with black powder coat finish. Custom installation kit included.
Features:
Specs:

California residents: click here
Videos are provided as a guide only. Refer to manufacturer installation instructions and specs for complete information.
I'm Matt with etrailer. Today we're gonna be talking about the Aries AdvantEdge running boards on our 2024 Dodge Durango. Now this would be a great option for a couple reasons. If you're looking for something that's just gonna give you more of a clean aesthetic to your vehicle, or if you just need a little more help getting inside, it's gonna help you out a lot. But another reason why I like running boards are because they're gonna not only gain you access to your vehicle, but also to the top of your roof too. So if you have anything up here like a roof rack, because maybe you're running outta space in your vehicle, you can load up gear up here.
And having a running board is you're gonna make that process of reaching gear a lot simpler to do. What's also important to go along with that is that your running boards have good tread. Now a lot of the Aries have different styles of tread, and I think all of them work really well. So let's kinda dive a little bit more into what really makes this one stand out. With this tread, it's gonna be spread across the entire running board almost.
So the only spots that don't have it is gonna be at the very ends, right here, spots that you're typically not gonna be stepping on. And what I like about this style is, with other styles out there, they might have spots we have tread at where you're actually gonna be stepping inside your vehicle, but I think this gives it more of a cohesive look to it, and just gives you more spots to really step on. And when you look at this, you can tell this looks like a pretty rough surface. When I feel it though, it feels relatively smooth, which kinda off-put me at first, 'cause I didn't think we'd get a whole lot of traction out of that. But when I actually do put my foot on it, it does grab a decent amount.
I'm trying to pull my foot on there, and it's grabbing more than some other types of running boards I've used in the past. And on top of that, we have this kinda neat pattern. I think this pattern just kinda gives it more of that rugged look, like I was saying earlier, and I'm just personally a fan of it. And we can get a few measurements too, just see what it's gonna be like to live with. So when you're trying to step on here, it's important to know how much of your foot you can get there.
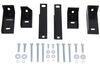
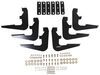
So if I measure just the board itself, this is gonna be around six inches. And I try to push this out to the furthest point it could, because you do have some adjustment to a small degree. But if I go to the furthest point where your foot might hit this, that's gonna raise it up to a little bit closer to 6 1/2 inches. And that should show you what it's gonna look like when you are using it. My foot's right here with the door closed. I can get the whole ball of my foot here. So that's gonna be great for me in most uses. If I open up the door, still is about the same amount, but this allows me to get closer to my vehicle. And on top of that, we can kind of see how much this is saving you, because, like I said, one of the big things about these is gonna be just making it a little bit easier to step into your vehicle. Right now, you can see how high I'm stepping. This isn't too bad for me, but if you're someone maybe with some bad knees, that might be a little bit too much for you. So talk about the height. Right now that's gonna be just around 22 inches of a step. With these boards, this is gonna be sitting up almost 12 inches, so about a foot. So the that's gonna be about saving you half that step, so you can see how it's gonna help you out in the long run. And this is gonna be made out of a very sturdy aluminum with a black powder coat finish to it. So with all that in mind, it's gonna be a little bit more lightweight, easier to work with when you're installing it, and it's gonna be less likely of rusting over time, especially with it being outside in all the elements, and with any type of road salts too. In my opinion, I think this is a great option for anyone who is looking for more of a cleaner finish. I do like a lot of the Aries running boards, so there's another one that I like too, it's gonna have little sections where you're gonna have more tread at, and that's gonna be perfect for if you're looking more for a softer finish, it's gonna have rubber sections there. I think that's great if you have kids and you don't want them to get kind of banged up by this if they kinda trip, and maybe scuff a knee on something, since it is gonna have rounder edges. But if you want something on the other side, that's even more aggressive, if you're going offroading, overlanding a lot, and you want it to really look the part, then I'd actually recommend the RidgeSteps, 'cause instead of having this type of surface here, it's just gonna be extruded metal that has that kind of rough texture to it, and I think it'll just fit that aesthetic a little bit more. But anywhere you go, you can't go wrong with them. Now for the installation, they're all can install the same way. And if you're curious to see that, just stay tuned, we'll walk you through the process. To start off the installation, I like to lay everything out. So right in front of it we are gonna have all the hardware that's necessary for this. I'd just like to lay this out, just to make sure we have everything, nothing's missing or damaged. And then we're gonna have our brackets too. You're gonna have two sets of these. This is only one set we have right here, but they're all gonna have specific points that will go in your vehicle. Right here, we're gonna have our rear one, next to that, we're gonna have our center one, and in front of that we're gonna have the front one. The way you can tell which one's which, there is gonna be a indicator on them. It's gonna be a little letter, just like that. It's gonna be labeled F, C, and R, for which location to go. Then we're gonna come over here to our vehicle now, and we're just gonna start prepping. And what we need to do is remove some adhesive tabs underneath our vehicle, because they're gonna be covering up some holes we're gonna be using. Now there will be a few under here. You will have some spots marked in your instructions. It's kind of vague, it's roughly gonna be placed like this. Now yours might be a bit different. The best way I find to really figure out how I'm gonna do this, is I'm gonna go to the front-most hole. I'm gonna remove that tab, And then there's gonna be a series of them underneath. And I'm just gonna go with every other tab. So there should be a tab here remove, leave one, remove one, leave one, and then remove one. Now I'm gonna show you how to take off one of these tabs. They might be a little bit different for you, but with this series, this is gonna be a very thin tab, and I find it's best just to get a flathead screwdriver and stab into the center of it just like that, which is in the center. Then I'm just gonna apply force to the side. This should kinda pop out, just like that. And then you'll repeat that process on the other two. And now we're gonna grab this little bolt. It's gonna be welded onto a plate. And what you're gonna do is when you remove those little plastic tabs, or those adhesive tabs, you're gonna place it right there. With that in place, I'm gonna take a little plastic retaining clip and slide it on. Gonna be a little bit tricky to do. We're gonna block the camera just for a second. There we go. And it's gonna hold in place just like this. This is gonna prevent this from pushing through when you put your brackets on. When this is done, then you're gonna repeat this process on the other two holes. When you're putting your brackets on, they're all gonna go in the same way. So you're gonna line up that bolt with that hole on top of your bracket just right there. Right now, I'm working on the center one. With the other ones, like your rear and front, you're gonna have a tab that wraps around the back right here. Starting off with a flat washer, a split washer, and then I'm gonna put on my bolt or my nut. Once you have it on there, you'll just kinda keep threading it. Eventually you're gonna reach a point where you're gonna get a little bit of resistance. That's gonna be a good time to stop. Now if you feel like it's just kind of sliding around and it's not gonna tighten up at least a little bit, what you can do is just pull down as you're tightening that nut so that plate doesn't spin around on you. And now I can move over to the other brackets. And for this next part, this is gonna be kinda hard to see underneath our vehicle, so I'm gonna show you the hardware now. We're gonna have our M6 hardware. So that's gonna consist of this bolt. You're gonna have two flat washers on here. One is gonna go on first, and then the next one will go on with your split washer, and then your nut. And I can show you that a little bit more in depth now. Now we're gonna start using that hardware. So I'm going over to my brackets again, and you're gonna find that on your vehicle you have this little hole here. That hole is gonna line up with a hole on the side of this bracket. I've already lined mine up, but if yours isn't lined up, you can just simply push it back and forth until it is. That's why you wanna leave this a little bit loose when you're starting off with. As you can see, I only have one washer on my bolt at the time being, and I'm gonna push this through the other side. Just like that. The reason I do it this way is 'cause it's gonna be a little bit easier to put my nut into place from the side. Now I'm gonna put on my washer and lock nut. We're gonna move back over to our bracket now, and you're gonna find that you have this hole on your vehicle. It's gonna be underneath. This hole should be lined up with a hole on your bracket. If it's not, you can just simply push this over to the side, either which way, until it is. That's why we didn't tighten this down all the way. Now I'm gonna show you our M6 hardware again. I only have that one washer on it right now, because one is gonna go on one side of the bracket. And try to push that through. With that through, I'm gonna put that other washer and that split washer on. Then on just like that, I'm gonna grab our nut and thread that on. Again, we're only gonna do this hand-tight. There's gonna be two of these that go on each one of your brackets. And once you're done with that, you repeat that process for the other two brackets. Now I'm gonna grab our running board and the hardware that comes on with it. That hardware is gonna be M8 hardware, so that's gonna be a bolt, a split washer, a flat washer, and you are gonna have a nut that tops it off. The way we're gonna install this is we have that running board upside down. You're gonna find that there's two channels that go all the way down. In those channels, there's gonna be these wider sections where the head of that bolt will slide into, and you just push it into place. You're just gonna do that with all of them. I recommend removing your washers, because those will go on at the very end, and you're just gonna install six bolts. What we're trying to do here is just kinda roughly line them up where the brackets are sitting at the moment. We'll be able to adjust this a little bit more after when we lift this into place, which I'll do here in a few seconds, right about now. I'm just gonna lift up, just place it right here. Of course those bolts aren't gonna be lined up. I'll just kinda fix it up now so they fit into these opening on these brackets. With these bolts lined up in that channel, we're gonna grab that hardware, those will be your flat washer and split washer, put those on, hold them into place, grab your nut, and thread that on hand-tight. If I get this started at least. Once this is on there, you'll be able to just get it hand-tight. And we're just gonna repeat that on all the other spots. So any spot where you have that bolt poking through in the bottom, you wanna do that though. Will be a total of six of these. And from here, we're just gonna make sure this is where you want it to be placed. So we're just gonna center it up just by sliding this back and forth. Just like that. In my opinion, I try a little bit more forward, 'cause I don't want this edge on the backside making contact with the vehicle itself. That's just my personal preference. You can put it wherever you want it to be. Afterwards, then you can tighten everything up. I recommend starting with your brackets. It's gonna be pretty tight in there. And then coming over to the actual running board itself. Now when you're gonna tighten up that running board, you're just gonna need a 13 millimeter socket and wrench too. And the last step really is just to make sure you torque everything down to the specifications in the instructions, and then repeat this on the other side. After which I just like to give this a good old test, make sure it's gonna feel pretty sturdy when I step on it. Right now, I like the way that feels. And that'll complete our look at the installation, and some of the features, of the Aries running boards on our 2024 Dodge Durango. I'm Matt. Thanks for watching.


Product arrived quickly and was pretty easy to install. Did it by myself in about an hour or so.
They look great and after a year still holding up fine.
Great Customer service
Love these great look, sturdy and easy to install.
Super easy to install and they look awe some.
Appears to be a quality set of bars, haven't installed them yet so I'll write more later. Fast service\shipping.
The running boards are amazing and look aggressive on the truck. I get compliments from the dealer when I take it in for routine maintenance. Etrailer makes installation easy with videos and written instructions.
Excellent fits perfect
The easiest install I have had and they look great. Excellent quality.
After one year, i'm just as happy with these nerf bars. The black power coat still looks great.
Good price, etrailer rep "DavidL" was excellent to work with. Fast delivery. Parts fit excellent and very happy with this purchase. I tried to purchase the same running boards from Amazon - having to cancel after over 2 months of poor communication and not receiving my parts.
Great product! Quality 2nd to none. Easy install!! Highly recommend!!
Very easy to install. No drilling required only took me about 30 minutes. They do look sharp. My only issue is they cannot extend back far enough for me to stand on to reach inside the bed. Most likely since it is a dually.
Easy to install. Rails do what they are supposed to do and look good also.
A very sturdy and good-looking product. Pretty easy to install too.
The bars are of good quality. The installation was quite straightforward. The most challenging part was not scratching the skin on my hands while installing the clip nuts. Three brackets supplied with the boards should be enough (I used the 2 forward frame holes and the rear one, so the board span for the rear doors is longer than the one for the front).
The bars/brackets fit Chevy Colorado 2024 even though the site says that the fit is not confirmed. I verified the fitment on the Aries website prior to ordering.
Great service...competitive price.
My wife is happy to be able enter and exit the truck with ease.
Light weight yet sstrong.
I would recommend this product
The fit and finish is excellent. The bars can be adjusted front to back and in and out which allows you to place them exactly where they work best for you.
As for the installation instructions, well, they need work. The diagram shown may or may not conform to your truck. Just keep in mind that each mounting bracket will be bolted to your truck at two points. Aries customer service guy told me one bolt. Diagram makes it like like three. It’s two, at least for my Ram 2500.
Total install time was about 90 minutes.
Do you have a question about this Nerf Bars - Running Board?
Info for this part was:
At etrailer.com we provide the best information available about the products we sell. We take the quality of our information seriously so that you can get the right part the first time. Let us know if anything is missing or if you have any questions.


Thank you! Your comment has been submitted successfully. You should be able to view your question/comment here within a few days.
Error submitting comment. Please try again momentarily.