
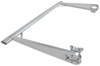
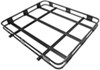
Got gear that doesn't know when to quit? This bundle handles long ladders, kayaks, or lumber with a cantilever extension that clears your cab and supports the front. It carries the load without stressing your tailgate, or your patience.
That 16-foot kayak or extension ladder doesn't stop at the cab, so your rack shouldn't either. The cantilever extension supports the front end of long loads, so they don't bounce, sag, or shift weight where your windshield wipers live. You'll spend less time worrying about straps and more time just driving.
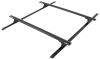
This isn't just for a couple pool noodles and a paddleboard. The full aluminum rack and extension hold up to 800 lbs when the load is spread out - enough for ladders, stacked kayaks, or even job-site materials. It hauls like a contractor but fits your weekend too.
You don't need to reinvent your rack setup. The T-slot bars work with common kayak carriers, ladder stops, and work accessories, so you can tweak it to fit what you haul. Bolt on what you need, remove what you don't, and skip the zip ties for good.
 Alternate Instructions
California residents: click here
Videos are provided as a guide only. Refer to manufacturer installation instructions and specs for complete information.
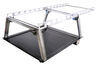
How's it going, Ford owners This is Ed here with etrailer.com, and today we're gonna take a look at the Malone trade sport with cantilever arm for our 2024 Ford F-150 with short bed. Now having the shorter bed, that kind of limits you as far as carrying longer lumber, longer canoes, and longer ladders. Having something like this that goes above your cab is gonna free up a lot of the negative space that you couldn't take advantage of, before. So let's take a closer look at the trade sport and see what it does for our pickup. Malone does a really good job of using nice, quality materials. The majority of your construction is gonna be aircraft grade aluminum, so it's gonna hold up against corrosion, and you're gonna have some good stainless steel hardware that's gonna hold up against seizing up.
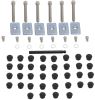
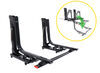
The cantilever arm bar here is basically an add-on to the Malone trade sport, giving you a lot more utility and a lot more range. This guy just bolts into the exterior T channel slot and on the bottom, you're gonna have two of these clamps on each one of your pillars. And what that's gonna do is grip underneath your bed rail and give you a nice, sturdy foundation. Out the box is gonna come with just about everything you need, other than a tape measure and a Phillips head screwdriver. If you have a better Allen key that gives you a better grip, wouldn't be a bad idea to grab that.
However, once you get this guy installed, please send some photos, leave comments and questions 'cause we love having that interaction with you. So now, I'm gonna show you how to get this guy installed. I went ahead and installed the rear crossbar, just so I can get an idea of how everything comes together. And basically, you're doing the same thing and you're just repeating it a few times over. You wanna make sure that you're paying attention to the orientation of your uprights.
You always want these guys angled towards the center. So this is gonna be our upright for our driver's side front, and we're gonna be able to get our T channel brackets installed right here. You're gonna have the hardware included. You're gonna get a Allen key bolt, as well as a T channel nut. And you're just gonna get it loosely threaded where it can just bite in a little bit, 'cause we're gonna still need this to slide down the track.
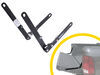
And we're gonna also install our load stopper bracket along the top track at the same time. You will have a cross member that goes down the side and top that fits into the channel right here. And I'm gonna show you how to get all those things done as well. So following our pattern with the T nut brackets, we're just gonna drop this guy into our upright, making sure that we're pointing towards where the center of the crossbar would be, and just spins around a little bit, just want to get it aligned and it'll just drop right in. And I'm just gonna go ahead and lower this guy down. And now we're ready to attach it to our crossbar. So now that I have my upright assembled, I'm going to remove the end cap. You're gonna need a Phillips head screwdriver and you have a single screw at the bottom here. And now that we have our end cap removed, it exposes our T channel tracks. So I'm just gonna go ahead and throw my load stopper along the channel at the top. I'm gonna fasten it a little bit so it's not sliding everywhere. And now I'm gonna take my upright, and first I'm gonna lead with my cross member support into the lower channel. I'm gonna bring that down and now align my top connections. All right, and now that I have everything installed on the track, I'm gonna go ahead and reinstall my cap. So now we're gonna install our cantilever arms. We're gonna drop three of these T channel nuts right into our X outside channel. Just kind of drop 'em right in. And those are going to align with the three holes that we have on our cantilever arm. So I'm gonna kind of shove this guy down, get it loosely threaded where it can just bite in a little bit. Now that I have all six of my bolts in, the way I positioned it to keep it even, I just kind of went level with the opening here for our T channel nuts. So from here, we're gonna put four more T channel nuts on the other end of the arm and put our front crossbar on. So now we're gonna take our front crossbar. This is what's gonna go over the cab. And just like on the other points, we're just gonna feed it along our T channel track. All right, we're just gonna get this guy going, all the way across. So I enlisted the help of Curt and Evan to help me get this up and into the bed. However, you can completely install this on your own if you we inchesre to just build it out in the bed. This is gonna allow you to get this guy put up and positioned exactly where you need it. I will suggest that you wait before you fasten out your crossbar, just so you can make sure it's positioned and even on the roof. So now that we have our cantilever arm put up, just gonna go ahead and clamp it. Clamp this bracket on to the top of our bed rail and that'll keep it secure and it'll go on both sides. Now one thing that you want to keep in mind is. if you're okay with it resting on top of your vehicle for a short period of time, it'll only be there for a moment. Otherwise, having that second set of hands again to help hold it up until you get your clamps secured will be the move. So now I'm gonna install my load stopper here on my top C channel, and I can reinstall my end cap, making sure that I keep my screw in there, 'cause this was keeping everything from sliding all about. Now that we have our end cap reinstalled, everything is good to go. And you can see with this cantilever arm, it's giving you a lot more ability, especially on your short box forward. So again, this is Ed with etrailer.com, taking a look at the Malone trade sport with cantilever attachment or a 2024 Ford F-150. Have a great one.

Our truck rack was somehow lost, or stolen, while in the hands of the shipping company (no fault of eTrailer). eTrailer quickly took the initiative to expedite shipment of a second rack, which we received in a few days. Getting the rack quickly saved our already planned canoe trip. Thank you eTrailer.
Info for this part was:
At etrailer.com we provide the best information available about the products we sell. We take the quality of our information seriously so that you can get the right part the first time. Let us know if anything is missing or if you have any questions.


Thank you! Your comment has been submitted successfully. You should be able to view your question/comment here within a few days.
Error submitting comment. Please try again momentarily.