
To see if this custom-fit item will work for you please tell us what vehicle you'll use it with.
Thank you! Your comment has been submitted successfully. You should be able to view your question/comment here within a few days.
Error submitting comment. Please try again momentarily.
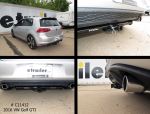
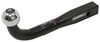
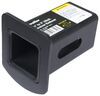
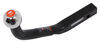
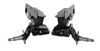
This fully welded, corrosion-resistant vehicle trailer hitch receiver is perfect for your light-duty towing needs. Draw-Tite's Tested Tough guarantee ensures that this hitch exceeds industry standards. Drawbar sold separately.
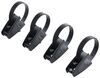
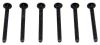
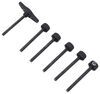
Features:
Specs:
Draw-Tite's Tested Tough program provides testing standards far superior to those outlined by the Society of Automotive Engineers (SAE), the go-to source for engineering professionals.
Each Draw-Tite trailer hitch receiver undergoes extensive fatigue testing and static testing with the ball mount that is either supplied or recommended for use with that particular hitch, thus ensuring results that are applicable to real life use. Fatigue testing is also conducted on hitches rated for use with weight-distribution systems.
In addition, Draw-Tite performs static testing on a simulated automobile, as opposed to the rigid fixture used for SAE testing, resulting in a more true-to-life scenario.
At etrailer.com we're committed to the products we sell, and to our customers. Our experienced and knowledgeable staff are available via both phone and email to address your questions and concerns for the lifetime of your hitch. The technicians at etrailer perform hitch installations on a daily basis, making them a valuable resource for do-it-yourselfers. The one-on-one, personal service you'll receive comes straight from an expert in the towing and automotive field. We've installed it, we've wired it and we've towed with it, so whatever your question, we can answer it.

California residents: click here

Hitch was quick and easy to install, and is barely noticeable on the car.
Third hitch I've purchased from etrailer in the last 2 years. Very satisfied every time! Great customer service and quality products.
My product was delivered as expected and several days quicker than I expected. Upon ordering, I immediately received a confirmation with a notifications of accelerated shipping dates. Very nice customer service and experience.
The product is perfect fit for my new Volkswagen GTI 2011 white, installation was very easy it took an hour maybe less to install , and you hardly see the hitch in the car because it just fits perfectly. I recommend to anyone that has Volkswagen GTI like me. You won't be dissappointed.
Product fit perfectly in place. Took a little bit of effort to figure out the fishing of the bolts correctly through the frame holes on my 2012 GTI. Could use some better directions on this point. Once on, the hitch is invisible except for the female connection, as i had expected. I would recommend this site and product to others.
Product was super easy to install. Installed the hitch in my drive way in 35 minutes with basic hand tools. I have not had any exhaust rattle or other issues. Best part when the tow arm is put you can not tell that I have a hitch on the car. Big thumb up to this prduct.
Installed this product according to the instructions. It took me 1.5 hours to install but was relatively simple to do once a layman like me got the hang of the fish wires (great concept)..The only correction to the instructions is, it says reuse the frame bolt on the driver's side when it was in fact, the passenger side of the car, (unless the instructions were written for a car in Britain..LOL). Quick shipping and great customer service. Thanks.
This hitch was overall pretty easy to install. I did the install with my car backed up on a set of ramps and this gave plenty of room to work and drop the muffler to install the hitch.
The toughest part of the install was fishing one of the bolts through on the driver side. The access hole didn't seem quite wide enough, so I pried on it a bit of a big alignment pin and it went right in. (You couldn't even really tell I had pried on it. that's how close it was to going in.)
Other than the issue with the access hole being too small, the install was really simple and I did not have to remove the rear bumper or plastic and was able to install it myself with no help. An extra set of hands wouldn't hurt to hold everything in place though.
One word of caution though is be sure you order a Class I rack to use with this hitch. I ordered a class 2 Yakima rack by mistake and it would not fit. It would not slide in far enough due to a backing plate in the hitch.
Installed perfectly. Ordered similar product from Amazon, shipped to me used & without mounting hardware twice. etrailer.com got it right on the first attempt with free upgraded shipping. Excellent service, I'm very happy with the purchase.

John S.

2/10/2015
1 year after installation and Ive had no issues with my hitch. It hauls a bike rack every day since installation. Ive had no problems

As there is no class 3 hitch receiver for a MK6 VW GTI at any price I've got to say that my Draw-Tite Sportframe has worked out fine. I needed a 2" receiver for my bike rack, and the rack for my 9' inflatable pontoon boat, but have found that a 2" adapter with a 4" rise is a great solution. Still well below the reduced tongue weight limit for my bike rack and heaviest ebike, or (just barely) for the boat rack and assembled boat, and the rise keeps everything at a nice height on a sporty hatchback.
I bought this hitch solely to mount a bike rack to on my mk6 GTI. I chose it over the Curt mainly because of the better ground clearance and better looks.
4-star review for the overall experience, the final product gets 5-star but the install is a solid 2.5-3.
I consider myself the average DIY-er (brake jobs, occasional bushings, etc) and this was a little tedious to install.
1st issue encountered was the carriage bolt heads were too big to get through the access holes in the frame, so be prepared to grind a few mm off the head with a bench grinder. Other than that the fishwire bolt install was straightforward (having to reuse a fishwire is a little painful since they are designed to pull off the bolt and only be used once).
Getting the hitch up under the exhaust is a two person effort, one to hold the exhaust down and help guide the mounting bosses in the gap.
2nd issue encountered was when tightening the hitch into position it had to bend about 3mm of sheet metal for the passenger side bumper mount out of the way, not detrimental but still a little thing that is noticeable when installing.
The final issue was that the slots for the exhaust hanger bolts were off a few mm which required some dremel tool work (under the car) to give the bolts clearance to go install straight. (Reference pic for the two concerns I had)
Once installed this hitch is very solid, very clean, and definitely worth it. Just be prepared for some aftermarket product finagling to get it perfect.
Installed easy on a 2012 GTI to use with a bicycle rack. Would recommend taking the 4 screws out and to pop the bumper off. Instructions don't have that step but you will find it very convenient to do so. Very clean and classy looking when installed. You only see the receiver below the bumper. Would recommend etrailer and this product for anyone looking to install a hitch on a GTI.
Installed on a 2011 VW GTI. Took about an hour to get the hitch fitted up. The only semi-difficult step was getting everything lined up while threading on the first couple of nuts. Like others have said, spending the extra 2 minutes to pop off the lower valence (remove four T-25 torx screws and then pull it straight back) helps a lot with opening up some room to see what you're doing. Hitch looks great installed, it's nearly hidden under the bumper and supports my bike rack with no issues. This is a great addition to the GTI, it makes an already practical car even more so. etrailer shipping and updates were awesome, the hitch arrived at my doorstep in Socal two days after I ordered it.
Installed on a 2013 GTI 4 Door. Installation was not too bad. Definitely need a breaker bar for loosening the existing bolt on the sub frame and a torque wrench to tighten everything down. I did it as a one man job and it was tricky getting the hitch into place, took some patience. Overall it did not take me too long and the result was great.
Note, #4 on the instructions should read "Passenger Side" as said in other reviews. I would also recommend removing the plastic from around the bottom of the bumper as it makes moving the hitch into position easier.
Using it with a Swagman XTC-2 and it is also awesome.
First I would like to say that the buying experience from etrailer is second to none. Every aspect of the process was first class; from the ease of ordering, the email notifications updating shipping progress, to the packaging; first class!
The Hitch:
Love the hitch, and is as advertised. The hitch is invisible once installed except for the 1 1/4' receiver, which is barely noticeable due to the black valence. There is also zero reduction in ground clearance.
Installation:
I installed the hitch without assistance, so can be a one man job, although assistance in lining it up would be helpful.
There is one error in the instructions; Step #4 states "on the driver's side" when it is actually on the passenger's side. Very obvious but might confuse someone.
There is one omission; It was necessary to bend the lip of the inner fender support out of the way on the passenger side so that the hitch could slide into place.
This is my 3rd or 4th hitch I bought from eTrailer. Their service is top notch and I refer anyone interested in a hitch to them all the time.
I went with the Draw-Tite over the Curt for my GTI because it sits much higher up against the underside of the car and looks very clean once installed.
Install on this hitch is fairly straight forward, no drilling or any weird modifications needed other than cutting your heat shield a tiny bit in the corner. Fishing the rear most driver's side bolt and plate into the frame is the hardest part of this install. It took a little bit of finagaling to get it into position. If my finger was like 1/4" longer it would've taken 2 minutes. After a bit I figured out I need to put the bolt through the plate inside the frame just above the bigger hole and then pull it into the little hole with the wire (you'll see what I mean when you get there). Took about 40 minutes all said and done.
Excellent hitch receiver and no rattles, which were a concern based on some of the other reviews. No loss of ground clearance is also a plus over the other brand that is available for sale. As others have said, removal of the rear valence trim piece and the use of a breaker bar for the passenger side existing sub-frame bolt both help with installation. I also borrowed a set of ramps from a buddy, which also helped. The directions are otherwise pretty clear (save for the slight mix-up in step 4 of driver vs. passenger side). All told, it took me about an hour and a half, not 40 minutes, but still not an unreasonable amount of time. A torque wrench to tighten everything back up according to the manufacturer's recommendation is also a good idea.
This Draw-Tite hitch is a pile of garbage. Just get a Curt instead. I chose this one over a Curt because of the better clearance, but am regretting my choice.
The powder coat is flaking off, the welds have spatter (i.e. sloppy welds), had to cut part of the bumper’s bracket to get it to fit (other reviewers ran into this as well), and the freaking hitch was welded to its frame crooked. I attached a photo—it’s difficult to see, but there’s a slight gap between the hitch and plate on the left side vs. the right. As a result, the bike rack is slightly crooked. I doubt it impacts anything, but annoying nonetheless.
Given the quality, I’d have reservations pulling anything more than a bile rack. The hitch opening is also VERY tight—it took me forever to get my Thule bike rack in. I was wondering if something was wrong with the bike rack, but no, I was able to install it on my wife’s car (which uses a different brand hitch) without any problems. Given what a pain this was, I’m not going to bother trying swapping it for a new one.
Great fit on the 2012 VW MK6 GTI. Just the square for the hitch is exposed. Very discreet and holds my Thule bike rack perfectly. I would like to see one more fish wire for the bolts included in the kit. Mine came with two. A small amount of trimming was needed to the heat shield. I’d say it’s a 2 out of 5 difficulty to install. Mostly takes a little patience to fish the bolts through. And you’ll need a drill with a bur bit to widen two holes for install. Otherwise basic hand tools and sockets work.
Absolutely love this hitch. My GTI sits a little lower so I needed as much ground clearance as possible. This will definitely do the job for me. Fairly easy to install. I was dreading dropping the exhaust but that was easy. Using the fish wire for placing the bolts into the frame rail was a new challenge but again, easy once I figured out to do it. I am excited to have a receiver to haul my bicycle and very pleased with the draw-tite version! Removing the rear valance was easy and helped a lot.
This hitch was easy to install and fits nicely above the muffler. Most of the hitch is hidden behind the bumper and only the receiver itself is actually visible. I did not take the time to remove lower part of bumper which some other reviewers suggested would be helpful. I assessed and decided it was not necessary - I was able to pretty easily fit it into place without removing any part of bumper. I did not cut nor remove the heatshield - I simply used an awl to poke a hole through the shield to expose the frame mounting hole and enlarged hole in shield to 1/2" with small electrical wire cutters. The hitch bracket was then just bolted over the shield.
awesome rack! awesome shop! if you're looking for a fairly easy to install rack, that hides all but the receiver this is the one for you. I purchased for a Thule Helium bike rack
Haven’t tried towing anything just yet, but the installation was pretty straight forward. Got it on my car in about 30 mins.
This was definitely worth the effort of lowering the muffler to install. It was pretty simple to do and you can hardly notice the hitch when not in use.
The hitch and etrailer get 5 stars. Fast shipping, price match policy and excellent customer service and support!
- Two people will make the install go a lot easier.
- It took a couple of hours to complete the installation, not 30 minutes.
- Have extensions to use with your socket wrench. Also a breaker bar will help when you get to step 4 in the instructions as this bolt is very tight.
- My car is a 2014 VW GTI Wolfsburg Edition 4-door. My comments below may or may not apply to all years of this generation.
It is not mentioned in the instructions but you'll have a lot more room and visibility if you remove the black valence below the rear bumper. Make this step #0. Here's how to remove the valence:
#0A. Remove the 4 torx screws that secure the valence underneath the bumper.
#0B. As you're facing the rear bumper, start from one corner and pull the valance straight back towards you. There are several horizontal plastic clips molded into the valence that secure it to the bumper. This step will remove the valance.
In step 1 of the instructions, it is not necessary to disconnect the driver's side (US) exhaust hanger, just leave it in place. You do need to remove the passenger's side exhaust hanger.
In step 2 of the instructions, instead of cutting or folding the heat shield, I poked a hole large enough for the carriage bolt to go through. I have zero rattles or noise from the heat shield, plus it looks OEM! :-) You do want to remove the bolt (13mm?) that's holding the heat shield up on the driver's side so you can see the frame hole and have room to operate. Just screw it back in at the end of the install.
Step 4 in the instruction's has an error. The M12 hex bolt they are referring to is on the passenger's side (US), not driver's. The diagram is correct.
I had a difficult time with reinstalling the passenger's side exhaust hanger bracket because the hole's weren't lined up. I'd recommend loosely installing one bolt on each side of the hitch first just to hold it up. Get the exhaust hanger lined up and tightened, then proceed with tightening the other bolts.
That's about it. Otherwise follow the instructions that came with the hitch. Just take your time and have plenty of lighting so you can see underneath. Back the GTI up on ramps or a lift. Be safe, don't work under the car with just a jack, have proper jack stands!

Altaf
3/30/2016
Hi Rachael. Everything has been flawless, no complaints here!
Do you have a question about this Trailer Hitch?
Info for this part was:
At etrailer we provide the best information available about the products we sell. We take the quality of our information seriously so that you can get the right part the first time. Let us know if anything is missing or if you have any questions.


Matthew F.
5/31/2016
Still functioning great and not showing any sings of wear. I use it to haul a kuat bike rack for 1-2 bikes and it works perfectly. I love how discrete it is.