
To see if this custom-fit item will work for you please tell us what vehicle you'll use it with.
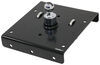
Remove the ball on this gooseneck hitch and store it in a secure location to get full use of your truck bed when you're not towing. Installs to existing, factory attachment points on your vehicle - no rail kit required.
Features:
Specs:
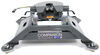
The Hide-A-Goose gooseneck trailer hitch works to meet your heavy-duty towing needs while still allowing you to get full use out of your truck bed. It installs to existing, factory attachment points beneath your vehicle to create a low-profile look.
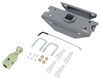
To remove the ball from this hitch, just lift and turn the lever that is built into the top of the ball. This will disengage the ball bearings in the shank so that you can easily lift the ball out of the hole.
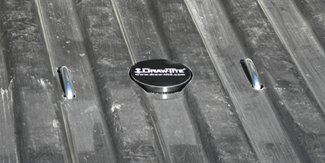
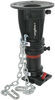
Once you've removed the ball, use the rubber cover to conceal the ball hole. This cover prevents dirt and debris from getting into the ball hole. This will prevent buildup that could cause the ball to seize up in the hitch.

California residents: click here
Videos are provided as a guide only. Refer to manufacturer installation instructions and specs for complete information.
Hey everybody, how's it going Today, we're gonna be going over, and showing you how to install the Draw Tite Hide-A-Goose gooseneck trailer hitch here on a 2022 Ram 3500. So adding a gooseneck hitch to your Ram 3500 is gonna be an excellent option, because it's really gonna allow you to maximize its capability, and haul those heavy trailers. Now, in regards to compatibility, this gooseneck hit here is gonna work on both models, with the Rambox, which is what you see here, and the models without the Rambox. It's also gonna work on models with the short, or the long bed. So speaking a bit more on that fit, this particular gooseneck hitch is gonna be designed for models without the factory prep package. If you do have the factory prep package, you're just gonna purchase a drop in ball kit, which we do offer here at etrailer.
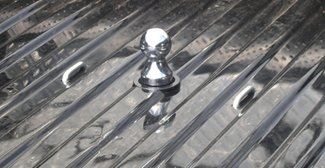
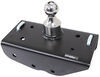
So this is what our gooseneck hitch is gonna look like when it's installed here. Now, most everything that's going on is gonna be underneath the bed. The only thing above the bed, that we're gonna be able to see, is obviously our hitch ball, while we're using it. And then we have our safety chain loops on either side here. Everything else is hidden underneath the bed there for a nice factory-like finish.
So this is obviously when we have our hitch ball installed. But when we're ready to remove the hitch ball, it's very easy. So on the top here, we have this little lever. So you can lift this lever, and spin it in either direction to lock it in place. And this is gonna allow us just to remove the hitch ball from the bed by pulling straight out.
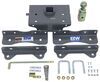
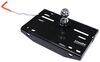
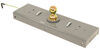
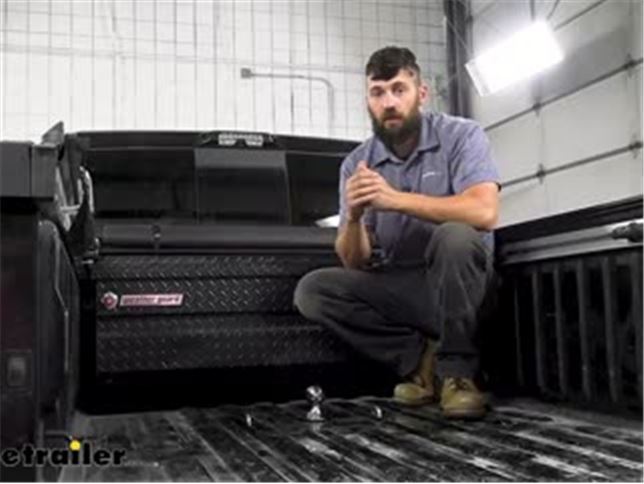
And now, with our hitch ball out, this is what it's going to look like the majority of the time here. And as we can see, we're still maintaining our bed here. The only thing that's gonna be sticking up above the bed is gonna be these U-bolts here, which rests on top of the corrugations there. But our actual gooseneck kit opening is below the bed here. So, you can still throw a couple sheets of plywood in your truck bed.
Pretty much use it as you would normally. So when you're ready to hit the road and start towing, it's very easy to reinstall your hitch ball. We're just gonna do that same thing in reverse. So lift up on that center section there, and rotate it in either place to lock it. Just drop your hitch ball in, rotate the lever back into the locked position. You can pull up here, and you can see, now it's locked into place. Now, one thing I do wanna mention with you guys, when you're not towing, take the hitch ball out. Unless you have a Tonneau cover on your truck here, you really don't want rain, dirt, water, getting in this connection here, because it's gonna seize up the hitch ball, and it's gonna get stuck. I don't care what gooseneck hitch you purchase, or how quality it is, we see this time and time again with people leaving the hitch ball in the truck bed even when they're not towing. And it does keep it in a location there, you know, where it's gonna be. But unfortunately, there's just too many issues with these things getting stuck. And that's not necessarily a design flaw of the gooseneck hitch, just kind of is what it is. Now, in regards to towing, our gooseneck hitch is gonna allow us for 20,000 pounds of gross trailer weight. That's gonna be the amount we can pull on our fully loaded trailer. And it has a 5,000 pound tongue weight rating, which is a downward force. Now our hitch ball size is gonna be the industry standard, two and 5/16 inches. So the vast majority of gooseneck trailers are gonna utilize that, so you don't really have to worry about that. And then our safety chain loops here, these are actually spring loaded. So, you can pull them up to attach your clevis hooks. and when we're not using them, we're just gonna draw back down to the bed so they're not taking up space. Now with your kit, you're also gonna get a rubber plug you can use to cover that gooseneck opening when you're not towing, just to protect the inside components of the hitch. Now this isn't the only gooseneck hitch option available for this truck here. There are a few others such as the B&W. I personally like B&W, I think they're great brand, and it's a great option for this truck. One notable difference though, after looking over the B&W is the B&W uses an external handle. So you actually have to get out of the truck, inside the wheel well, and pull that release handle to remove the hitch ball. Whereas with the Draw Tite here, it's actually built into the ball mechanism. So, in my mind, it's gonna be a little bit easier to use when you have the built in mechanism into the hitch ball. And you also don't have to get out of the truck each time. Overall, I like it. It's gonna be a little bit easier to install because we don't have to worry about that handle as well. So in regards to installation, this one is actually pretty simple to install as far as gooseneck hitches go. All the bracing is already gonna be present under there. Pretty much the gooseneck hitch just drops into place there into that center section, and then you bolt it up. Everything is fairly simple. You don't need to pay someone to do this. I would say most weekend warriors have the skills to do this in their driveway at home in a few hours, depending on your experience level. In regards to the tools you're gonna need, you're gonna need a hole saw to cut a hole in the truck bed here. And you're also gonna need a torque wrench to torque down those fasteners. You can rent the torque wrench for free from most local auto parts stores. And hole saws are a fairly common tool, you should be able to obtain locally. So the first step of our installation today, we need to go ahead and remove the spare tire, just temporarily. So go ahead and reference your owner's manual, and the tools inside the vehicle needed to lower that down and out of place. Next we'll be removing the spare tire heat shield located over here on the passenger side. This is gonna be held in place with three bolts on the inside here. And there's a couple more at the top on the back side of that cross member. So we'll use a 10 millimeter socket, go ahead and get those out. Next we need to lower our exhaust, here. So our three rear most hangers we need to remove. So in order to do that, we're gonna be using some spray lubricant here. Spraying them down. And then we'll take some sort of pry tool to remove them from the rubber isolators. So the next thing we're gonna do is, we're gonna find the location in our truck bed where we're gonna be drilling the opening for our gooseneck hole. So what we're gonna be doing is, there's actually two method your instructions. One of them entails measuring. The other one is using a template that they provide in your instructions. So how the template works is, that's the method we're gonna be using is, we're gonna take the center section of our gooseneck hitch here, and there's gonna be a gooseneck sleeve that sticks up from there. In your kit here, you're gonna get, in the instructions, a template that you can actually cut out. So this is a scaled template. You're gonna cut that out. And then you're just gonna tape that to the top the gooseneck hitch opening, with that template facing down, just like you see we've done here. And now that we have our template taped on, we're gonna go ahead and lift this center section up underneath the vehicle, secure under their temporarily. That way we can find the center point there of our gooseneck hitch opening, and then we'll come up top here and drill it out the rest of the way. So we're just about ready to lift our center section into position. Before we do that, I wanna go ahead and get our hardware ready. We're gonna be getting four of our 3/4 inch bolts with these split lock washers on. Now I'm gonna jump under the vehicle, so we can show you how those install. So here is the cross section assembly of our gooseneck hitch and we're gonna have these large holes on the outside, two on each side. So there's actually gonna be weld nuts on our center section. Once we lift it in the place, we're gonna be securing it to the metal plates on the outside using this hardware. So we're gonna go ahead and grab an extra set of hands to help us lift that up in there, and then we'll secure it using that method we just showed you. So we had a little bit of trouble sneaking the center section into position there. We did sort of have to angle it a certain way, and you'll actually, I had to use a rubber mallet to sort of coax it the rest of the way in there 'cause it was very tight between those plates. And I did have to have someone pull down the exhaust. So, a little bit tricky to get it in there, but once you do get it in there, it's pretty easy to secure your bolts. We've just got two in there holding it in place now. We're gonna go ahead and install our other two. And again, we're not tightening these down right now. We're just gonna be installing them hand tight. So now that we have our center section into position here, we're gonna take a small pilot drill bit. We're gonna be looking for that center alignment mark that we taped onto the top of the gooseneck sleeve, and we're gonna be drilling through that into our bed. And that's gonna be the center of our gooseneck opening. Then we'll go up top there, we use a hole saw bit, and drill it the rest of the way out. So we've got our pilot hole coming through the truck bed. Now we're gonna come back with our hole saw bit, and enlarge it to the final size listed in your instructions. So, we got our hole drilled in the bed here. Overall, I think it turned out pretty well. Now once you do get the material removed, you're gonna wanna come back with a metal file and clean up all those rough edges. And then you can come back with either a can of spray paint, a paint marker, a primer stick, whatever you have. And basically, we just wanna coat all that bare metal there just so you don't have to worry about any rusting. And we went a step further, we actually used this little rubber protective ring we have down here. This is gonna do two different things. Number one, it's gonna protect that metal. And number two, it's gonna protect your hands when you're reaching in and outta there. Now keep in mind, this isn't required, it doesn't come with your kit. It's just a nice little added touch we had that we used. You guys could probably use something similar with any sort of rubber hose to clean that up, if you wanted to. So we've got the hole in our truck bed all squared away. Now we're gonna come underneath the truck here, because we have a couple more bits of hardware to install. For this next step, we're gonna be grabbing a nut plate, another 3/4 inch bolt with a lock washer. So, we've installed the horizontal bolts. So the four here, here, here, and here. Next we need to install the vertical bolts, which go here, and here. Now you can see, we already have this one installed. It's pretty easy to do. So, we're gonna take our nut plate here, and we're gonna insert it from the front of the cross member. So, towards the front of the truck, in this bed corrugation there. Then we're gonna slide it all the way back, until our threaded hole lines up with this one here. And then the other hole in the nut plate, that cutout hole is gonna line up there. So we're gonna head over here to the front of the truck, and I may need to bend this wire a little bit in order to get the channel plate up into the bed channels. And then we'll line everything up, and begin installing our hardware. So once we get that one side on, we're again, just doing the same thing on the other side. Now I will admit, it is a little bit more challenging over on the driver's side, because we have our brake line brackets and our gas tank in the way, but it's still possible. So next thing we're gonna do is, we're gonna be drilling out our safety chain holes here. So we're gonna have two of these on each side. The one on the passenger side are gonna be a lot harder cause we have the exhaust there, but we're gonna take a 5/8 inch drill bit. We're gonna go ahead and drill these out on either side. So we mentioned the passenger side being more difficult then the driver's side. And the reason for that is, the exhaust is in our way. But if you do like us, we took our ratchet strap here, I just hooked it to the shock tower mount on this side, then pulled it away from those two holes so we can get our drill bit in there. You don't wanna do it too much there. And you do have to break the hangers free, which we showed you earlier in the video. But, I think this is gonna help us a lot to be able to drill out them holes. So you guys are welcome to do this as well. So now we're back here in our truck bed. And what we're gonna do is, we're just gonna clean up some of the rough edges around those holes that we drilled through. So I'm gonna be using a burr bit for this. If you guys have a file, a piece of sandpaper, that'll work good as well. So now once we get all those metal shavings cleaned up, we're gonna come back with a paint marker and just coat that bare metal there. So now that we have our holes cleaned up here, we're gonna come back with our U-bolts and I'm gonna install those into the holes that we just drilled from the top. So if your U-bolts don't just drop right in, you can take a rubber mallet-and just try to coax in the rest of the way into place here. Now I am going to take the U-bolt back out, and then hammer it back in a couple times just to loosen everything up. So a little bit easier to manipulate. So now for each leg of our U-bolts, we need to take a conical toothed washer, place it over the U-bolt. Then we need to place one of our springs over the leg of the U-bolt. And then finally, we're gonna place on one of our nuts. So go ahead and thread that on now. Now we don't need to tighten these all the way down. Obviously we wanna tighten up hand tight, and then we're gonna use a ratchet to tighten up a few more turns. Basically, we just want a couple threads showing from outside the nut there. So we'll tighten that nut until we can see a couple threads on the bottom there. And then we're just gonna repeat the same process for each of our other legs. So now that we've got all of our U-bolts out of the way, we can begin tightening and torquing all of our 3/4 inch bolts that hold the center section to the bracing here. So, we'll go ahead and tighten, and then torque these down to the amount specified in your instructions using a one and 1/8 wrench. Now, some of these can be pretty hard to get to, so you are gonna have to be creative in getting your tool up there. So now that we have everything torqued down, the only thing left to do is to raise our exhaust back up into position, reinstall our heat shield, and then raise our spare tire back up. But after that, that's gonna do it today for our look in installation of the Draw Tite gooseneck trailer hitch receiver here on a 2022 Ram 3500..

good product fits great easy instal
Do you have a question about this Gooseneck Hitch?
Info for this part was:
At etrailer we provide the best information available about the products we sell. We take the quality of our information seriously so that you can get the right part the first time. Let us know if anything is missing or if you have any questions.


Thank you! Your comment has been submitted successfully. You should be able to view your question/comment here within a few days.
Error submitting comment. Please try again momentarily.