


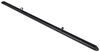
Raised cargo rail lets you create anchor points on your trailer, in your shop, or other flat surfaces. Horizontal or vertical mounting options give you more versatility compared to E-track rails. Easy installation with bolts or rivets (not included).
Features:
Specs:

California residents: click here
Videos are provided as a guide only. Refer to manufacturer installation instructions and specs for complete information.
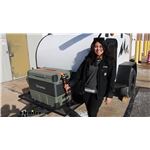
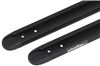
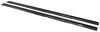
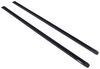
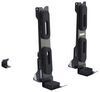
Hey everyone, it's Evangeline here at etrailer. And today we're taking a look at the Front Runner Cargo Rail. This is gonna be a short track that has the Front Runner eye nut on it, and that way you can put it pretty much anywhere and anchor down pretty much anything. With this being the short cargo rail, it's gonna be great for your cargo organization systems 'cause you can put this in different spots. Now for the track that's going to be 5 1/2 inches long, so that's how much space you have to move this eye nut back and forth. You can also get the longer cargo rail and that's gonna be the Front Runner 45 plus inch cargo rail, usually designed for your trailers and truck beds when you need more cargo organization.
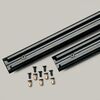
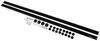
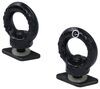
Included with this is gonna be your four different parts. So you have your heavy duty eye nut, this is made of steel with that black powder coat finish. That way you have that really strong anchor point for your hooks. And then holding that eye nut in place, you have your flat washer as well as your block. So this is something you'll see on a lot of Front Runner accessories that makes it very easy to slide around.
But also with a simple twist, you now have a firm foundation on your track. The rail though is made of aluminum. So fortunately that's why you have that flat washer in place just to create that space between the different components. But you also have that powder coat there. For our setup here today, we do have two of these cargo rails just to create that double anchor point.
But this does arrive as a set of one, so plan accordingly and get as many as you need. Now let's take a look at how to get this all together. When you install this, hardware is not included, because you can mount this in different ways, whether it's to your wall, to your truck bed, in your trailer, all kinds of configurations. So a good baseline to know is that ideally you'll want M6 hardware or M6 bolts to get this tightened down. But from that point on, it's gonna be up to you.
Now I'm gonna install this here to the front of our trailer. That way you can see how I'm installing it from above and from below. So the hardware I'm using here today is a short M6 bolt and then I'm gonna have a flat washer, a lock washer, and then a M6 nut. Ideally, you'll also want a bolt that has a button head top. Whatever bolt you do end up using, you just wanna make sure that it doesn't sit above this rail. So in the case of our cap screw, I'm able to drop it down, but still since it sits below the rail, I'm able to move our anchor nut around. So that's gonna be the most important thing you have to think about. Once I've figured out where I need it to be, I'm then going to secure it with my flat washer and lock washer. And then the nut to hold it in place. So if you're securing this to a wall or to your truck bed, you may need to put rivets down to create that nut or to drill some holes. Whatever you need to do to get that bolt on top secured. With your anchor point fully installed, you can now add your little eye anchors. So notice how I have this loosened so that I can fit the bolt through. So we have our flat washer on top. We're just gonna pick whichever spot we need it to be at and then tighten this down. Now the downside to not having those end caps is while it's loose, you can very easily slide this right back off, but that could be a bonus for you as well for making this quick and easy to use. Here's why I recommend using a button head bolt. So look at the underside of this end cap, Without the hardware, this just pops into place and creates that nice end. Now if you had a cap screw like what we have, we are unable to pop that end cap back into place 'cause it just butts up against that hardware. So you can leave this off if you want, but if you want to use that end cap, try to find a button head bolt where the end cap can fit up and over. These now create great bases to attach your hooks of whatever strap you'll be using to tighten down your cargo. While Front Runner does recommend their Stratchits as an awesome strap option. You can definitely take a look at that. You can just also use this with any ratchet strap that fits into that eye anchor. This is just a very easy look at our anchor points. The main thing here is just figuring out where you're going to attach them and how you're going to attach them. There's a lot of versatility to them just because they are so simple. If you wanna attach them to a wall, if you want them in your vehicle, if you want them on your trailer, it's just a matter of two holes and two bolts per anchor. So hopefully this video just helps show how simple it is and that way you can make it work best for yourself. Another thing is make sure you have enough straps, and those are all available here on our website, whether it's the Front Runner Stratchits or your ratcheting straps that you saw right here. This right here was a look at the Front Runner Short Cargo Rail at etrailer.com.
Info for this part was:
At etrailer we provide the best information available about the products we sell. We take the quality of our information seriously so that you can get the right part the first time. Let us know if anything is missing or if you have any questions.


Thank you! Your comment has been submitted successfully. You should be able to view your question/comment here within a few days.
Error submitting comment. Please try again momentarily.