
# 1
Swagman Upright Bike Rack for 1 Bike - Roof Rack Crossbars - Frame Mount
Great product for the price. Pretty easy to set up. Only issue I have is my mountain bike, which is an XL frame with 27 inch wheels, is pushing the limits of the base. Wish this rack was just 4-5 inches longer that way you have the perfect overlap amount in the middle without pushing the current frame to the limits. With that said it does hold my bike just have to find the sweet spot. But this fits my son’s youth bike perfectly!
As always with products I buy from e-Trailer, this item is exactly as advertised and works perfectly. Easy assembly, I bought 2 but only installed one until I check the fit with my rooftop carrier.
RockyMounts Roof Bike Racks Review - 2017 Toyota Camry

Today on our 2017 Toyota Camry we're doing a test fit of the Rocky Mounts Switch Hitter roof-mounted bike rack. That part number is RKY1270. Now we already have our bike secured down. We're first going to show you how we secure it in place. We're going to start here at the back. You'll see we have a cam buckle strap that's going to wrap around our bike.
Thule Roof Bike Racks Review - 2017 Toyota Camry

Today on our 2017 Toyota Camry we're doing a test of the Thule ThruRide Roof-Mounted Bike Rack. That part number is TH535. Now we already have our bike secured down. We're first going to show you how we do that. Starting off here at the back we have our back wheel cradle. This is adjustable along the entire length of our bike rack sliding up and down.
Inno Roof Bike Racks Review - 2017 Toyota Camry

Today on our 2017 Toyota Camry we're doing a test fit of the Inno Multi-Fork Lock roof-mounted bike rack. That part number is INA392. Now we already have our bike secured down. We're first going to show you how we do that, starting off in the back here. Now we have a fully adjustable wheel cradle. This is going to slide along our bike rack to accommodate different lengths of bikes.
Fit Check: Rhino-Rack Road Warrior Rooftop Bike Carrier on a 2016 Toyota Camry

Today on our 2016 Toyota Camry we're going to be test fitting the Rhino Rack Road Warrior Rooftop Bike Rack, part number RBC036. We already have a bike installed on the rack, let's take a closer look and show off some of the features. How the bike is attached to the rack, we're going to have two points of contact with no frame contact at all. We'll have a rear wheel strap which is adjustable along the bike rack to accommodate different sized bikes, and then up at the front we have this skewer mount which will grip your bike by the fork mounts. You will notice that the skewer mount does have a lock on it already, so once you put this into place and lock it, the bike will be secured to the bike rack. With everything installed as it is, we're not going to have any issues of clearance between the trunk and the bike rack as you can see here. Let's go ahead and take the bike off and set it down. We'll push this tab at the rear wheel strap to release it, then holding onto the bike so it doesn't fall onto the vehicle, we'll release our front skewer like so, and lift our bike up and off. How the bike attaches to the rack, we're going to have this bracket here with the turn knobs to kind of sandwich the bike rack and the bracket over our rear crossbar.
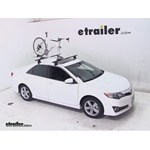
Fit Test: Rhino-Rack MountainTrail Rooftop Bike Carrier with 2016 Toyota Camry

Today on our 2016 Toyota Camry, we're going to be test fitting the Rhino Rack Mountain Trail roof top, bike rack, part number RBC035. We already have a bike installed on the rack, let's go take a closer look and show off some of the features. How the bike is attached to the rack, we're going to have two points of contact, with no frame contact at all. Instead, we're going to have this wheel strap at the rear, which is adjustable along the length of the bike rack, to accommodate different size bikes. Then, at the front we have the skewer mount, which will grip your bike by its forks. On the front of the skewer mount, you'll see that it does have a lock already attacked, so once you secure that, your bike is going to be secure to your bike rack. With the bike sitting as it is, there's not going to be any issues of clearance between the trunk and the bike rack, as you can see here. Let's go ahead and take the bike off, and set it aside. We'll start with the rear wheel strap, pushing in on the tab, and lifting up.
Thule Roof Bike Racks Review - 2016 Toyota Camry

Today on our 2016 Toyota Camry, we're going to be test fitting the Thule Circuit XT Roof Bike Rack, part number TH526XT. We already have a bike installed on the rack. Let's go ahead and take a closer look, and show off some of the features. How the bike attaches to the rack, we're going to have two points of contact with no frame contact at all. We'll have this wheel strap at the rear, and this is adjustable along the length of the bike rack to ensure that you can use bikes of different sizes. Then up at the front we have the skewer mount that will grip your front bike by the fork mount. You'll also notice at the end here of the skewer, there is a knock out where you can place a Thule lock core, which is sold separately, so that you can secure your bike to the bike rack.
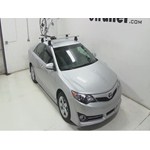
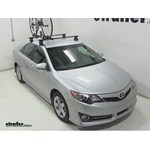
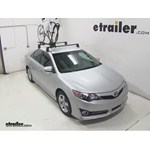
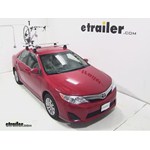
Is the Swagman Upright Bike Rack for 1 Bike Compatible with the 2014 Toyota Camry?
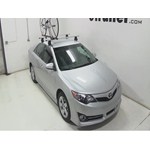
Today on our 2014 Toyota Camry we'll be test fitting the Swagman Upright Roof Mounted Bike Rack, part number: S64720. With a Thule Rapid Traverse Roof Rack system installed on the roof of our Camry, we'll begin our test fit by placing the bike rack up on to the vehicle's load bars. Starting at the front I'll take the silver U bolts to go around the underside of the front bar up through the pre drilled holes at the head of the bike rack. I'll then thread on our black wing nuts, keeping them loose encase I need to make any adjustments. I'll then move to the back of the bike rack and take the silver U bolts to go down through the pre drilled holes of the bike rack, taking the black plate and I'll insert the bolt into the hole of the black plate and then thread on our wing nut. I'll swing it around the underside of the bar and repeat the same process for the other hole on the other side of the plate. I'll then tighten down those wing nuts.
Test Fit: Swagman Fork Down Roof Mounted Bike Carrier on a 2014 Toyota Camry
Today on our 2014 Toyota Camry, we'll be test fitting the Swagman Fork Down Roof Mounted Bike Rack, part number S64710. With a Thule Rapid Traverse Roof Rack system installed on the roof of our Camry, we'll begin our test fit by placing the bike rack up onto the vehicle's load bars. We'll start at the front and take the silver U-bolts around the underside of our front bar, up through the pre-drilled holes at the head of the bike rack. We'll take our black wing nuts to thread down onto the threads of the silver U-bolt and tighten them down. I'll move to the back of the bike rack and adjust the sliding tray, and then take the silver U-bolt to go down through the holes of the bike rack. I'll take the black plate and insert the bolt through the hole of the black plate, and tighten it down with the black wing nut. Once everything is all tightened down and secure, I'm ready to install our bike. We'll simply just make sure the skewer is loose at the front, and we'll undo the cam buckle strap at the rear. We'll place our bike up onto the bike rack, slide in the forks down onto the skewer.
RockyMounts TieRod Stretch Roof Bike Rack Review - 2014 Toyota Camry

Today on our 2014 Toyota Camry we'll be test fitting the RockyMounts TieRod Stretch Roof Mounted Bike Rack, part number RKY1011. With the Thule Rapid Traverse Roof Rack system installed on the roof of our Camry, we'll begin our test fit by placing the bike rack up onto the vehicle's crossbars. We'll allow the rubber coated steel straps to go around the front bar, and then we can remove the black plastic cover to hook the straps into position. I'll then use the included allen tool to tighten down the silver bolt, which will bring the straps tightly around the front bar. Moving to the rear, I'll use one of the allen keys to remove one of the allen bolts so that we can position the rear bracket around the rear bar. I'll reinstall the allen bolt into the black thick bracket on the bottom and use the included allen wrench to tighten both allen bolts down. Once everything is all tightened down and secure, we're ready to load up our bike.
Thule Sprint Fork Mount Bike Rack Review - 2014 Toyota Camry

Today on our 2014 Toyota Camry, well be test fitting the Thule Sprint Roof Mounted Bike Rack, part number TH528. With the Thule rapid traverse roof rack system installed on the roof of our Camry, well begin our test fit by placing the bike rack up onto the vehicles load bars. Starting at the front here, Ill make sure the rubber coated steel straps are on the underside of the bar and Ill hook them back into the connection point. Ill then turn the Speed-Link knobs which will tighten down the straps tightly around the load bars. After repeating the same process for the back bar, were ready to install our bike. Well need to loosen up the acu-tight knob at the front of the bike rack which will extend the skewer outward. Well then undo the cam-buckle strap at the back of the bike rack and place our bike up onto the bike rack.
Thule Big Mouth Roof Bike Rack Review - 2014 Toyota Camry
Today on our 2014 Toyota Camry we'll be test fitting the Tully Big Mouth Roof Mounted Bike Rack part number TH599XTR. With the Tully Traverse Roof Rack System installed onto our Camry we'll begin our test fit by placing the bike rack up onto the vehicles load bars. Starting at the front here we'll need to position the L-brackets that are on the front bar. You may need to loosen up the black wingnuts so that the T-bolts can fit into the slots of the L-brackets. We'll then tighten them down snug just to make sure the L-brackets stay in place. We'll move to the back of the bike rack and remove one of the wingnuts from one of the bolts. We'll position the two bolts on both the front and back side of the rear bar and then we'll swing the plate around the underside of the crossbar.
Installation: Kuat Trio Roof Bike Rack on a 2014 Toyota Camry

Today on our 2014 Toyota Camry, we'll be test fitting the Kuat TRIO Roof Mounted Bike Rack, part number RU01. With the Thule Rapid Traverse Roof Rack System installed on the roof of our Camry, we'll begin our test fit by placing the bike rack directly onto our vehicle's load bars. I'm going to start with the back and remove one of the black wing nuts from the black bracket. I'll position the black bracket around the underside of the rear bar and insert the bolt into the hole of the bracket and reinstall the wing nut. I'm going to keep it loose just in case I need to make any adjustments. Now at the front, I'll take the rubber coated U-bolts to go around the underside of the front bar up into the pre-drilled holes of the bike rack. I'll take the cylinder nuts and thread them down onto the threads of the U-bolts. I'll use the included tightening tool to tighten down the cylinder bolts around the U-bolts.
DIY Install: Yakima FrontLoader Wheel Mount Bike Carrier on your 2014 Toyota Camry
Today on our 2014 Toyota Camry. We're going to be test fitting the Yakima Frontloader. A wheel mount roof bike rack, part number Y02103. With our Yakima Q Tower Roof Rack system already installed in the Camry. We'll begin our test fit by placing our bike rack directly onto our load bars. As we do this, we want the two outer portions of our front clamp to go in front of our bar, and the single center portion of our front clamp to go behind it. We'll then turn the black T handle located on the front of the rack, this will secure our clamp around our bar.
Beginner’s Guide to Installing the Yakima ForkLift Roof Mounted Bike Carrier on a 2014 Toyota Camry

Today on our 2014 Toyota Camry, we're going to be test fitting the Yakima Forklift, a fork mount roof bike rack, part number Y02098. With the Yakima Q Towers roof rack system already installed on the Camry, we'll begin our test fit by placing our bike rack directly onto our load bars. Here at the front, we're going to remove the skewer which is reverse thread. Slide back the black plastic cover. Loosen the black T handle and remove the T bolt from the slide in the lower portion of the clamp. We'll then bring that portion around the underside of our load bar, reinsert our T bolt and tighten down our black T handle to secure our clamp. We'll then slide our black plastic cover forward and reinsert our skewer.
Setting up the Swagman Fork Down Roof Mounted Bike Carrier on a 2012 Toyota Camry

Today on our 2012 Toyota Camry, we'll be test fitting the Swagman Fork Down roof-mounted bike rack, part number S64710. We'll begin our test fit by placing the bike rack onto the vehicle's load bars. We'll then take out our hardware and use the silver brackets to go on the underside of the front load bar, up into the pre-drilled holes of the front part of the bike rack. We'll then use the black wing nuts to thread onto the silver brackets to secure the front of the carrier to the front load bar. We'll then move to the rear, where this time we will slide the silver bracket down through the bike rack, and use the black plate to go on the underside of the rear load bar, and use the included wing nuts to tighten it down. We'll then move back up to the front and continue tightening them down.
RockyMounts TieRod Stretch Roof Bike Rack Review - 2013 Toyota Camry
Today on our 2012 Toyota Camry, we'll be test fitting the RockyMounts Tierod Stretch roof-mounted bike carrier, part number RKY1011. We'll begin our test fit by placing the carrier onto the vehicle's load bars. We'll pop off the black plastic cover at the front of the carrier, and bring the rubber-coated steel straps around the underside of the front load bar. We'll then move to the back of the bike rack, where we will loosen up the Allen bolts to bring the rear bracket around the underside of the rear load bar. We'll then use the included Allen key to tighten them down. We'll then move back up to the front of the bike rack, where we will tighten the silver bolt to bring the straps up around tightly against the front load bar.
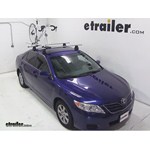
Whispbar Roof Mount Bike Rack Review - 2012 Toyota Camry
Today on our 2012 Toyota Camry, well be test fitting the Whisbar Roof Mounted Bike Rack, part number WB-200. Now our vehicle is equipped with the Yakima Round Bar Roof System, so well begin our test fit by placing the round bar adapter onto the crossbars. Well do this by first removing the black strip at the top of the adapter exposing the two silver Allen bolts. Well loosen up the Allen bolts to allow us to put the two clamps on the crossbar. Once the clamp is on we can then replace the bracket inserting the silver bolts through the holes in the brackets and tightening them down with the Allen key. Well then repeat these steps with the other adapter for the rear crossbar.
Fit Test: Yakima FrontLoader Wheel Mount Bike Carrier with 2012 Toyota Camry

Today on our 2012 Toyota Camry, were going to be test fitting the Yakima Frontloader Roof Mounted Bike Carrier, part number Y02103. To fit our bike carrier onto our roof rack, were going to lay it on top of our crossbars. Well fit the front head over our front bar and use the hand nut to tighten it down. Then in the rear, were going to fit the clamp around our crossbar and tighten it down with the wing nut. Once weve done that, were ready to load our bike. Well take the front wheel hoop and push it open.
Fit Verified: Yakima ForkLift Roof Mounted Bike Carrier on a 2012 Toyota Camry

Today on our 2012 Toyota Camry, were going to be test fitting the Yakima Fork Lift Roof Mounted Bike Carrier, part number Y02098. To mount our bike carrier up on the roof, first well remove the front skewer and open up the front clamp as well as the rear clamp. Well position the bike rack on top of our crossbars, close the clamps, and tighten them down with the wing nuts. Once weve done that, we can reinstall the skewer upfront and undo our wheel strap in the back. Well lift our bike up and set the rear wheel in the tray on the bike rack. Well then set our front fork into the skewer and secure it using the skewer.
Thule Domestique Roof Bike Rack Review - 2012 Toyota Camry

Today we have 2012 Toyota Camry and well be testing the Thule Domestique Fork Mount Bike Carrier part number TH513. Weve already got our bike carrier assembled according to the instructions and now were ready to fit it on top of our roof rack. Well place the rack up on top of the bars. Well fit the front clam around our front bar and the rear clamp around the rear and well tighten them down with the included Allen keys. Once weve done that, we can replace the skewer into the head of the bike rack and well be ready to load our bike. Well undo the rear wheel strap and fit the rear wheel of our bike into the tray.
RockyMounts TieRod Roof Bike Rack Review - 2012 Toyota Camry

Today, we have with us a 2012 Toyota Camry and we're going to be test-fitting the Rockymounts Tierod roof-mounted bike rack, part number rky1014. We've already got our bike carrier assembled and we're ready to mount it up on the roof. To secure the bike carrier to our roof rack, we're going to take the two rubber-coated straps in the front, free them around the front load bar, re-attach them to the head of the bike rack and tighten them down with the included Allen wrench. We'll reinstall the head cover up at the front. Then at the rear of the bike rack, we'll fit the clamp around our rear bar and we'll tighten it down using the wing knots on the bike rack.Then we're ready to load our bike. We'll fit the rear wheel of the bike into the tray and set the front fork down on our skewer.
RockyMounts TieRod Stretch Roof Bike Rack Review - 2011 Toyota Camry
Today, on our 2011 Toyota Camry, we'll be test-fitting the RockyMounts TieRod Stretch roof-mounted bike rack, part number RKY1011. With a Thule Rapid Traverse Roof Rack System assembled onto our vehicle, we'll begin out test-fit by placing our TieRod Stretch directly onto our Roof Rack. Here at the front, we'll need to remove the black plastic cover. We'll bring our straps around the front bar, fitting them back into the head of our bike rack, then we'll use an Allen key to tighten down the Allenbolt, which will tighten our straps around our bar. Once we have the front tight, we can re-install our black plastic cover. Here at the rear, we'll bring our rear bracket around our rear bar, we'll drop the Allen bolt through the bracket and tighten with an Allen key. With the front and rear of our bike rack secured, we can go ahead and undo our rear wheel strap and make sure our skewer at the front is loose.
DIY Install: Swagman Fork Down Roof Mounted Bike Carrier on your 2011 Toyota Camry

Today, on our 2011 Toyota Camry, we'll be test-fitting the Swagman Fork Down Roof Mounted Bike Carrier, part number S64710. With a Thule Rapid Traverse Roof Rack System assembled onto our vehicle, we'll begin our test-fit by placing the Fork Down directly onto our load bars. Here at the front mounting platform, we'll bring our U-bolt around the underside of our load bar, fed 00:20 itup through the platform, and secure it in place with the wing nuts. We can then repeat this process for the other side of the front platform. Here at the rear, we'll take our U-bolt and drop it through the top of the bike rack, down around our load bar, and then we'll run our bolts throughour black bracket, and secure it with the wing nuts. With the front and rear of our bike rack secured, we'll make sure our rear wheel strap is undone, and that our skewer at the front is loose.
Thule Echelon Roof Bike Rack Review - 2008 Toyota Camry

Today, on our 2008 Toyota Camry, we'll be test-fitting the Thule Eschelon roof-mounted bike carrier, part number TH518. Now, our Camry's already equipped with the Thule traverse roof rack system, so were ready to load our Eschelon. We'll begin by placing the bike rack on top of our crossbars in a location suitable for us. We'll make sure that the head of the bike rack is directly over the front cross bar where we can then take the rear mount of the Eschelon and make sure if it's over the rear crossbar. We'll then simply run the clamp underneath the crossbar and loosely fasten the wing nut to the bolt. We'll then move forward to the head of the bike rack.


What our customers are saying:
"Everyone that bought before me was right! I got my rack in time for my next days off and putting it together was fast too. And I'm a grandma!! Thank you for being fast and honest! You beat anyone in my town hands down!"