
Most Popular 500 lbs WD TW for 2012 Toyota Camry
change vehicle# 1
Curt Trailer Hitch Receiver - Custom Fit - Class III - 2"

- view all Trailer Hitch
- Custom Fit Hitch
- Class III
- 350 lbs TW
- 3500 lbs GTW
- 5000 lbs WD GTW
- 2 Inch Hitch
- 500 lbs WD TW
- Visible Cross Tube
- CURT
More Information >
by: Bryon 02/10/2024
This also worked
View More
View Less
by: Michael08/15/2023
Very easy install and works perfectly
View More
View Less
# 2
Curt Trailer Hitch Receiver - Custom Fit - Class III - 2"

- view all Trailer Hitch
- Custom Fit Hitch
- Class III
- 500 lbs TW
- 5000 lbs GTW
- 5500 lbs WD GTW
- 2 Inch Hitch
- 500 lbs WD TW
- Visible Cross Tube
- CURT
More Information >
by: Tyler- 2008 Toyota 4Runner04/28/20232008 Toyota 4Runner
Very happy with purchase of this trailer hitch. Installed onto my 2008 Toyota 4Runner 2wd SR5 4.0 with no difficulties at all by myself. I recommend a second person to help lift the other side and to speed up the installation time but it’s possible with one man. 8 bolts, half inch drive, 19mm and 13mm sockets are all that is needed. Estimated novice time is 50 minutes and that is exactly what it took me. No cutting of fascia necessary. However, I did have to unhook the rubber latch on the tail pipe to get the passenger side bolts in (super easy and no problem to do). Two day shipping as promised straight to the front door. Highly recommend etrailer and this hitch receiver.


View More
View Less
by: Tyler04/12/2019
Arrived in a very timely manner in good shape. Easy install with instructions. I chose not to drop the exhaust as you can get the bolts in easy enough with it on. For the factory seven way plug and bracket i just bent it back and it works great. I have ordered through etrailer before and will do it again in the future ! thanks guys Tyler


View More
View Less
# 3
Curt Trailer Hitch Receiver - Custom Fit - Class III - 2"

- view all Trailer Hitch
- Custom Fit Hitch
- Class III
- 350 lbs TW
- 3500 lbs GTW
- 5000 lbs WD GTW
- 2 Inch Hitch
- 500 lbs WD TW
- Visible Cross Tube
- CURT
More Information >
by: Chuck07/30/20182018 Toyota Sienna
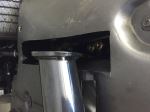
I installed this trailer hitch on my 2018 Toyota Sienna. It is very well-built, and fit perfectly. Customer service was very responsive when I had some questions, and responded right away, both by phone and email. The instructions were very good, but could benefit from additional information regarding cutting the car’s rear trim panel. In addition to the cut that needs to be made for the trailer hitch bolting plate to go through on the driver’s side , it also needs to be cut around the main bar / receiver area. Instead of cutting a big slot for the main bar, I cut out around the receiver plates, and put drain holes in the ends that would otherwise collect water. One shortcut that I found was that I was able to move the exhaust out of the way far enough by just removing the rearmost hanger, rather than removing the two hangers as shown in the video.


View More
View Less
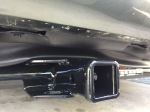
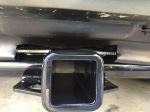
by: Mike L01/07/20122011 Toyota Sienna
2012 Sienna LE FWD. Watch the 2011 installation video before you start. This 13105 hitch tucks in even prettier than I expected, and now my brother is jealous. Note I made the cutout in the underbody panel narrower, starting 1.75 inches from the hole (see photo), for a closer fit, and there is still room for torque wrench. I also cut a slit out to the front edge, so I could slip it on with the hitch in place, and for better access to my air hoses inside the left fender. I decided to add Airlift after reading reviews, since on trips I carry a maximum load. Installed single-handed, raised on jack stands.


View More
View Less
# 4
Draw-Tite Max-Frame Trailer Hitch Receiver - Custom Fit - Class III - 2"

- view all Trailer Hitch
- Custom Fit Hitch
- Class III
- 400 lbs TW
- 4000 lbs GTW
- 5000 lbs WD GTW
- 2 Inch Hitch
- 500 lbs WD TW
- Concealed Cross Tube
- Draw-Tite
More Information >
by: Leland04/30/20182011 Dodge Grand Caravan
I have been looking for a hitch for awhile now and then I came across your web page. I have seen Draw-Tite hitches on quite a few vehicles. So I went on to do a little research and to read quite a few of the reviews on this hitch here. After reading the reviews and the price of the hitch at that time I decided that I had found the hitch for my 2011 Dodge Grand Caravan Crew. I placed the order and the next day received a message that my order had shipped. The box arrived very quickly after I placed my order which was a pleasant surprise. One side of the box was really tore up and the hitch had come free of the strapping inside the box. The only thing inside the box was the hitch with the tongue/receiver wrapped in plastic wrap and the two pieces of cardboard that had come free. I search the inside of the box for some instructions but did not find any at this point so I would know exactly which bolts to take out. The first thing I did was to jack up the back of my van so I had a little more room to work underneath where the hitch was to go. Then I took off the passenger side rear tire to give me better access to the bolts that had to come out for the hitch and for the exhaust system to be lowered. I then took out the five bolts for the hitch and had to take out the three bolts holding up the exhaust to give me room to install the hitch. Then came the hardest part of the whole process and that was getting the hitch up to a point where I could get a bolt started. I tried using the exhaust system to help me but was still having a problem. So I got a cinder block I had in the garage and put it under one end of the hitch which was a better platform and really helped me getting the other side started. From that point on it went really well getting the other side started and then all five bolts in and tightened down. I then stepped back to see what it looked like and at this time I saw something white deep in the hitch receiver/tongue. When I pulled it out I noticed it was the instruction I had looked for earlier. It would have been nice to have these when I first started. A suggestion would be to put a notice on the plastic wrap that is wrapped around the receiver/tongue of the hitch that states "Instruction Enclosed" or "Packing Slip Enclosed" or just tape them to the inside of the box, not hidden inside a wrapped receiver/tongue of the hitch. I then went back and torqued the five bolts to what it stated on the sheet I found. I then put the three bolts back in the exhaust system to get it back in place which basically completed the installation of my Draw-Tite Max-Frame Trailer Hitch.


View More
View Less
by: Shaun 03/18/2024
We have had the hitch for a year. Only use it for the bike rack as we do not want to tow with the mini van. Hauled 4 bikes to the beach easily and quietly. Assembled as directed and fit in place easily. Satisfied with the product.
View More
View Less
What our customers are saying:
"Hello, I just wanted to thank you for the great hitches you sell! I tried three different hitches on my truck that where not even close to you product. Hidden hitches should be hidden hitch. Take a look at some of the stuff out there, Real garbage. Your hitch is up and absolutely hidden, perfectly even. Absolutely satisfied with you product! And let me tell you it tacks a lot to satisfy me being a perfectionist. Thank you ever so much."