
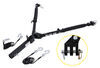
Blue Ox Base Plate Kit - Removable Arms


To see if this custom-fit item will work for you please tell us what vehicle you'll use it with.


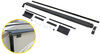
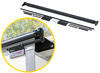
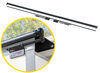
Custom designed to fit your vehicle so it can be safely towed behind your RV, this base plate has easily removable arms that offer a seamless look when you're not flat towing. Base plate bolts directly to your chassis, so no welding is required.
Features:
Specs:
This base plate's hidden design creates a clean and seamless look. The bracket arms are easily removable, creating a slick appearance when you're not flat towing. Because the arms can be removed, you also won't have to worry about banging your leg into any protruding arms when you walk by.
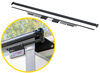
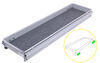
Attaching and removing the bracket arms is a breeze. To attach the arms to the base plate, simply insert them into the receivers and rotate them until they lock into place. Once you're finished towing and want to remove the arms, pull the pin to disengage the lock, rotate the arms, and remove them from the receivers. Finally, plug up the now empty receivers with the included receiver covers to help keep dirt and debris out of the base plate and provide a finished look.
Flat towing your vehicle is much more convenient than using a trailer or a tow dolly. These other options take up much more storage space, leaving you less room both at home and at the campsite. In addition, securing your vehicle to a trailer or tow dolly can be a hassle and more time consuming than hooking up with a tow bar.
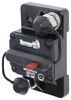
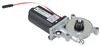
There are 5 basic components needed when flat towing a vehicle: a tow bar, a base plate kit, a safety cable set, tow bar wiring, and a supplemental braking system.
The tow bar links your towed car to your motorhome. It attaches to the custom-fit base plates that install on the frame of your towed car. Safety cables ensure that your towed car does not separate from your motorhome in the event that your tow bar becomes detached. Tow bar wiring allows your towed vehicle's signal lights to sync up with your motorhome's tail lights, which is required by law in most states. Finally, the supplemental braking system - also required in most states - brakes your towed car when the brakes in your motorhome are activated, preventing wear on the motorhome and decreasing braking distance for your entire setup.

California residents: click here
Videos are provided as a guide only. Refer to manufacturer installation instructions and specs for complete information.
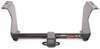
Today on our 2009 Subaru Forester, we're going to be taking a look at and showing you how to install the Blue Ox base plate kit with removable arms, part number BX3616. So here's what the base plate is going to look like once we have it installed on our Forester. This is going to serve as the attachment point for our tow bar to hook directly up to our Subaru. Now, this is going to distribute that weight across the front of the vehicle a lot better, taking some of that excess weight off of the front suspension. Now, whenever we're not towing, we're going to be able to easily remove these arms here. You can simply pull on the pin, rotate it, and we can pull it out and installing them is just as easy.
We'll slide it in until the pin makes contact, push it in, and rotate it until it locks into place.Around the outside of our attachment point we're going to have our safety chain connection points. And as you can see, we're going to have plenty of room to get those hooked up, even with some of those oversized hooks. Blue Ox even provided us a spot that we can mount up our electrical connector, making it a lot easier to route everything. Our Blue Ox base plate is going to work for a wide variety of Blue Ox tow bars, as well as some Roadmaster tow bars with an adapter that is sold separately. Now, really the big benefit to this style of base plate is the fact that our tow bar is going to hook directly to this.
We're not going to have a separate bar or that crossbar that's going to go across, our tow bar is just going to hook directly into the arms. And as you can see, whenever we remove the arms when we're not towing, it's going to blend in really nice with the bottom of the grill here, and we're not going to have to do too much cutting on the grill. At least not anything that you can see.To keep any kind of debris out of our base plate and help protect it, they do provide us with these caps that we can put in. Again, they're black, so it's just going to blend in nicely to the bottom of the car here. To begin installation we're going to want to open up our hood and we're going to have six push pins that are holding the upper part of the grill in place.
There's going to be three on each side. So you want to grab a flat head screwdriver and there's going to be a small notch in the push pin. You come underneath that notch to pop out the center section. We can lift it up, pop out the rest of the clip. We'll repeat that for all the remaining pushpins.In front of the front tire here, inside the wheel wall, right about where our fender meets our fascia, we're going to have a fastener.
Now, typically it is going to be a push pin, but ours has been replaced with a bolt. So if it is a push pin, you're going to want to push that center section in and then you can pull it out.But in our case, we're going to take an eight millimeter socket and pull this bolt out. You'll do that on the other side as well. Now, if we come to the bottom side, right where that front mud flap is, the very corner, we're going to have another push pin that we're going to need to remove. So again, kind of come into that center section. We're going to pop that center section out, so take the tension off of it. Once it's released, getting a little bit of trouble with ours, but if it's released from the bottom that's okay, it's all we really need. As we move forward in front of the mud flap underneath our fog lights and in the front of our Subaru, we'll have another push pin towards the outside edge. And then one right underneath the grill.Now we're going to have the same combination on the other side, so we can remove those too. Now with an extra set of hands we're going to start at the corner where our fender meets our fascia, and we're going to start pulling it away, unlocking those clips. And once we get it loose, we don't want to pull too far away, because we're going to have to disconnect our fog lights down here. So if we're pushing on that tab, should be able to pull down and then pull that connector out. And then we'll pull our fascia away and we're going to set it aside where it won't get damaged. Now on the driver's side, right behind the bumper beam itself, we're going to have this sensor that's fastened in with a bolt. You would want to grab a 10 millimeter socket and we can pull the bolt out.We'll just let our sensor hang down out of the way for now. Now on the passenger side, in the same general location, we're going to have a wiring loom with a clip holding it onto the frame. So going to grab a trim panel tool or a flathead screwdriver, and we're going to pop that push pin out of the frame. We'll just move our wiring back out of the way. Now we're going to have to remove our bumper beam. We're going to have four bolts holding it in place, two on the top and then two on the bottom side. So then I want to grab a 12 millimeter socket and we'll pull those out.Now, when you do remove these, you want to make sure that you at least leave one, just hand tight, maybe a couple of threads so that it doesn't fall off, when you take the last bolt out. So we're going to remove the last bolt, making sure we have a firm grip on the bumper beam, lift up slightly and we can pull it off, and we're going to set it aside for now. Now right in the corner here I already marked out. But while our bumper beam is removed, we're going to have to notch this small section. It's going to be even with this lower part of the flange. So you want to come right below the mounting hole for the bumper beam, go over it until it lines up with the outer edge here and just make that small triangle cut. Now I'm going to be using a rotary tool. You can use a reciprocating saw or a grinder, whatever's going to be easiest for you.We have this side notched out. We're going to go ahead and repeat that for the other side as well. It's never a good idea to leave exposed metal on your vehicle. So I'm going to take a little bit of spray paint. I'm going to spray where I cut, hopefully preventing any kind of rust or corrosion. And we'll do that for both sides that we've cut. Now in the center, right by our radiator, but a little bit towards the driver's side, we're going to have this sensor here and that's going to be our ambient temperature sensor. We're going to have to push it back towards the radiator just a bit so we can make clearance for our base plate. Now the easiest way is just to take a pair of pliers, we're just going to bend it back slightly on each side. You just want to be careful when you are bending it. You don't want to have your pliers go into the radiator or have the sensor go too far back and cause any damage.Now on the side of the frame here we're going to several different holes, the large one in the center is going to be reamed out to a half an inch. So we can grab a half inch drill bit and a drill. We're just going to make sure that it's a full half inch around, and we're going to do that for the other side as well. Please grab one of the shorthand bolts to make sure that the holes is going to be large enough to fit.At this point we can get ready to put our base plate up and hanging in place. Before we do, we're going to take our hardware, I'm going to take two of the half inch bolts, and we're going to take some red Loctite. We're just going to put a little bit on the threads. It's going to make it a lot easier doing it now, rather than trying to hold the base plate and do it, and then put your hardware in place. Just want to make sure you put a small bit of Loctite on each piece of hardware. Now, the next thing is, we're going to take our base plate. And since it's such a tight fit, you're going to have to do this at the same time on each side. So we'll slide it in and then we're going to rotate it up to where it levels out.Then we're going to line up the large hole with the hole that we drilled. We can take that half inch bolt, we're going to go through our base plate and into the frame. We're going to follow the bolt with a flat washer and then a half inch lock washer. And then finally we're going to secure it down with a half inch lock nut. Now we at least want to get this on there a couple threads, just hand tight so we know our base plate won't come falling down. And we'll do the same combination on the other side. So with our base plate loosely in place, you'll notice that we're going to have a few more holes, we'll have two more up top by the half inch bolt. And then one more at the very bottom that we're going to have to drill out.But if we look through this forward hole on top, you'll notice that there's going to be a weld nut on the inside of the frame. So we can either drill that out, which I'll tell you can take a lot of time, or to make it easier on ourselves we can take a chisel and we're going to knock that weld nut out. Now we can come back with a drill bit and we're going to want to drill them out so the 3/8 bolt can fit through each one of those three locations. So we're going to leave the base plate in position and use it as a template and then go through and drill in each mounting location. So we have the top one done. We're going to repeat that for this back side one, as well as the one on the very bottom. So now that we have the holes drilled, we're going to take our short 3/8 bolts, and we're going to double-check that they fit through the holes inside of our base plate.And then again we're going to take a little bit of Loctite, put it on the threads, and we'll pass it through. And we're going to use the short bolts for up top, making sure they go through the base plate and then through the frame. And then just like with the half inch bolt we're going to take a 3/8 flat washer, slide it over the bolt, followed up by a 3/8 lock washer, and then secure it down with a 3/8 locknut. We'll do that for both bolts. Now the driver's side is going to work the same way, except for the hole that's going to be towards the back. That one is also going to hold our sensor in place. So you're going to want to get it lined up, but the hole through the sensor isn't going to be large enough, and that tab here is going to be in the way. So we can either cut that alignment tab off or bend it flat.You can you just take a pair of pliers and bend it so it's going to be out of the way so that our sensor can sit flat against the bracket. But we are going to have to ream out the hole so we can take our drill bit that we used to drill out the base plate. And we're just going to drill this big enough so that 3/8 bolts could go through it.So the hole drilled out, we're going to pass our bolt through, line it up with our base plate, and then we'll secure it down with the same combination of hardware we did with the other ones. Now on the bottom we went ahead and took the long 3/8 bolt, again applying that red Loctite to it and slid it through. However, there is a gap in between our base plate and the frame. So we've put that spacer in between there to take up that gap and then follow it up with the hardware that we've been using, flat washer, lock washer, and then lock nut. And we did that for both sides. Now we're going to come back and we're going to tighten up all of our hardware. Got our 3/8 bolts and nuts we're going to be using a 9/16 wrench and socket. I just want to tighten it up so it's nice and snug. Now for our half inch hardware, we're going to be using a 3/4 inch wrench and socket to snug those up.Now they're all snug. I'm going to come back with a torque wrench and I'm going to torque all my hardware down to the specified amount in the instructions. We're going to make sure to repeat that for all of our remaining hardware. Just double check the chart to make sure that you have the correct spec for each size bolt. So with our base plate all secure we're going to want to put on our permanent safety cables. Now the main thing with these is you want to wrap them around the frame and then we'll take the quick link and attach both ends to the attachment point here on the end of the base plate. Now you're probably going to have some access cable. So what I'm going to do is I'm just going to kind of push it aside, take some zip ties and secure everything down so it won't interfere with the bumper or any other wires or anything back here.So I just took a zip tie and tying my safety cable to the base plate, so it be nice and tight against it, and then took the excess and loosely zip tied it to some of these existing wires back here so that it wouldn't be sticking out. So now that we have the facial off and are baseplate secure, now it'd be a good time to go ahead and run your wiring for your lighting system. So we went ahead and did that so it's easier to route them up to the front here and not have to worry about the fascia. So now we can take our bumper beam. We're going to line it up. And there is these two little keeper tabs on the top. We're going to want to make sure that they go over the frame, kind of sit on there and help support it.You going to want to get at least one bolt on each side, a couple of threads so we don't have to worry about it falling off. Now you'll notice on the bottom hole here it's going to be really close to the base plate. So when we put a bolt through, there is a chance that it is going to make contact. So in the kit, they're going to provide us with two, 5/16s flat washers. I'm just going to put them on that bolt. So that way it takes up a little bit of space, we still have enough threads to engage it and fully secure it. So we're going to want to put two flat washers on each bolt that's going to be close to the base plate. Now we can come back with a 12 millimeter socket and tighten down all the bolts. And you can see with those two washers it gives us just enough space to where that bolt is not going to be actually driving into the base plate.So now with an extra set of hands we're going to lift our fascia up, but don't forget to plug your fog lights in. Make it a lot easier putting the fascia on. We'll get everything loosely lined up. You want to double check down here just to make sure all the tabs are going through the opening. You can start working everything back into place, make sure the plastic goes in the correct spots. You have to lift up a little bit to get those clips to line up. Now once we get our fascia back in place, we noticed that it's not quite fitting how it should. And we noticed that right here on the lower section of the grill, this piece is actually hitting the base plate. So we're going to need to notch out a little bit right here so that it's not pushing against it and causing it not to sit properly. Now to make sure our fascia doesn't fall off we're going to go ahead and put a few fasteners back in on the top.When you put the push fasteners back in, you're going to want to make sure that center section is still sticking out. Push it into the hole, the outer part first, and then lock it down by pushing in the center section. Now we're going to start working on putting all the other fasteners back in place that we took out earlier. These underneath can be a little bit of a struggle, but you're going to want to make sure that outer ring is pushed in first, going through both layers of plastic, and then you lock it down with the center. That'll finish up your look at the Blue Ox base plate kit with removable arms, part number BX3616 on our 2009 Subaru Forester.

Awsome as always

Great to deal with
Do you have a question about this Tow Bar Base Plate?
Info for this part was:
At etrailer we provide the best information available about the products we sell. We take the quality of our information seriously so that you can get the right part the first time. Let us know if anything is missing or if you have any questions.


Thank you! Your comment has been submitted successfully. You should be able to view your question/comment here within a few days.
Error submitting comment. Please try again momentarily.