


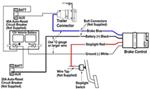
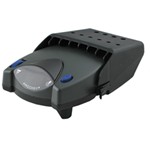
Today is 2001 Dodge 1500 Ram Pickup. Were going to install Brake Control, part number 90885, Prodigy P2 Brake Controller. And also well be using part number ETBC7 for installation kit. Now, first thing were going to do is go ahead and attach our bracket to the hitch for our wire harness. Next weve part number 118140. Theres not much to work with the hitch here, so were going to put it on the end at this point.
Lets go and tighten down the clamp. And were going to install our bracket from the ETBC7 kit onto this bracket. All right now were going to do some prop work and a wire harness. Were going to run a great cable through our simple harness, and were going to connect wires up, then we can go ahead and install the whole assembly onto the vehicle. What were going to do is actually just wind this up in electric tape and leave her leads out that we need.
Were going to leave four poles sticking out and were going to need a brake wire which is going to be blue and a black wire for trouble power supply, and then well just wrap up purple and white wire. Our white wire is going to direct through frames of brown and then the purple wire is going to be for reverse slice if its ever needed. Into our black and blue wire, were going to install a grey cable that has black and white wires inside of it. What were going to do is peel that gray sheet, lets strip the wires back and make a connection. Im going to go black to black and white to blue.
And well close up some electric tape. Next were going to install the loom along the wires like this. Lets go ahead and install our wire harness into the bracket. Well go ahead and take our four pole harness from the truck, run it through our adapter. A little dielectric grease in there to help protect it since it will be a permanent connection at this point, and were going to zip tight around it to make sure it stays together.
Well take our wire at the ring terminal and that will be a ground for a connector. Were going to run that up to the frame. Now well go ahead and continue running great cable up to the front of the truck, just make sure we stay away from making moving like the suspension component or anything hot like the exhaust. The same thing applies when you run up behind a firewall up towards the battery. Lets go check our cable, well pull it up. Well run our length the wire up to our positive terminal in battery, then well cut off our access. Youll ought to release some slack in there also for room for the circuit breakers. Were going to mount those right here. Once we have our length established, well go ahead and zip tire wires, make sure the thing is safe and secure. Now well take our cable. Were going to split the sheath all the way back to where were going to install our circuit breakers. Well use the black wire for our 40amp circuit breaker for 12volt power supply up back. Our white wire will be ran to the inside of the cab so this will connect to the blue wire, our brake controller output. Lets take our wires and set them out of the way for now. Lets go ahead and install our first circuit breaker. Well go and cut our wire, Im going to strip this open, just put a ring terminal on both ends or Ill put it going to our simple connector will go to the silver post and our other end which cock a post will go out through battery. Okay, through the other end of our wire, were going to install a larger ring terminal, and then well go ahead and wrap that to a positive side of the battery. And well actually hook it up, leave that as one of the last things we do. Now were going to find a place to run our white wire into the cab. Ok, we found a scrumet right here on the firewall. Were just going to make a slit in the center of it so well run our wires through. Lets take a wire and pull it out. Well leave that wire alone for now. And now were also going to need some run some wires for our brake controller power. Remember we have the extra leftover wire, were going to use that to go from brake controller back after the circuit breaker and the battery. Were going to take a wire, Im going to trim enough length to go to the circuit breaker which mount right here. Ill run a length up to the negative side of the battery as well as the positive terminal. Now so make sure it has enough length to go out back towards the brake controller. So this end of our wire of our battery, were going to strip it back and route our wires to the terminals. Since we know our wires are going to go, and go ahead just secure them. And in the both ends of our wires, well add ring terminals. Instead of a terminal, were actually going to hook up to this ground wires coming directly off the terminal instead. Next were going to install our second circuit breaker. In this case, well be using the 20amp circuit breaker, it can depend on how big of a trailer, how many access you have o your trailer determines what circuit breaker youre going to use. In this case well be using 20. Well then split the sheath right here and pull out a black wire and make your connections to the circuit breaker. Right now were back inside the cab of the truck. Well go ahead and connect our wires that we ran from the outside in, through our wire harness, theyll go through our brake controller. Well start with our great cable first, and great cable is our positive, negative connection for our brake controller, so were going to match those up color for color. Ok, thats settled. Now well go back to our single white wire, remember that runs through our blue wire on our seventh pole, and now well run through our blue wire on our brake controller. All right, well go ahead and tape up our wires, make them nice and neat. And then well go ahead and start working our connection through our red wire. That goes a cold side of our brake switch. This is our brake light switch right here. And basically were going to follow wires down and were going to split the sheath over the top of it and pull our wires test. Now typically its going to be white with a tan stripe. So well be using a quick connector, connect our red wire to the cold side of our brake switch which is a white with the tan stripe. The wire harness is all hooked up now. now, weve got to find a spot for our brake controller. This nice slant area right here and we can still open up our compartment. Attach it right here, a couple of self-tapping screws. Well run our cable through our pocket like a brake controller, plug it into the back and just snap into place. All right, now well take our remaining wire and zip tight safe out of the way. Last thing we got to do is go ahead and hook up our two power wires with straight to the battery and were going to use another nut on top of this. This will be a 6mm nut with a 1.0 thread pitch. All right, we got two dots thats lets us know we have power. And with that that will finish it for our install part number 90885 to project P2 brake controller and ETBC7 kit.
Trailer Brake Controller Installation - 2006 Dodge Ram

Today is 2006 Dodge 3500, were going to install brake controller from Tekonsha to P3 part number 90195 and a brake controller adapter part number 3020-P from Tekonsha. All right, first thing well do is go ahead and take our adapter cord and plug it into port just underneath the dash. This end of the adapter cord Im going to plug it into the port underneath the dash. Plug and well just go ahead and plug until it snaps and were good to go. Leave that alone for now, then well find a spot to mount our brake controller. This truck has a brake controller previously, so well actually one of its existing holes thats already in the dash and through that room were going to work here.
Brake Controller Installation - 2005 Dodge Ram 3500

Alright today on this 2003 doge ram 3500 pick up, were going to install parts for brake controller part number 90885. Were also going to install the adaptor core part number 3020-p. First off well go ahead and show you where the port is at on the vehicle, the tilt port is right behind this wire harness, its the blue socket right here. Were going to take our adapt cord and draw out the back, just plug right into it.Now the wire harness around it makes it for a tight fit, so you may have to pop the port loose to get a better angle at it to install it. Make sure it snaps into place and we got a cord. Now we go and find a spot to mount our bracket for our brake controller.
Trailer Brake Controller Installation - 2008 Dodge Ram

Today on this 2008 Dodge Ram 3500 were gonna install the Tekonsha P3 Brake Controller with direct wiring harness part number 90195-3020P.Our first step is gonna be locating the manufacturers connector for the brake control. The blue connector just above the power control module is the one we need.Well take our direct wire harness and plug directly into the blue connector.Now were plugged into the manufacturers connection, Im gonna go ahead and set my harness aside and we need to mount our brake controller.Well take our mounting bracket that comes with our install kit and simply mount it here underneath the dash. Behind the plastic cover of the dash is a metal bracket and today Im gonna be using self-threading screws to install my bracket. You could drill a small power hole and use the screws that come in the install kit.Now we can go ahead and install the brake controller on our mount.Now with our brake controller mounted, well take the other end of our wiring harness and plug it right into the back of the brake controller.As you can see, the power lit up our brake controller. Now we just need to do some final touch up.Im gonna take a couple of zip ties and secure my wiring up underneath the dash. Simply take the extra from our wiring harness zip tie it off to the manufacturers wiring.
Trailer Brake Controller Installation - 2002 Dodge Ram 3500

Today on this 2002 Dodge Full Size Pickup 3500 were going to install a brake controller part number 90885, the Prodigy P2 Brake Controller, and the adapter cord part number 320-P. First well start off with the adapter cord, alright this is our port right here, now it is kind of covered up by the wire, sometimes you can sneak it through or sometimes you could just pop it off and get a little easier access with it. It plugs together, were going to go ahead and snap this back into place, now well take our cord, and well just leave it alone for now. Lets go ahead and mount up the brake controller. Now well go ahead and mount our brake controller bracket in this are right here where it is still easy to reach, but not in the way either. Well just line up with this line right here; well use the hardware to attach it to the dashboard.
Trailer Brake Controller Installation - 2008 Dodge Ram 3500

Today on this 2008 Dodge 3500 we are going to install the Tekonsha P3 brake controller, part number 90195. Our first step is going to be locating where you want to mount your brake controller. For this application, we are going to mount it right here. One of my mounting fasteners is also going to be one of the current trim fasteners. So I will go ahead and remove that first and install my mounting bracket. For my other fastener, we are just going to use one of the screws provided in the installation kit. 0:35