
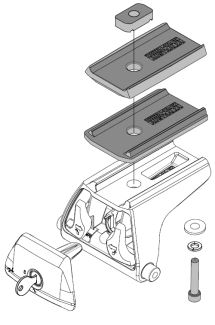
Roof Rack Includes:
Part Numbers: RB1500-3,RRRLT600-3,RRRJKB1,RRQMFK05,RRQMHD05-2,RRQMHD10
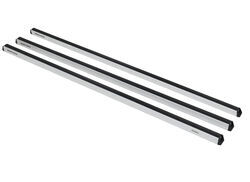
These heavy-duty, aluminum crossbars work with Rhino-Rack legs to create a sturdy roof rack or ladder rack for your vehicle. The square bars have built-in C-channels for mounting Rhino-Rack Heavy-Duty, contractor-grade accessories.
Features:
Specs:
California residents: click here
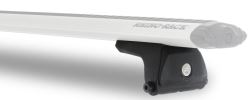
Quick Mount legs let you mount 3 Vortex Aero crossbars to RTC- or RT-style roof rack tracks. A trigger system allows tool-free installation of the legs into the tracks, and the locking covers secure the system to your roof.
Features:
Specs:
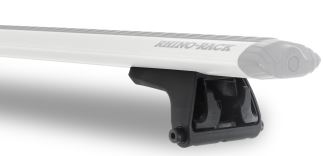
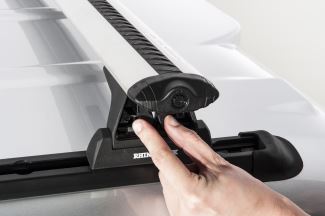
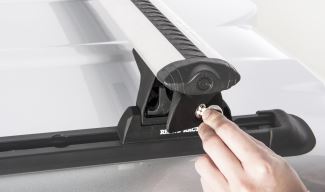
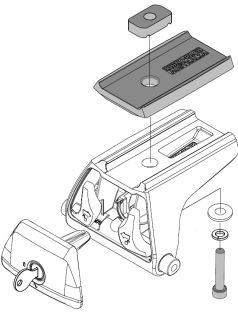
The bases of these Rhino Rack legs easily mount into your Rhino-Rack RTC- or RT-style roof rack tracks with included hardware. Just slide the nuts into the tracks, line up the mounting plates, and bolt the bases down. After this initial setup, you can leave the bases in the tracks.
Molded inserts help keep out dirt and provide a finished look when there are no legs and crossbars installed. To install a leg, simply remove the insert.
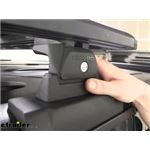
Once you've set up the bases, installing and removing your roof rack is easy. The Quick Mount legs have an integrated trigger system that creates an easy, tool-free installation.
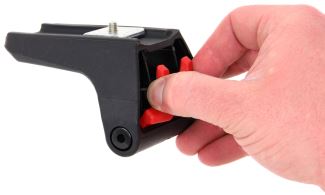
To install a leg in a base, pinch and slide the internal triggers together.
Lower the leg onto the base and slide the internal triggers apart to secure the leg in the base.
Once the leg is installed in the base, replace the cover and lock it to help secure the system to your roof.
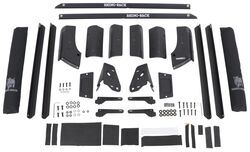
The Backbone adds support to your factory hard top so you can carry more gear on your roof rack. Provides mounting points for a Pioneer Platform or up to 3 Rhino-Rack Vortex Aero or Heavy-Duty crossbars.
Features:
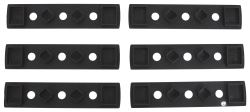
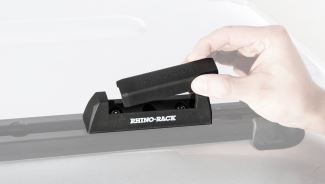
Rubber base pads install on bottom of Rhino-Rack Quick Mount legs to provide cushion and to help level a Pioneer platform on the roof of your vehicle.
Features:
Specs:
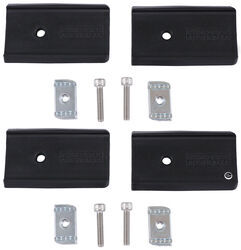
These 5-mm thick Quick Mount spacers bolt to the tops of 4 RLT600 legs to level 2 Heavy-Duty crossbars on your vehicle's roof. Sold as a set of 4.
Features:
To attach the Quick Mount spacer between your roof rack leg and crossbar, you will use the flat washer, and spring washer originally included with the leg hardware. You will replace the leg's original socket head cap screw with the new screw included with the spacer kit.
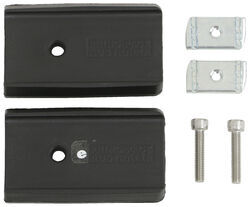
These 10-mm thick Quick Mount spacers bolt to the tops of 2 legs to level a crossbar on your vehicle's roof. Sold as a pair of 2.
Features:
To attach the Quick Mount spacer between your roof rack leg and crossbar, you will use the flat washer and spring washer originally included with the leg hardware. You will replace the leg's original socket head cap screw with the new screw included with the spacer kit.
Videos are provided as a guide only. Refer to manufacturer installation instructions and specs for complete information.
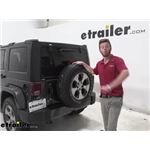
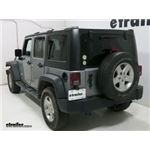
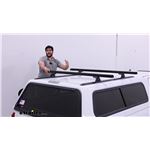
What's going on everybody, Adam here with etrailer. Today, we have a 2017 Jeep Wrangler Unlimited and we're gonna be taking a look at the Rhino-Rack Backbone roof rack system. Well, for our Backbone system, it is gonna give us two different options. We can do one, which is just putting the Vortex Aero cross bars up on top here. But also, if you are a platform-style fan, you can get a Pioneer platform rack up on top of these as well. And the really good thing about this is it really gives you more bar space.
We have three bars up here now and you can get a larger platform tray. But the cool thing is it's just everything back, so we can still take off our top two panels, so we can get some sun but still have all of our accessories up on top here. There is some drilling required. So, if you're not really a fan of drilling into your hardtop of your Jeep, probably not the system for you. But trust me, it's well worth it.
It looks good and it will handle a lot of weight as well. So, let's go ahead and get into that installation process. The first thing we need to do is remove the hardtop on the back of our Jeep. So, once we have that done, then we can start assembling some of our support brackets for the inside of that hardtop. Now, it's time to assemble our support brackets.
And the one way we can find out if it's the right side, one, we want the Rhino-Rack to be facing in and we are gonna have all these holes line up really nicely. And another thing to notice is there's a little edge here, that is going to go towards the front of our vehicle. So, once you find out that you got the right size, we're gonna go ahead and start assembling. Now, we wanna go ahead and take our bolts here. We wanna put a lock washer on there, and then we have a normal washer.
And then what we're gonna do is we're gonna take the smaller hole of the two. So, this one that's a little longer, we're gonna use this later. We're gonna line it up, just like this. Let's put this on there. And we're not gonna tighten these down yet. We just wanna get them hand tight for now. The next bracket we're gonna install are going to be the one that has the threaded stud on it. So, what we wanna do is lift this up and we're gonna take that stud and go through the bracket. But you gotta remember, we have different types of brackets for each one, so we gotta make sure that we have the right one. Now, for our second bracket, we're gonna grab the one that has the threaded stud on it and we're gonna take a nuts and a washer. And what we're gonna do is raise this up and we're going to mount it to where it's gonna go through that hole. We're gonna have this hole up top exposed and it's gonna be going towards the opposite end of this bend. So, do that and put the washer and nut on it and just get it hand tight for now. And we're gonna do this for all two of these. And of course, the other two on our other bracket. Now, what we wanna do is take our bracket here and we're going to set it up onto the end here. Here's our back little tailgate. So, we wanna get it to where it's going to line up with this line right here. And you'll notice, as you start to bring it back, it'll fall into this little tiny pocket and it lines up really nicely with the back here. So, once you get it to where you want it, take a paint marker of sorts, and mark it with paint. So, now we know exactly where to drill our holes. We're gonna do the same exact thing for our second bracket. But with this one, it's gonna go right up to this edge here. And again, we would do wanna line it up with the top part of that channel and get it all in place. And then do the same exact thing and mark it up. And we're gonna do the same exact thing for the other side. So, now what we wanna do is take our piece of paper here. You're gonna notice a gutter, front and rear. So, we're going to take this and slide it down in this little gutter here. And we wanna make sure that this end of the paper is all the way to the outside of that gutter. We wanna keep this in place as best as we can, as best as we can. And what we're gonna do is take a little punch or something to mark our spots. And we're gonna do the same thing for the other side. Before all of our holes, what we're gonna start with is going to be an eight-inch drill bit and then we're gonna jump it up to a quarter-inch drill bit. And that's gonna be for all of our back ones and all of our ones up front. I always like to go in reverse so that I make myself a little hole, just because if you just start drilling, it wants to walk. So, with this, you don't have much problem. For our front holes, we are going to have to go through two different layers, so make sure you get through both of them. And again, I like just go in reverse, and then go in through. There you go. Perfect. Now, it's time to step it up to a quarter-inch bit. We can open up just these two holes and these two holes. So, the farthest back four holes on both sides. You really don't gotta push too hard. You kinda just let it go and let it slowly eat its way through. Perfect. All right, now for our front two holes on both sides, what we're gonna do is take a step bit and we're going to open up the top hole to 18 millimeters and then the bottom holes to 16 millimeters. It's gonna be the same for both different sides. So, go ahead and do that. And you know you're good whenever you got nice, tight fit around these. And now, we can go ahead and go underneath and drill those out too. Now, it's time to pad up all of our pieces. So, we're gonna have one that is gonna look kind of like glasses, a little bit. So, just take the center pieces out. Then what we're gonna do is put them down here. And we wanna get it right to that edge and as even across as we can. And we're good there. And then on our other bracket here, we're just gonna have a longer piece and just put it right there. And try to get it not overhanging the edge, but right up to it and push it down. And then what we are going to get now, 'cause we have a bunch of little rings, we're gonna put those right there to cover up those holes. Not cover them up, just surround them. It might be a little easier to maybe put on the ground the flat part down. Oh, yeah. Oh, yeah. So, we're gonna put these on the same exact spot for both the right and the left side of this bracket here. The next thing we wanna do is take the bigger circular pads right here. Take the middle guy out and set that to the side. And then we're gonna put it right here on this little section. And it is easiest, just to kinda keep it on the ground. Put that on and give her a good push. And then we're gonna take our square little pad and take the middle guy out. Take this off. I'm gonna put this over this hole. Perfect. And then what we're gonna do is we're gonna take this bigger square piece here. And that is gonna go kinda like this. We don't want it to be sticking out on the side or anything like that. And once that's done, we just have two more of these small little circles. And they just go right there and on the other one. And again, the same exact deal as all the other ones. This is gonna be the same on both the right and the left side. So, for both our very farthest back bracket and our bracket here, what we wanna do is take our hardware. It's got a little notched edge there. So, what it's gonna do is gonna sit really nicely in those holes. So, now that we have that on, those are gonna stay, and now we'll go on the inside and finish up some other connections. Now, it's time to take our bracket, remember this So, everything is all assembled. And we're gonna just place them down. The hole should line up, which they do. We're gonna take our bracket and slide it into place. You wanna kinda make sure that those screws don't go back through that hole. But what we're gonna do is washer and we have an nylon lock nut that goes right. It would be a little bit easier with two sets of hands, but I can do it all by my lonesome self. So, now that we have that, we'll do it for the rest of our bolts. Now, we just need a 10-millimeter socket and our Allen key that came with the kit. Allen key goes on the outside on that screw that we push through, and this one goes right here. And we're gonna do the same thing for the other side and our other ones on this side. Now, we're gonna take our bigger Allen key that comes with a kit and we're gonna tighten this one up. And then the top one, we're just gonna need a 13-millimeter to tighten that up. The next thing on our list is we're gonna take our quarter-inch drill bit and we're gonna drill a hole down through this hole here once it's all installed, so this bracket is not gonna move around at all, so the hole is exactly where we need to be. So, there we go. Try to get all that stuff out, whichever way you see's best. Now, all we need to do is grab our bolt like this and grab that little O-ring, and it's gonna go on the bolt before we put it through the hole. So, put it through the hole. And we're just pretty much going to take a washer and a nylon locknut to go on the underneath of this. So, now we wanna take our washer and we are gonna have a nylon lock nut. So, let's take the washer and put it on there first and then grab that nylon lock nut to follow. And we're gonna do this same exact process on the other side. And we can tighten these down right when we get them threaded on there. Now, it's time to take our other piece. We're gonna lay it down. And then we're gonna have a little bracket and that's gonna go underneath. And we are gonna have some screws to go into the threaded portions here. So, now we're gonna go ahead and take our little bolt. And we wanna make sure it has the pressure washer and the washer on it and start threading that in. And we can tighten these down all the way. So, now we have our brackets here. So, what I want you to do is go in between your front driver's side and your back door and pretty much just unzip this and you'll see these bracket here. You take this bracket. And if you put it up to it, we're gonna take one of the side bolts out and then these two top bolts. It'll line up. But don't put them anywhere far because once we get them out, it is going to be replaced with the same bolt we're taking out. So, be mindful of that. And be sure not to lose them. So, let's go ahead and put the bracket in place and start replacing the bolts. So, now that that's all done, pretty much all we have to do is just put our hardtop back on our Jeep. Now, it's time to replace our three little bolts on each side. So, now we can take our pads here and put them on these uprights right by the seat, just so we don't have anybody hitting their head or anything like that. So, now that we have the Backbone system installed, now, all we really have to do is either put up some cross bars or a platform rack. Well, everyone, that just about does it for our look at the Rhino-Rack Backbones roof rack system on our 2017 Jeep Wrangler Unlimited..
Average Customer Rating: 4.6 out of 5 stars (213 Customer Reviews)
These heavy-duty, aluminum crossbars work with Rhino-Rack legs to create a sturdy roof rack or ladder rack for your vehicle. The square bars have built-in C-channels for mounting Rhino-Rack Heavy-Duty, contractor-grade accessories. Quick Mount legs let you mount 3 Vortex Aero crossbars to RTC- or RT-style roof rack tracks. A trigger system allows tool-free installation of the legs into the tracks, and the locking covers secure the system to your roof. The Backbone adds support to your factory hard top so you can carry more gear on your roof rack. Provides mounting points for a Pioneer Platform or up to 3 Rhino-Rack Vortex Aero or Heavy-Duty crossbars. Rubber base pads install on bottom of Rhino-Rack Quick Mount legs to provide cushion and to help level a Pioneer platform on the roof of your vehicle. These 5-mm thick Quick Mount spacers bolt to the tops of 4 RLT600 legs to level 2 Heavy-Duty crossbars on your vehicle's roof. Sold as a set of 4. These 10-mm thick Quick Mount spacers bolt to the tops of 2 legs to level a crossbar on your vehicle's roof. Sold as a pair of 2.Quick, A+ thanks
good price and prompt delivery
Best price on the part. Fast shipping. The install video made it a breeze. Rhino rack was a little lazy with the written directions and stamping all the parts. The etrailer video for 2015 JKU was needed.
Great quality product and a breeze to install. I like that they are simple to install and remove as my needs change.
Great quality and was easy to install as the directions were simple to follow.

Just as I had expected. Top quality and no rust. A bit scary drilling the holes in your top but all went well. Their anti theft allen screws could use an upgrade.
The Rhino-Rack Vortex Aero kit for the 2019 Mercedes Benz Metris Worker van (no roof rails) is a perfect fit. The 3 racks are in perfect alignment with the spacer blocks and can be removed in about 3 minutes to take the van into the car wash.
Make sure you download the specific installation instructions from the manufacturer for the proper installation of the support legs.
Overall I like the rack. Aero bars are quiet, rubber grip strip on top is nice. Product is high quality. My only gripe is the mounting feet and it’s fit on the Mercedes Metris. Each foot is only able to utilize one bolt hole on the factory placed mounts. Using 2 per foot would be much better like in most other applications I imagine. But once it’s all assembled and installed it seems fine. Height spacer blocks are perfect, bars are all on the same plane. Looks good too! Etrailer also has real people working customer support who answer the phone and help you out. I highly recommend the rack and buying from etrailer!
This system is great. Have a 6’ rack mounted to it and it easily supports 200-300lbs of dynamic load a d 700+ static load without issue.
Was missing a few parts upon initial delivery but no problem as customer service was extremely helpful. This is why etrailer is my go to. Thanks as always.
Product is great but the strainer customer service I received from Melissa T was above and beyond fantastic
Etrailer is my go to for all my overlanding needs
Big Truck Big RV brought me here. Thank you for that. etrailer is awesome!
Great product! I have had no issues
Great product! No issues
Haven’t installed but this brand and reseller are the best!
Crazy fast shipping great company to do business with
Ask the Experts about this Roof Rack
Do you have a question about this Roof Rack?

Rhino Rack Accessories
Fit to this rack on your 2013 Jeep Wrangler Unlimited
Info for these parts were:
At etrailer.com we provide the best information available about the products we sell. We take the quality of our information seriously so that you can get the right part the first time. Let us know if anything is missing or if you have any questions.
Jeep Wrangler Unlimited Accessories


Thank you! Your comment has been submitted successfully. You should be able to view your question/comment here within a few days.
Error submitting comment. Please try again momentarily.