
Ditch Brackets for Rhino-Rack RLT600 Quick Mount Legs - 13 mm - Rivet Mount - Qty 2
(2 reviews)
Price: $53.20
In Stock
Ditch Brackets for Rhino-Rack RLT600 Quick Mount Legs - 13 mm - Rivet Mount - Qty 2
Item # RRQMFK08
Retail:$92.99
Our Price: $53.20
You Save: 43%
Orders above $99 qualify for Free Shipping
In Stock


- All Info
- Reviews (2)
- Q & A (0)
- Videos (2)
- Photos
Rhino Rack Accessories and Parts - RRQMFK08
- Roof Rack
- Brackets
- Tower Parts
- Legs
- Rhino Rack
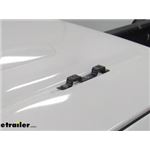
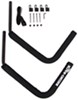
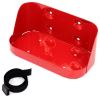
These brackets install in the ditches of your vehicle's naked roof. Ditch brackets provide permanent fixed mounting points for Rhino-Rack RLT600 Quick Mount legs so you can create an aftermarket roof rack. Includes 2 brackets and hardware.
Features:
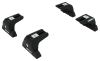
- Ditch brackets provide permanent fixed mounting points for Rhino-Rack RLT600 Quick Mount legs (sold separately)
- Mount directly in the ditches of your vehicle's naked roof
- Attach with included rivets - rivet gun required
- 2 Brackets and 6 rivets included
Specs:
- Application: Rhino-Rack Quick Mount legs RRRLT600 and RRRLT600H
- Bracket width: 13 mm
- 5-Year limited warranty
QMFK08 Ditch Brackets for Rhino-Rack RLT600 Quick Mount Legs - 13 mm - Rivet Mount - Qty 2
Installation Details


Video of Ditch Brackets for Rhino-Rack RLT600 Quick Mount Legs - 13 mm - Rivet Mount - Qty 2


Videos are provided as a guide only. Refer to manufacturer installation instructions and specs for complete information.


Video Transcript for Rhino-Rack RLT600 Quick Mount Legs Ditch Brackets Review
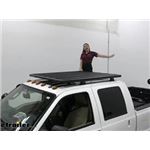
Hi everyone, it's Evangeline. And today we'll be taking a look at our ditch brackets for rhino rack RLT600 quick mount legs, right here at etrailer. This is installed to a naked roof, but notice how we don't have clamps hooking down into our door. That's because we have the ditch mount brackets. So these are installed right into our ditch, they involve drilling and riveting. So, definitely check out the install video for that.
But this means that this is permanently mounted to our vehicle. A permanently installed system like this is not for everyone. Let's say you're just leasing your vehicle or you're playing on upgrading to a different vehicle next year. I don't recommend this system for you. And there's other options out there.
You could get the cross bar systems that go right into your door, they're more temporary, you can take them out when you're done with them and that's a great option too you still have that good weight capacity. But, if you're someone who is perfectly fine with drilling and riveting into their roof, and who wanna make the most out of having a pioneer platform on your roof and then have that extra weight capacity and versatility then this might be a good option for you. So, before installing your brackets, you first need to make sure that you have all of the right tools. So, the this is everything that I use. What's actually included in your keep is gonna be your five millimeter rivets, your butyl tape, your bracket that goes on top, and then this screw for if you're gonna be using a weather strip or if you have a weather stripping on top of your truck.
In our case though, since we don't we are just gonna set this aside, since it is optional. Now the tools that I brought to the table in order of being used is gonna be your measuring tape. Please make sure you use the same measuring tape for this entire process. Once you've measured it out double check those spots, go ahead and mark them. I use this as well to mark for where I'm gonna put the drill.
And then speaking of drill, I use a five millimeter drill bit. Remember five millimeters, not 3/16. This is very important especially once you have those holes drilled out you're gonna be using a rivet gun. Make sure you have the correct tips to match your rivets. Once everything's installed, this is gonna be an extra sealant just an extra precaution since we don't have weather stripping on our truck. So once you determined or checked that you have all the tools you need for this job, let's get started. The most important part here is to make sure your measurements are correct. So just closely follow those rhino rack instructions just to make sure you get all your measurements correct. So you're gonna have three holes that will match up the bracket and then go ahead and once you've double checked your measurements and made sure they're not wrong, you're gonna go ahead and mark those holes with a pen. So I just mark it over the bracket that way I know it's all lined up and I use painters tape here just as an extra precaution. Next to make sure that my drill doesn't skip, I'm just gonna make a little hole punch here, right Where I marked it. There we go. Do that a couple times. Now that we have our holes punched we're then gonna make a pilot hole. And of course, please be careful when you do this you don't wanna go through your headliner. Fortunately, the truck we're working on has pretty good clearance so, I'm not that worried about it. Just be careful. After you make your pilot hole you may have to like build towards the five millimeter drill bit. So go ahead and switch those out if needed. Keep double checking with your brackets to make sure that all your holes line up and I'll get back to you once you finish all 12. So that our clear coat is dry, and we're gonna go on to the next step, which is to set up the butyl tape. These are squares with holes already in them. So that's nice you're just gonna put them over your holes and try to get them centered. Then place your bracket over those holes and push them down onto the tape just to get them secured, and then drop your rivet into you the hole. So if you did this right, it should fit right through. The final step is to get your rivet gun and there you go. Since we don't have that weather stripping, we put that seal on there just to make sure everything is covered and this is when you would install the rest of your towers. So, that's it for the install process of your ditch brackets. Depending on the heights of your brackets and depending on your vehicle, it may be a little bit different, but just make sure you have the correct tools and you should be good to go. And that was a look at our ditch mount brackets for your rhino rack quick mount legs, here at etrailer. My name is Evangeline and I hope you enjoyed the journey..
Customer Reviews
Ditch Brackets for Rhino-Rack RLT600 Quick Mount Legs - 13 mm - Rivet Mount - Qty 2 - RRQMFK08
Average Customer Rating: 5.0 out of 5 stars (2 Customer Reviews)
These brackets install in the ditches of your vehicle's naked roof. Ditch brackets provide permanent fixed mounting points for Rhino-Rack RLT600 Quick Mount legs so you can create an aftermarket roof rack. Includes 2 brackets and hardware.by: Richard 12/01/2022
by: Gonzalo02/01/2021
2
2
See what our Experts say about this Rhino Rack Accessories and Parts
- What Adapter Will Fit My Retrax Tonneau Cover to Let Me Use the Yakima OverHaul HD on My 2019 TacomaIf you have a Retrax tonneau cover on your 2019 Toyota Tacoma (5-ft. bed) like the RetraxONE XR # RTT-60851 or the RetraxPRO XR # RTT-80851, the adapter that you need to use the Yamkima OverHaul HD # Y01151-58 is the Tonneau Cover Adapter Kit for Yakima OverHaul HD # Y01155. As far as mounting a Rhino-Rack pioneer platform on the OverHaul HD, the only platforms that will fit are the Rhino-Rack Universal Pioneer Platform Rack part # RR42114BF which is 48" long x 38" wide and part # RR42115BF...
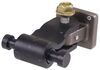
view full answer... - What Orientation is Meant When Describing the Rhino-Rack Ditch Brackets WidthThe width of the Rhino-Rack Ditch Brackets like the Ditch Brackets for Rhino-Rack RLT600 Quick Mount Legs # RRQMFK08 is the side to side width. I have included a picture that will help visualize this.
view full answer...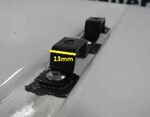
- Permanent Roof Rack for 2018 Honda HR-V with Naked RoofYou are correct that there isn't a roof rack available that's specifically designed to permanently install onto the roof of your 2018 Honda HR-V but we certainly have the parts needed to make this work. Customers usually don't want to drill into the roof of their vehicle so this is a bit of a unique case! For the roof rack I recommend sticking with one brand for all the parts since they have been tested together and you can be sure that they will not only fit but also provide you with...
view full answer...
Do you have a question about this Accessories and Part?
Info for this part was:

Edited by:
Tyler C

Expert Research:
Michael H

Video Edited:
Jacob T

Updated by:
Wilson B

Written by:
Daron K

Installed by:
Evangeline M

Video by:
Thomas T
At etrailer.com we provide the best information available about the products we sell. We take the quality of our information seriously so that you can get the right part the first time. Let us know if anything is missing or if you have any questions.
Product Experts Available Now!
Call 1-800-940-8924
Thank you! Your comment has been submitted successfully. You should be able to view your question/comment here within a few days.
Error submitting comment. Please try again momentarily.