
Thank you! Your comment has been submitted successfully. You should be able to view your question/comment here within a few days.
Error submitting comment. Please try again momentarily.
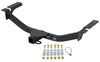
These custom-fit clamps and pads let you mount 4 Inno XS200, XS250, or INSU-K5 feet to your vehicle's naked roof to help create an aftermarket roof rack system. Clamps mount to feet with bolts. Kit includes 4 clamps and 4 pads.
Features:
Specs:

Videos are provided as a guide only. Refer to manufacturer installation instructions and specs for complete information.
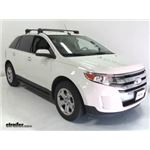
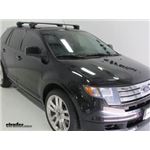
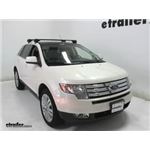
Today on our 2012 Ford Edge we're going to be test fitting the Inno Aero Roof Rack System consisting of part numbers INXB115-2, these are the Inno Aero crossbars, 45" long. We'll also be installing part number INXS200, these are the Inno flush feet for the Aero crossbars. Finally part number INK759, and this is the custom fit kit for the Ford Edge. The Inno Aero Roof Rack System is great for carrying a wide variety of accessories on your roof while freeing up space inside your vehicle. You can carrying bike racks, cargo baskets, cargo boxes, ski and snowboard carriers, and even kayak carriers. The Aero bars have an aerodynamic shape to them, and also have this rubber strip at the top which going to help reduce wind noise and drag while you're driving. It also means that these can take in T-track accessories as well.
We do have locking end caps on each of our flush feet, so once this is installed on your vehicle it's secured to your vehicle as well. The two bars combined have a carrying capacity of 165 pounds, although you always want to double check with your vehicle's manual to make sure that it can withstand those weights on the roof. Now that we've gone over some of the features of the roof rack system let's go ahead and show you how it installs. We have our front bar already installed on our vehicle and how we did that after everything was assembled properly, we measured back from the center of the doorjamb to the center of our bar and tightened it down. Let's go ahead and show you how the rear bar goes together. Here we have everything laid out.
We have one of our flush feet already installed on our bar, and here's what the flush feet look like prior to installation along with the covers. We also have our foot pad that's going to sit on top of our vehicle to prevent scratches and abrasions, our clamp, which is going to attach to our door frame, and this adaptor bracket here which is going to help us install our flush foot onto our bar. Let's go ahead and get this started. We'll slide our inner piece out all the way, then take our adapter bracket and kind of push that into place there, and we'll push this back towards the center of our bar. Now, when installing your flush foot you want to make sure the right one is going to the right area. So, they are marked right and left, and even have a picture as to where they're supposed to be situated.
Next we'll take this top tab here and line it up to our bracket, then we'll slide it out into position, and before we tighten it down we want to make sure that the spread between the two feet is what it is in the instructions. I'll take our handy-dandy measuring tape here. All right. With that done we can take our included tool here, tighten our bolts on the inside down. Then we'll take our pads from our fit kit and push those into place.
Make sure they match up properly, and they just push in. Finally, we'll screw our screw here from the end and install our clamp, and now we can set this on the roof of our vehicle. We'll open up our doors first. Now that we have these in place we'll get a measurement from the center of the doorjamb to the center of our bar here for our measurement to get the proper spread between the two of them. Next we'll start to tighten down and get it snug around our door frame here. Then we'll give about five or six turns to each side until it's completely tightened down. The way you know that it's completely tightened down is you hear audible clicks from our torquing tool here. With both sides torqued down now we can take our end caps here, line them up, push them into place. We'll take our keys and lock them down. Then we can load up our gear and hit the road. There you have it for the Inno Aero Roof Rack System on our 2012 Ford Edge.


See my review of the Inno Roof Rack of which this product is a part.
Everything about this kit met my expectations.
- Perfect fit for my Ford Edge, as advertised.
- Lowest bar height that was still high enough for the Edge Vista roof to clear. The glass does clear when nothing is attached to the bars.
- Aero bar shape. I haven't done a lot of miles yet with only the bars and no other attachments.
I attached an Inno roof box (which still fits through my garage door!) and did a 2000 mile road trip at insterstate speeds. Except the box noise (expected), and a bit of a mileage hit, I had no issues. Secure fit the whole way.
bars and adapters to my MKX worked perfect traveled from South Carolina to Maune with a kayak on the roof. Totally trouble free
Overall really incredibke experience. I had no idea what type of rack/rails would fit my car. The website asked a couple simple questions and showed me exactly what was compatible. I had a few further questions and I called a customer service rep and she was really nice and helpful over the phone. Ordered my products that day, received an order confirmation email, a shipment email, and a tracking number. Arrived in just a few days. Really happy with my experience.
nice rack, easy to install, looks nice on my car, worked well
Highly recommend. Easy assembly and the product video on your site was visually a help too.
Do you have a question about this Accessories and Part?
Info for this part was:
At etrailer we provide the best information available about the products we sell. We take the quality of our information seriously so that you can get the right part the first time. Let us know if anything is missing or if you have any questions.


Mark
7/14/2025
Great!