


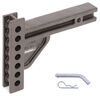
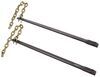
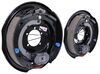
Of all the hitches we tested, this is our favorite. It fixes sway, creates superb handling, and levels your ride - silently. Rotating chain-style, clamp-on brackets make setup easy. Max 4-1/2" drop, 10-1/2" rise. Made in the USA, too!
Features:
Specs:
California residents: click here
Videos are provided as a guide only. Refer to manufacturer installation instructions and specs for complete information.
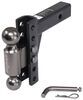
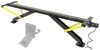
Hello neighbors and friends, Steven here with etrailer.com. Let's take a look together at our Blue Ox SwayPro weight distribution with sway control for two inch hitches rated at 7,500 pounds gross towing weight. So folks, obviously we've got this just kinda demo set up here on the table today. I'll throw an image up on the screen of what it looks like fully installed. Keep in mind on the far left of that image, those two brackets will be hanging over the frame of your trailer with the chains coming down, the spring bars underneath and the coupler over there to the far right on top of the ball on the adjustable ball mount or shank there. Now this evenly spreads out your tongue weight among all the axles of your tow vehicle and the trailer and it levels out your ride to give you a more controlled stability when driving, making turns, those kind of things.
So basically if you're sagging in the middle where the connection point is, this kind of system could help give you back to level. It also lets you tow with the max capacity of your hitch. Number one, make sure that your hitch on your vehicle that your tow width is rated for weight distribution. Now this system here by Blue Ox is gonna be superior and silent on its sway control. So the sway control's built into the whole assembly, the chains, the tilt of the head, all that kind of stuff.
Some of the brands use friction bars and L brackets and they're kind of noisy when you're making turns and just all that kind of stuff. Now again, having that head at a slight tilt angle will help you on your trailer be self-centered. So it's gonna always want to go back to the center line. Now the constant tension in these trunnion bars here also help force that trailer in a straight line. So when everything's hooked up, it's basically keeping you and forcing you back straight behind the tow vehicle, wherever the tow vehicle's pulling it.
Now this is quick and simple to use thanks to the rotating brackets on the systems here. So quite frankly, once you get this over the frame of your trailer like you see on this bracket here, and you got the chain through the top here and going down to the mechanism, I'm gonna come around here. Basically at that point you can take the included tool and this guy just looks like a lug wrench, almost, on a vehicle. It's got some nice grip here. I like how they kind of machine that down.
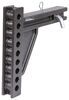
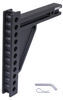
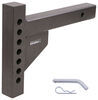
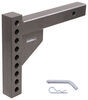
You can really feel it and it sticks to your hand nice and good. But basically, you got a tool here that marries up to this guy. So whenever it's time to tension down the chain and everything, you can use that and ratchet around once you've got the release of the safety pin and everything. So follow the instructions that come with it. It's not too hard to use, honestly, just take your time. I always tell people, read through the instructions fully, make sure you comprehend what you're doing and then go back and do the install. The shank here is a two by two shank, gives you the pitch pin and clip included, you get all the hardware here for installing the head onto the shank. You get some safety chain anchor points as well as a couple other nuts and bolts that are included as well. The ball size is a 2 5/16 inch ball. That is your standard size for weight distribution, nine times out of 10 and the lift bracket position. So these lift brackets on your trailer frame, it kind of A's back, they need to be about 29 inches back from center of the coupler. And the max frame height for these brackets to sit on will be a six inches tall frame. Now the shank length is 13 inches long and it has a maximum rise of 10 1/2 inches from the top of the receiver opening and a max drop, if it's in the drop position, like the yellow one there on my image on the screen, of 4 1/2 inches. So again, that image there is kind of just to show you the two options you have as far as the max range. Now the adjustment holes are spaced at 1 1/4 inches apart on center. Now again folks, this system includes the head assembly, the adjustable shank, the spring bars, everything you see here in front of me. They even have grease zerks built in inside the head unit back here out of sight on your angle unfortunately. But that's also gonna help you make maintenance super simple and easy. Keeps everything clean. Again, no drilling for setting this up. Everything's a clamp on style. The brackets go over the top and then these set bolts here thread into the front end of this bracket and hold it in place. Well folks, again, as you can see, a nice elegant powder coat finish over the hardened steel. Very nice product made here in the US. Blue Ox always does an amazing job on everything they make. If you've ever seen their products or heard about 'em, you know about their quality. Well folks, that's gonna wrap it up. I'm Steven, thank you so much for your time. I hope this information and this look together today has been helpful for you. Have a great day.
Ratings & Reviews

Info for this part was:
At etrailer we provide the best information available about the products we sell. We take the quality of our information seriously so that you can get the right part the first time.


Thank you! Your comment has been submitted successfully. You should be able to view your question/comment here within a few days.
Error submitting comment. Please try again momentarily.