


Perfect for light-duty towing, this custom, vehicle trailer hitch receiver features fully welded, gloss powder coated steel construction. Standard drawbar included.
Features:
Specs:
At etrailer.com we're committed to the products we sell, and to our customers. Our experienced and knowledgeable staff are available via both phone and email to address your questions and concerns for the lifetime of your hitch. The technicians at etrailer perform hitch installations on a daily basis, making them a valuable resource for do-it-yourselfers. The one-on-one, personal service you'll receive comes straight from an expert in the towing and automotive field. We've installed it, we've wired it and we've towed with it, so whatever your question, we can answer it.

Videos are provided as a guide only. Refer to manufacturer installation instructions and specs for complete information.
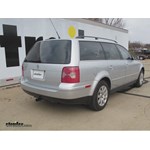
Today on our 2005 Volkswagen Passat, we'll be installing the Curt Hitch, part number C11054. This is what our hitch will look like once it's installed. Next we'll give you a couple measurements to assist you in selecting accessories for your new hitch. From the center of the hitch pin hole to the outermost edge of the bumper is 3 inches. From the top of the receiver tube opening to the ground is 12 1/4 inches. This will assist you with selecting accessories such as a ball mount, bike rack or cargo carrier. Now we'll go ahead with installation. To begin our install, we'll first need to remove the vehicle's spare tire.
We'll open up the rear trunk, the spare tire cover and then remove the hand knob that secures the spare tire in place. We'll set it aside and then remove the spare tire completely. Now we'll locate the plug in the bottom of the spare tire well. We'll need to remove this plug completely, as it will not be re-installed. Using a utility knife, you may need to cut the sealant around the plug.
Next we'll get underneath the vehicle. On the passenger side, we'll need to remove the under body trim panel and it's multiple fasteners that secure it. We'll set the fasteners and trim panel aside. We'll be using a half inch block and bolt along with a half inch flange nut for all four attachment points for this hitch. We'll take the half inch carriage bolt and block and drop it through the spare tire well into position. Using the hitch as a template, we'll mark out the section that needs to be trimmed.
With it marked off, we're going to use a rotary tool to cut out the plastic section. Next, we'll put our hitch in place and secure it with a half inch flange nut. Using the hitch as a template, we'll drill out the other three attachment points. We'll start with our bumper attachment points. To gain access to drill the holes out, we're going to take an extra step of drilling out a three quarter inch hole saw hole into the under body panel. This will allow us access to get our drill bits in position and drill out the hole.
Note, it may be necessary to use a jack to help hold the hitch into place, so that it doesn't move around when drilling out the hole. It may be necessary to use a step bit process by marking the center point of the hole and then using a smaller pilot bit, enlarging it to the half inch size. Additionally, you can use a block of wood to help hold the rear fascia back while drilling out the hole. Now that we have our holes completely drilled out, we'll put our half inch carriage bolt and block into place and then secure it with the half inch flange nut. We'll tighten these down, to help hold the hitch in position. Next we'll drill out the final attachment point, which will be on the passenger side spare tire well. With our hole drilled out, we're ready to put our hardware in place. To assist in sealing up the spare tire well holes, we'll be using the lock tight RTV gasket maker, part number LT37467. This will assist in preventing any outside intrusion, water, or air or possibly exhaust. With all our holes drilled out and the hardware in place, we'll tighten them down, with the exception of the driver's side. We'll need to remove it, apply the RTV and then re-secure it. With all the hardware tightened down, we can torque to specifications as indicated in the instructions. With the hitch secured and torqued to specifications, we can slightly modify the under body panel we removed earlier on the passenger side. We'll put it in position, mark out the sections that need to be trimmed. We're going to use a rotary tool to cut out the plastic section, then re-secure it with the fasteners we removed earlier. With the under body panel re-secured, this will complete the install of the Curt Hitch, part number C11054 on our 2005 Volkswagen Passat. .
Average Customer Rating: 4.0 out of 5 stars (2 Customer Reviews)
Perfect for light-duty towing, this custom, vehicle trailer hitch receiver features fully welded, gloss powder coated steel construction. Standard drawbar included.The hitch fit perfectly on my 2004 VW Passat. I am towing a sea-doo and it pulls it with ease. I installed it myself. The hardest part of the install was drilling through factory frame which is I believe hardened steel. Get really good drill bits and have patience because it took a long time to cut through the frame! I am happy with my product. Thank you ETrailer.com
Got a hitch and it's honestly something worth buying. Getting the screw in the bumper tub was the hardest part but with the wire thats provided makes it fairly easy. Got it installed and ready in about 40 minutes. Definitely well worth it. It should do the job of towing my dirtbike around!
Info for this part was:
At etrailer.com we provide the best information available about the products we sell. We take the quality of our information seriously so that you can get the right part the first time. Let us know if anything is missing or if you have any questions.


Thank you! Your comment has been submitted successfully. You should be able to view your question/comment here within a few days.
Error submitting comment. Please try again momentarily.