
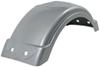
To see if this custom-fit item will work for you please tell us what vehicle you'll use it with.
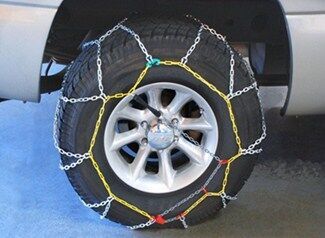
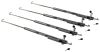
Get consistent traction and a smooth ride for your vehicle when driving in snow and on light ice. Brightly color-coded chains have built-in tensioners to ensure fast, easy installation and a tight fit. Never worry about misplacing parts.
Features:
Specs:
Note: To determine whether you can use snow chains on your vehicle, or if they might affect your ABS/EPS functionality, consult your owner's manual.
These Titan Chain diamond-pattern chains are great winter weather chains. If you live in an area where you're likely to get periodic snow and ice, these chains are perfect because they're durable and easy to mount. And they're lightweight and compact, so they store in your vehicle nicely too.
These chains are among the easiest and fastest to install because they have built-in tensioners that you can just pull taut to adjust the fit. These tensioners allow the chains to fit your tires, no matter the profile or wear pattern. And because the tensioners are built-in, you never have to worry about losing them like you might with other chains on the market.
SAE Class S tire chains are designed for use on passenger vehicles with restricted wheel-well clearance. Most newer cars, vans, and small trucks - especially those with large aftermarket tires - will require Class S chains. If you're unsure about the class of your vehicle, consult your vehicle's user manual.
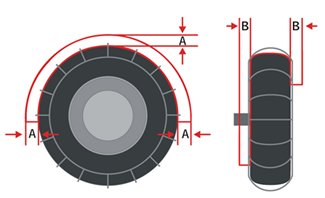
These chains will fit your tires provided there is both:
If you know your tire size, you may think you won't need to test fit your new chains. But there are a lot of variables that can affect whether chains will fit your specific tires, including your tire type, the amount of air pressure in the tire, the amount of tread wear, and the tire manufacturer. You'll also need to know how much clearance is in your wheel well, which you can determine by measuring from your tire tread to the sidewall of the wheel well.
We recommend that you order chains as early in the season as possible to give yourself plenty of time to test fit the chains and reorder if needed. This way, you won't be stuck out in the cold later with snow chains that don't fit.
You can test fit these chains in your garage or driveway, but you'll want to wait until there's snow on the ground to actually drive with them. Likewise, if you're out in the snow and come across bare pavement, you'll want to pull over and remove the chains. These chains can cause damage to the bare pavement, your garage floor, or your vehicle if they break from the wear of riding on a harsh surface.
Installing these chains is incredibly simple.
1. Lay out the chains on the ground to make sure there are no twists or kinks.
2. Spread the chain around the back of the tire.
3. Connect the ends of the cable, which will sit behind the tire.
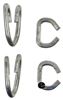
4. Around front, connect the 2 ends of the yellow side chain using the green hook at the top of the tire.
5. At the bottom of the tire, feed the silver tensioning chain through the red channel bracket and pull it taut. Then run the tensioner through as many red clips along the side chain as you can, leaving room to still be able to stretch the hook across the tire.
6. Attach the hook to the side chain directly across from the last clip you ran the tensioner through. The hook should face away from your tire. Pull your vehicle forward 2-3 vehicle lengths and recheck the tension.
How to Choose Snow Chains for Your Vehicle
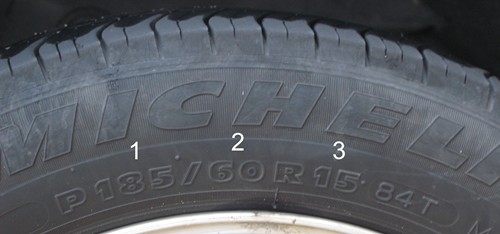
To choose the right snow chain, you must match your tire size. Those measurements can be found on the side of your tire, as shown below.
185/60-15
These chains fit the following tire sizes:
Videos are provided as a guide only. Refer to manufacturer installation instructions and specs for complete information.
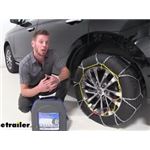
Adam: Hi everyone, Adam with etrailer.com. Today we're going to be taking a look at Titan Chains Alloy Snow Tire Chains. One thing I do like about these tire chains compared to your ladder chains, we don't have any connection to make around back. A lot of the times underneath, we have the climb on the ground, go around back, and then connect it. This way it's just up top here so we don't have to get down in the snow. Because if you're putting snow tire chains on your tires, there's probably going to be snow on the ground.
You don't want to be rolling around in that.We do have some square links that are going to be made of manganese nickel alloy steel, so it's going to help resist rust and corrosion and just keep it from wearing down really quickly. It is SAE S Class certified, so it is going to give you a smooth ride and fit pretty well in your wheel well. It does have a diamond pattern, which is going to give you really good traction for stopping and acceleration.One thing I really do like about these tire chains is it does have a built in tensioner, which a lot of the times you're supposed to get these rubber tensioners that aren't attached to your chains, and I know I would probably lose them. Definitely it being completely attached to the chains is going to be a plus for me, just so you don't lose them. Also, this does have a speed rating of 30 miles an hour so we do suggest not going over that speed.It also comes with a pretty nice carrying case.
It's going to last a little bit longer than those canvas bags, those usually rip over time. This one, it's made of sturdier construction and has a zipper. You're going to keep your chains neat and organized in this case and you're not going to lose them. If you have an all wheel drive or four wheel drive application, all you really have to do is buy two sets. It does come in a pair of two and it's going to be the same exact installation process on both sides.
Let's just go ahead and get to it.The first thing we're going to want to do is lay out our chains and make sure there's no kinks in our links. If that's all looking good we can go ahead and fish this behind our tire. Once we have them back there we can put our hands in our wheel wells, grab both ends, and connect them. While we're back here, we're going to grab these chains and drape them over. We do want to make sure that this straight line here is going to be in the middle of our tire tread.
Once we have that set we can go ahead and take our green hook here to try to get it clipped on this yellow excess of chain.Once we get that and everything's nice and even, one thing I do want to note, you guys can see back in here, there's two different ends. We have the open section with these two pieces of metal. We want that facing away from our tire because we want to have that smooth part up against our rubber just so we don't damage our tires when in use.If all that checks out, you get this green hook connected, and then we can take our tensioning device which is actually built in, which is definitely a plus for me because I misplace stuff all the time, we're going to place it like so and give it a good tug and make sure it's nice and tight. Once we get that, we're going to go ahead and put them through these red loops. Once we do that, we'll come over here and connect them to the yellow part of our chain.Once we have all that set up, we want to make sure and see if it's tight, and if it is, we do recommend rolling over it a couple more times and then coming back out and make sure that tension stays as it is. If it is, we're ready to hit the road.Well everyone, thanks for tuning in and taking a look at our Titan Chain Alloy Snow Tire Chains.

Info for this part was:
At etrailer.com we provide the best information available about the products we sell. We take the quality of our information seriously so that you can get the right part the first time. Let us know if anything is missing or if you have any questions.


Thank you! Your comment has been submitted successfully. You should be able to view your question/comment here within a few days.
Error submitting comment. Please try again momentarily.