
255/70-22.5
255/70-22.5
255/70-22.5
255/70-22.5
To see if this custom-fit item will work for you please tell us what vehicle you'll use it with.


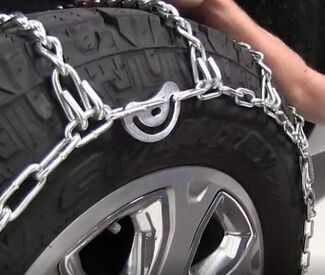
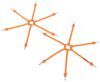
These standard, twist link chains are great for driving in deep snow. The cam-style side chains ensure quick adjustment and a snug fit. Their low-carbon steel construction makes them durable.
Features:
Specs:
Note: To determine whether you can use snow chains on your vehicle, or if chains might affect your ABS/ESP functionality, consult your owner's manual.
These chains are great for giving you extra traction in deep snow. But if you're more likely to see seriously icy conditions, you may want a chain with square or V-bar links that can really bite into the ice for more traction.
If you know your tire size, you may think you won't need to test fit your new snow chains. But there are a lot of variables that can affect whether chains will fit your specific tires, including your tire type, the amount of air pressure in the tire, the amount of tread wear, and the tire manufacturer.
We recommend that you order chains as early in the season as possible to give yourself plenty of time to test fit the chains and reorder if needed. This way, you won't be stuck out in the cold later with snow chains that don't fit.
You can test fit these chains in your garage or driveway, but you'll want to wait until there's snow on the ground to actually drive with them. Likewise, if you're out in the snow and come across bare pavement, you'll want to pull over and remove the chains. These can cause damage to the bare pavement, your garage floor, or your vehicle if they break from the wear of riding on a harsh surface.
Installing tire chains is easy.
1. Lay out the chains on the ground to make sure there are no twists or kinks.
2. Drape the chain over your tires, making sure that the prongs attaching the cross chains to the side chains face away from your sidewalls. Drive forward about half a tire rotation.
3. On the back of the tire, pull the chain tight and hook the ends together. Repeat this on the front ofthe tire, then clamp the lever to fasten extra chain links and keep them from flapping as you drive.
4. Insert the included tool into the cam and twist to tighten the sidewall chain. Twist as many cams as it takes to get a tight fit.
5. Drive forward 2-3 vehicle lengths before checking the chains tension. Tighten any loose cams.
If needed, rubber adjusters (sold separately) can help you get a tight fit. Make sure the hooks on the adjusters face away from your tire so your wheels don't get scratched.
Quick Tips:
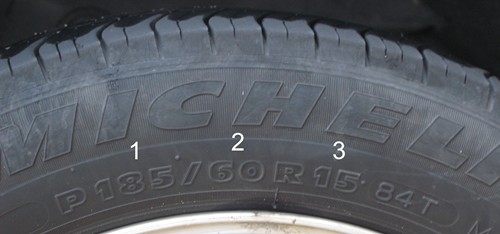
To choose the right snow chain, you must match your tire size. Those measurements can be found on the side of your tire.
185/60-15
These chains fit the following tire sizes:
Videos are provided as a guide only. Refer to manufacturer installation instructions and specs for complete information.
Today we're going to be taking a look at the Glacier Twisted Length Snow Tire Chain with cam tensioners. These are available in a wide variety of sizes to fit many different applications. Designed for highway use and not intended for off road applications, our tire chains do have a 30 mile an hour speed rating. As you can see, we've got a twisted length design. That gives us a raised edge on two points of our length to help get good traction for when we're taking off and stopping. They've constructed it using a low carbon steel, so we're not going to have to worry about a ton of corrosion. These chains have been designed for highway use.
They've got a rounded edge, it kind of smooths out our ride going down the road. Also, these chains are great for use on the rear axle or the front axle of front wheel drive and rear wheel drive vehicles. They've designed it in a ladder style. This is going to help us with taking off and stopping in a straight line so that this chain is going to go all the way across our tire. Now that we've gone over the features, let's show you how to get this installed. As you can see, we've spread it out here to check to make sure we have all the twists out and things like that, make sure we don't have any kinks.
Then we'll grab the side away from our tensioners. We just want to work this up and over our tire. We'll set this so that our front ladder rung or the first cross chain will sit there in front of the vehicle. Now it's time to roll it forward and allow those lengths to go underneath our wheel there. As you can see, we've got it up to about our third or fourth spot here. We'll now take the tag end, we're going to connect it on one of the six lengths there.
Let's do the fourth one, what I like to do is let those hang down so we're getting a direct connect onto our length. As you can see, we do have three extras hanging over there on the back side. We'll bring it around to the front. We've got a plus or a minus of one, so we have the option of using the third the fourth or the fifth length. I think the fourth is going to serve our purpose here. Bring that through, cam that over and there's a spare length that's hanging out here.
That's just going to go over and hold that into place for us. It's now time to start tightening our tensioners. We'll use our tensioning tools, place it in and rotate them around. As you can see, that's going to draw in some of the slack we've got and get each of our lengths of chains nice and tight. Now that we've got all of our cams tight, you'll see our chain's tightened up. We still have three excess lengths hanging off of each side of our chain here. One option would be to try to tuck that in behind our chain, to where it's not going to be flipping around. The other option would just be to cut it right off there, remove it completely. That way you won't have to worry about it slipping out as you're heading down the road. As with any manually adjusted chain, we do recommend the use of a chain tensioner. The one I've got here today is a really neat one from Glacier, the part number on it is PW105. It's got six lengths on it, as you can see, you're just going to connect those kind of evenly around our tire. That one's not so even. Kind of connect those evenly around, that's going to give us that extra little bit of force that we need to really hold our chains in place. Now that we've seen how the chain installs and how it's going to fit onto our vehicle, let's take a look and see how it performs with some footage we have of it in action. That will complete today's look at the Glacier Twist Length Snow Tire Chains with cam tighteners. .

Info for this part was:
At etrailer.com we provide the best information available about the products we sell. We take the quality of our information seriously so that you can get the right part the first time. Let us know if anything is missing or if you have any questions.


Thank you! Your comment has been submitted successfully. You should be able to view your question/comment here within a few days.
Error submitting comment. Please try again momentarily.