
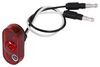
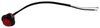
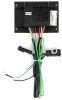
Curt T-Connector Vehicle Wiring Harness with 4-Pole Flat Trailer Connector


To see if this custom-fit item will work for you please tell us what vehicle you'll use it with.
Thank you! Your comment has been submitted successfully. You should be able to view your question/comment here within a few days.
Error submitting comment. Please try again momentarily.


Quickly and easily install a 4-way trailer connector on your vehicle with this custom harness. T-connector plugs directly into existing wiring. Powered converter reduces strain on wiring system and is made using SMT to ensure superior performance.
Features:
Specs:
Installation
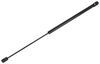
This custom-fit T-connector plugs into your vehicle's wiring harness, which is located in your rear cargo area. You will have to remove the rear scuff panel and the driver's side interior trim panel to access this harness. Once you've plugged in the T-connector, run the hot lead up to your car battery. Connect the lead to the included fuse holder, and then connect the fuse holder to the positive terminal on your battery.
Once installation is complete, the 4-way connector will be stowed in an out-of-the-way location within your cargo area.
It is recommended that you use a small amount of grease on all electrical connections - the plugs on your automobile and the 4-pole connector itself - to help prevent corrosion.
A tail light converter is built into this T-connector. This converter is a circuit-protected, battery-powered unit that bypasses the electrical routes that are used by a basic wiring harness. As a result, there is virtually no draw on your tail light circuits.
Because most trailers run on a two-wire system - wherein the brake and turn signals are carried on one wire - the separate brake and turn signals from your vehicle's three-wire system need to be combined so they are compatible with the wiring system of the trailer. This converter combines the brake and turn signal functions of your automobile so that they run on one wire to properly activate your trailer's tail lights. Note: This will not affect how the tail lights on your vehicle operate.
Curt builds each tail light converter using surface-mount technology (SMT). This method of construction involves soldering electronic components directly to the surface of a printed circuit board. SMT eliminates the need for leads, which are used in older through-hole technology. The result is a circuit board that is smaller yet provides more routing area and that offers superior performance, reliability and durability.
Circuit boards constructed using SMT have been shown to perform better under rough conditions with excessive vibration than those made using the through-hole method. And where would vibration be more likely to occur than in towing applications? Curt converters also produce less heat, leading to increased durability and longer life. In addition, lower levels of resistance ensure better performance, especially for parts that operate at higher frequencies.
Each Curt circuit board is made using high-quality components that are pieced together in the most technologically savvy fashion, leading to greater predictability and reliability in functioning.

California residents: click here
Videos are provided as a guide only. Refer to manufacturer installation instructions and specs for complete information.
Hello, neighbors, it's Brad here at etrailer, and today, we're taking a look at installing the Curt four pole trailer wiring harness on a 2016 Buick Encore. Adding four pole wiring to your vehicle is gonna allow you to tow a trailer or have accessories. They're gonna mimic your running lights, your turn signals and brake lights, keeping you safe and legal while towing. And when not using your four pole, you can simply just tuck it in this storage compartment, wherever you see a mess, find a good spot for it. This is a good spot over here. It doesn't really matter.
The main thing is, this is gonna stay protected until we're ready to use it. There's also a dust cap you can throw on there, just to kind of keep this from any buildup that might occur. Now when you are ready to use it, pretty easy. We have weather stripping along here that gives us enough give to pass our wires through, and that way, we can just simply drape this out. Make sure this is flat and away from the latch, and you can go ahead and close this down, hook up to your trailer, and get ready to go.
This is module protected, meaning if you have faulty wiring on your accessory or trailer, if it does have back feed, it's gonna stop at the module, and protect your factory lighting. And this actually plugs into your factory plug, so there's no cutting or splicing on that end. And really, the only cutting and splicing required is to run a power wire up to the battery to get your 12 volt power. Now you do have to remove a few interior panels, but I found a pretty quick, easy way to do this without getting too far into it. And I did have to drill a hole to pass my power wire through.
There's really no grommets to get that up to the battery. You can run it through the interior. It's gonna be a little bit more tedious, and honestly, you can definitely get it on the outside by just drilling that hole. So I'll walk you through all the steps, and that way, you can get your four pole wiring installed. At the beginner installation, we're gonna go ahead and try to gain access to where our taillight is.
We're gonna remove this in order to pass our power wire to our battery. I've looked through this vehicle, and there's not really a whole lot of easy ways to pass that power wire outside of the vehicle to get it to the battery. Your other option is routing inside the car, which is gonna require a decent amount of pulling up of panels and routing that wire. So I'm gonna show you the way that I found to do it. On our driver's side, we'll start by taking off this little side panel, so we can gain access to this plate. Now these little plastic clips here have a screw behind them, so you're gonna wanna use a trim tool or a flathead screwdriver to kind of get kind of back here, and pry on this in order to pop it out. You might even be able to get a gap up top, so once you kinda get some leverage underneath it, and you should be able to pop that off. That one just kind of flew off. So be careful there. We'll do the same over here, and we'll go ahead with our Phillips head screwdriver and get these removed. Now with that, we should be able to just pop this. There's two clips here, as well as one's along the bottom. So pop those out. This should slide up, and we can set this aside. Now we can gain access to this panel. We'll just use a flathead screwdriver. Again, there's a nice little wedge here that you can kind of just pry on, and then just kind of work around the edges until we get this removed. And you're gonna want to kind of pull it from, I'll show you the tabs since we have this out. This one kind of wedges in the side. And then you have these clips here. So if you pry on this, you should be able to kind of just pop it out, but there's kind of a reference as to where those clips are. And behind the taillight, there's gonna be four nuts that we're gonna remove, as well as a screw that's gonna be on the front. But while we're in this panel, there's gonna be three of them that you'll be able to see pretty easily. The fourth one is kinda tucked down, and there's a stud that hangs out, allowing you to easily get that nut back on. And to get these off, we'll be using an eight millimeter socket to go ahead and get those removed. Now they are tiny, so hold onto 'em. I suggest knocking them loose with the ratchet, and trying to get them with your fingers as best as you can. That way you're not dropping them. And that last one, you can kind of see this stud hanging out, so you will need a deep well eight to get to that. Now there's also gonna be this plastic cover here. We're gonna pry this up. It's got notches on either side, so you just kind of put some leverage behind that, and that's gonna give us access to our Phillips screw there. So we'll go ahead and get that taken out. Now getting your taillight to separate, sometimes it's gonna kinda have build up over time, and there is a seal that's a watertight seal that kind of holds it in. So what you can do is push on the studs where we've removed those eight millimeter bolts, and that's gonna kind of help push it along. You're kind of giving it pressure along the taillight too, just kind of wiggle it back and forth. And we should be able to get this to pop out. And this is where we're gonna be routing our power wire. Again, there's just no easy way to, normally there's a grommet or something along those lines to make it easy, but we're gonna be routing it through here. I'm gonna go ahead and disconnect our taillight, so it's not hanging. Plus, we're gonna be plugging into that here shortly. So you're gonna wanna kind of peel back on this gray clip. If you need to, you can put a flathead and just kind of pry that back. That's the lock. And then push in the center. And that should unplug pretty easily. Now I'm just gonna find a spot where I know there's no wiring behind there. And just drilling this out is gonna allow us to, again, pass this through and still maintain that seal. So I'm just gonna go ahead, right about here, and drill through our metal. Now go ahead, and you can clean off any of those burrs that might be left. And I'm just gonna put a little bit of clear coat here, just because it's gonna be raw metal. We don't want this to turn to rust long term. So we'll go ahead, spray that down. So what I'll go ahead and do is I'm gonna tuck this bundle of wire in between the fascia and the metal here. That's gonna drop down and allow us to run this to the battery. But we'll leave about a foot and a half to pass in here, maybe two foot, just to make it easier to attach to our module. Now we are gonna come back later, and once we have everything attached, we'll go ahead and silicone this up just to kind of seal that. But for now we have our length of wire ran up so it'll make it easier for our connection. We'll go ahead and strip back this end so we can get our power connection made. And you're gonna grab the module, and this black wire is already pre-stripped, so you can take the butt connector that's included, and we'll just crimp these down. Now with any butt connector, once you crimp it down, you wanna give it a quick tug just to make sure that it's got a really good connection. It's not gonna come loose over time. Now with that, we have that attached. That's gonna allow our module to live here. Now we do need to make sure that we're able to pass our wire over to our passenger side, and we're gonna be doing that on our scuff panel. I think I found a way that we were able to just pass this through without having to pull any of this plastic off. So it should make it a little easier. So you'll see these little tie down hooks, or your cargo hooks. You're gonna go ahead and remove those. You're gonna need a 10 millimeter. And scuff panels generally are gonna have clips, just like the rest of our interior panels. So just kind of pry up on each side, and then work your way to the middle, and this should pop off like that. So let's set this aside for now. Now once we have that popped out, you're gonna see there's a pocket here behind the styrofoam, and this is gonna allow us to get our wires passed through, and we'll be able to kind of tuck them under. So I'll go ahead and get my passenger side, as well as our four pole wiring. I'm gonna have that live in here, so we'll get those routed over. I'm just gonna pull my excess four pole and my green wire, and that's gonna allow this module to kinda live in this spot here. But we'll go ahead and get this routed over to our passenger side. And we are gonna take some panels off to plug this into our taillight. On the passenger's side, it's gonna be pretty simple, just pull this back. And then we have a panel very similar to the driver's side. So we'll just pry this back. And now we have access to our taillight plug. So just as we did on the driver's side, you're gonna peel back that gray plastic clip, and get this separated. We're then gonna pass our green wire through a very similar gap that we had on the driver's side, and then route it up here to where we can plug this in. And your scuff panel is gonna probably hide all this wiring. I just went ahead and tucked it kind of inside this dusted area, just to kind of give it a nice cleaner look. And then we'll pass this up, and pretty simple. The plug obviously matches the OEM one, so we're just gonna go ahead and plug it into the other one, and this will go into the taillight. So pass this up and make your connection. Now if you want to, you can zip tie up these wires, so connector's not bouncing around. But other than that, on this side, we can go ahead and get those panels put back. Our four pole wiring, I'm gonna go ahead, this can kind of just live here by the spare tire for now, and that's gonna allow us to drape this out of the hatch whenever we need to use it, but keep it protected when not in use. So we can go ahead and get our scuff panel put back in. So just kind of pop it back from the middle, working your way out. And then you may have to tuck the weather stripping back in place too. We're gonna go ahead and attach our ground wire on the driver's side here. You can see the ring terminal is attached. It does have a flat side. You're gonna want that against metal. Now there's a bunch of studs here that you can use as a factory ground. You are gonna need to pick up a nut to actually thread that on there. Your other option is included in the kit is a self-tapping screw. So find a spot where there's no wiring. Any of this metal should be fine. I do recommend kind of scuffing that area down to metal. That way, it has a good contact. But since the stud's here, I'm gonna make that work pretty easily by just kind of sliding this on there. Again, you'll have to pick up a nut to do this, but this is a great way to not have to drill, and it's gonna make for a good ground. So just make sure you tighten it down. You don't have to crank it, but you wanna make sure that ring terminal's not gonna spin around on you. So you can go ahead with the socket, and get that tightened down. Now we need to mount our module up, so it's not able to kind of just flop around while driving. And there is included double-sided adhesive here. So we'll just go ahead and place that on there. And there's a nice flat spot that's gonna allow us to stick this on there. So just kinda, I'm gonna tuck it under the wire, and I'm actually probably gonna zip tie this in place as well. But again, this is just gonna kind of hold this in place for us. So at this point, since we have our module mounted, that power wire that we attach with the butt connector, you can go ahead and pull any extra slack out, and feed it through the hole that we drilled, just to give us a little bit of extra wire to run with up to the battery. So at this point, we'll grab our taillight plug, and we'll just snap this in place. And this is going to plug into our taillight. So I'll go ahead and zip tie up my wires, make sure you have enough to plug into the taillight. And then from there, we're just gonna get our taillight put back in place. But before we get our taillight put back in, I mentioned putting silicone in this hole, and that's what I'm gonna do here. So just an RTV silicone here just to fill that up and make it a water tight seal. So go ahead around that hole, and just make sure that it's coated up, and allow that to cure. Once you get your taillight plugged into our new harness, I'll go ahead and get the eight millimeter bolts put back in. And then we're gonna head underneath the vehicle to route our power cable up to the battery. So once we routed our power wire, I just kind of followed along some safe ways to get this up to the battery. The main thing is, we're avoiding exhaust, or any moving parts like suspension. So I zip tied it up to our hitch that we had, and just kind of followed these hard brake lines. Now don't zip it to the brake lines on these brackets. You can fit a zip tie through the top or bottom, and that's gonna secure that up. And then I just kind of followed that along. Now at this point, I kind of made a quick detour over to the side, and this is gonna keep it on the same side as the battery. So from here I routed it behind the side skirt pillars, where it kind of attaches. If you need to, you can pry those out. But I was able to just kind of fish them through. And that's gonna hold this wire in place for the length along this side of the car. Now from here, I cut over, zip tied, and then the rest of my wire is taped up to an airline tube. And this is gonna help me pull up our power wire to the battery. Now if you don't have an airline tube, you can use a bunch of different things. You can use a weed eater string, a coat hanger, anything that's gonna allow you to pass that down, tape it up, and pull the wire up. And now up on this, there is the steering column, as well as your axles and sway bar. So you wanna make sure that it's nice and taut. It's not gonna get caught up around any of those, so just be careful and double check when you pull it up. So we'll just pull up our extra power wire. Now obviously we have a little bit of extra here, so we're gonna go ahead and cut off our excess as we're going to be attaching a fuse holder. I'll go ahead and strip back a little portion of this wire, and then we'll grab our fuse holder and a butt connector. So grab your fuse holder, make sure your fuse is not in it. We don't want power going through this as we make our connections. And we'll just butt connect these together. And on the other end of our fuse holder, we're gonna take our ring terminal that was included in the kit. We'll get this crimped down, and this is gonna attach to the positive terminal. So you can pop back your cap here. And we're gonna go ahead and use this 13 millimeter stud here. So with our socket, we'll go ahead and get that nut taken off. So we'll put our ring terminal in place, and get our 13 millimeter nut put back and tightened down. Now we'll take our included fuse, and put this in our fuse holder. Cap this up, and I'm gonna go ahead and just zip tie up the excess wires, kind of give it a cleaner look in here. Now that we're hooked up to power, we can go ahead and test our four pole. We wanna make sure that it's working before we just hit the road. Now I'm using a four pole tester. You can get these here at etrailer. Another option is to hook up to your trailer, or whatever that has the four pole, and have someone run through the light sequence, so you can see it on the back end. And so we'll start by running our running lights, and then next, we'll do our left turn signal, our right turn signal, and then finally our brakes. And with everything working properly, we're ready to start using our four pole. And that was a look in installation of the Curt four pole trailer wiring harness on a 2016 Buick Encore.

This product is extremely well designed and takes all the guesswork out of properly installing. The video that was made available was also a great resource.
This receiver is great! It was easy to install and worked well (wiring and ball mount inclusive). I bought the Encore instead of a truck hoping I could still use it for chores and have a better riding vehicle and thanks to e.trailer and Curt it works for me. Than you!
Real good customer service and fast shipping. Everything fit like a glove and was easy to install. Would recommend.

Todd

2/21/2017
Its been a year and Ive had no issues. Everything works great.
Excellent instructions accurate fit easy installation
Hardest part was running the power wire from the battery through the firewall wire harness and under the drivers side door sill plastic to the back of the car. Rest of wiring harness was plug and play.
Well done
The service was great. I go into a fix where I needed the product overnight. It was a little expensive, but the service folks made it happen.
The product was basically as advertised. Easy enough to install once you get it figured out.
Most everything is done through the rear hatch. Remove all the flooring. Then remove both side panels to access the back of both tail lights. The toughest parts were as follows. 1. Disengaging the connector from the tail light. Take a flat screwdriver and insert it on the taillight side of the connector, and pull the two apart. It almost takes two people. 2. The other was routing the battery lead to the front of the vehicle. I routed it forward to the driver side rocker, then through the rocker, then across the front wheel shroud, then briefly through the frame rail, and then up to the battery. I used a wire feed to pull the wire through the length of the rocker.

Install was fairly easy and straightforward. Instructions and video were very helpful. Hardest part was getting the wire through the firewall to the battery but everything works great, no issues after a year of install.
I was very happy with this purchase but the dealer that installed it said the left & right signals were wrong. When they turned on the left signal in the vehicle the right came on and same for the left the right came on, the wires were reversed. They also said they were disappointed they has to run full length to get to the battery for the hot wire. Well it works GREAT now. Thanks GREAT product.
I just used it for the first time this morning after having some one install it, I am not very handy. pretty easy install according to them. Everything worked as it should and it towed the small trailer I needed it to perfectly.
Easy to follow instructions and simple to install. Hardest part was removing all the panels.
Installation was a bit of a challenge, but I got it done. Everything fit, everything works fine.
Good shipping & packing
Still need to install. Arrived promptly, thanks
Product arrived on time and fit the way it was supposed to
Quick delivery. Fits perfectly and easy to install.
Easy quick transaction
Easier impossible
Do you have a question about this Custom Fit Vehicle Wiring?
Info for this part was:
At etrailer we provide the best information available about the products we sell. We take the quality of our information seriously so that you can get the right part the first time. Let us know if anything is missing or if you have any questions.


Terry K.
9/19/2016
Great