


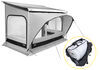
Roll out instant shade wherever you stop. The OutLand awning turns your vehicle into a basecamp with quick solo setup and rugged shelter that stands up to sun, wind, and rain. It's ready for overlanders and vanlifers chasing the next great view.
The OutLand will create a true basecamp in a few minutes. With 7' 6" of coverage stretching out from your roof, this awning turns a patch of grass into your own private lounge. Just find your spot, open it up, and you'll have shade whenever you want it.
No more flagging down a neighbor for help or wrestling with tangled poles. Hit the push-button releases and let the arms swing free. The telescoping legs drop smoothly, and Quick Lock adjusters let you set your height in just a few clicks. Even if you're camping solo, you'll have your setup finished before your morning coffee is done brewing.
If the wind kicks up or the rain rolls in, you want a canopy that holds its shape. The exclusive pump buckle tensioning system keeps the fabric tight. Plus, the rugged material blocks sun and sheds water, so you can stay outside and enjoy the day.
When it's time to pack up, the telescoping legs tuck right back into the lead rail. The awning rolls into its slim, protective case, so there are no loose parts to rattle and nothing bulky taking up space. And the slim housing sits low against your roofline with a sleek look, ready for when adventure calls again.
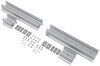
Adventures change and so do vehicles. The included adapter kit connects straight to Thule roof racks and most aftermarket crossbars. There's still space for your rooftop tent or cargo box, and you can add accessories or side panels (sold separately) whenever you want to expand your shade.

California residents: click here
Videos are provided as a guide only. Refer to manufacturer installation instructions and specs for complete information.
Hi, Matt with etrailer. If you like the shade, but you don't wanna get too far away from your vehicle, and you wanna look good while you're doing it, then the Thule OutLand awning is gonna be a great option for you. So let's check it out. So I think this is gonna be for anyone who's doing a lot of tailgating, because you wanna make sure you're gonna be close by. You wanna make sure everyone's gonna stay nice and cool, especially if you had the food by your vehicle. It's gonna make sure no one gets sunburned, and everyone's gonna enjoy their time.
Or if you're someone who does a lot of camping, and you have most of your gear inside of your vehicle, you can kind of establish a home base where you can stay nice and cool. And what's really nice about all of this is you're gonna look good while you do it, 'cause we're gonna have this very nice canvas design tour awning. This is a little bit better overlooked than some of the other ones I've seen. And what's cool about that too is when you roll this back up, it's gonna have this solid metal casing, which, compared with some of those more flimsy canvas bags, in my opinion, looks better. So what we're gonna be focusing on today is what stands out to me about this, and how much shade we're actually getting in its size.
Then we'll go over the components and the setup process for when you wanna use this. And then I'll give you my final thoughts, and then show you how to install it on your vehicle. With this awning we have today, this is gonna be 8' by 7'6". So that kinda gives you an idea of how big it is. But I got a couple chairs and a cooler here to kind of represent that a little bit better.
So it's a little bit later in the day, and this is how much room we have here. Now if it was more midday, I could probably stand right underneath here. And this, you're probably gonna be able to get four chairs underneath here, even five people if you're all standing up. So it does give you a decent amount of space. Now if this isn't enough for you, we are gonna have another size above this on our website if you need a little bit more room.
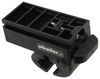
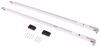
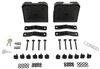
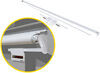
It's gonna be made up of three parts. We're gonna have the legs, the awning itself, and the brackets that mount it to your roof. So let's start with the legs. These legs are gonna be telescoping, so they go up pretty high. If you don't want it that high, you can simply lower this down some. And what's neat about this is you can put them at different heights. So if I want that side higher, in case it's raining outside and I want that rain to flow off from one side, and not build up in the center, and stretch this out over time, I have that option. We're also gonna have another point on this arm here, and you can actually tighten this one up and make sure you have a really snug fit so it looks good on top of it here. And with this awning, you can kind of see the design of it, it's gonna have these stripes that go down. It's gonna make this kind of greenish tint to it. I think this looks pretty good, and it's gonna be relatively thick. That's great, because you're gonna prevent sun from seeping through. Now something I did notice when I was rolling it up earlier is it gets a little toasty. So when you're rolling it up, try not to keep your hands on top of it, 'cause the top surfaces is gonna be hot, it might burn your hands a bit. So when you are rolling up, kind of do it from the bottom. And moving to the very far end, we're gonna have the canister itself and the brackets that hold it into place. Now this canister is gonna be pretty sturdy. It's gonna be made from this aluminum, and it's gonna have this black coating on the very top of it. And typically, this usually gets kinda hot. Right now, It can keep my hands on it. It feels warm, but it's holding that temperature fairly well. Now the way it's gonna mount to your roof is via a roof rack. So make sure you have one of those. And it works best with Thule roof racks, because it's gonna be the same manufacturer. But depending on what type of bar you have, whether it be a aero bar, or a different type of bar, or a square bar, with most square bars, you're gonna have to clamp this around here. And it does come with the hardware for that. Now if you have something with a T-channel up top, most cases it'll work. You can actually check the owner's manual to make sure if it's gonna be compatible with your setup or not. You know we do have this cap here, and it's gonna have a metal lock core here that's gonna give you more security. And the one thing I will say about this, this can be a little awkward to reach and get up here. And then when you do try to take it off, or put it back on, I find that I have to put a decent amount of pressure to actually get this to lock in place. But to give you a better understanding on how all these features are gonna work together, I can set it up now for you. First thing we wanna do is press these buttons on either side. That's gonna lift it up, and I'm gonna get this out of my way now. We're gonna just open up these arms, just by pulling on them. Sometimes you might have to wiggle a bit. And I'm gonna leave my arms kind of slanted in a bit, and you'll see why in a second. Here is the second one. Here we go. Gonna let it roll down. I'll support it with my thumbs, but also these arms help support it too. And what we can do at this point is extend these out the rest of the way and continue to let it down. At some point, we're gonna get to the very end of it. We're gonna have these legs I'm just gonna pull on, and these come out. Let that down for both of them. And just for now, I'm just gonna keep them in the lowest position. The way we can lock this into place is we're gonna have this lever here, and that we're just gonna push all the way up. You might have a little bit of resistance at first. There we have it. Same thing for the other side. Now we're gonna come over here, we're gonna take our arm, we're gonna have a hole right here in the side. I'm just gonna line this up. If this isn't lining up, like it is right now, what I'm gonna do is just retract this arm a bit by pressing on this tab right there. You can kind of see it. Once I press on this, it should retract a little bit. I don't need it to retract a lot. And now we'll just push against it. So we have a little bit of tension on there. We'll do that on the other side too. Now this is looking pretty all right at the moment, but it's kind of hard to get underneath it. So we're gonna raise it up. So what we're gonna do, is I'll typically just put my foot down on the base of it and undo this lever over here, and push it up. I'm just gonna put it in the highest position now. Right now I got a little bit of tension on it, 'cause it's a little bit tight. So I'm just gonna stop at this point. Leave it here and lift up the other side. There we go. Now we're just gonna situate the legs unto a spot they feel good at. And you'll notice that one of our sides is hanging down a little bit low. So let's tighten that up. We're just gonna reach over here. We're gonna have that lever that we used to retract it. This time we're gonna pull away, and that's gonna make it a little bit tighter. We'll just keep going till have a pretty good fit up here. Once you like the way your awning feels, then we'll just come by with these little stakes, push those into the ground. And you're gonna have two stakes per post. And once you get everything staked down, you can sit up your chairs, take a seat, enjoy that new shade. So in my opinion, I think this is gonna be a solid choice, 'cause, again, it's gonna look really nice, not just when you're using it, and you're all set up at the campsite, but also when you're driving around, because it's gonna be in one neat package, compared to some other ones that have the canvas bags, which in my opinion don't look as nice. Now it's also gonna be really sturdy, but that sturdiness is gonna lead to it being a little bit heavier. So you gotta be mindful, if you're putting anything else in your roof, so you don't exceed its capacity. And the last thing I do need to note about it, is sometimes it can be a little bit tricky, to work width when you're setting up or tearing down, because we do have a lot of buttons and levers. And if you're doing this by yourself, especially when you're tearing down, trying to bounce, all that can feel like you're juggling. Even if you have your kid to help you out, just hold something in place. It is gonna go a long way. Care to see what the installation of this one looks like, just stay tuned, we'll walk you through it. So the first part we're gonna start off with is gonna be the bracket. Now you already have this assembled before you actually get this on top of your roof. And it's also gonna depend on what type of crossbar you have. If you have a square bar, then you're gonna wanna use more of the clamp-on style. But if you have anything with the T-channel, you'll be able to go with this style, which is gonna be much quicker in my opinion. So what we're gonna do here is just line up these blocks, and push these into this channel here. Just do that, and then you can do that on the other side. You're gonna just tighten them down a little bit. It should only require a few turns. Now right now I'm using a 10-millimeter socket and wrench, but your kit will come with a tiny wrench. I'll show you what that looks like now. And I think this is fine. It can be a little bit awkward to use, but this will actually let you know when you make a full turn up. But I'd recommend, if you can, use the socket and wrench. And now we're gonna grab our awning, and make sure the backside is facing up with that channel. And we're gonna grab a square washer that's gonna go with our carriage bolt. We're just gonna push this right into place, so like that. We'll put it in another one just like this. And then now we're gonna grab a friend to help us put this on our roof. And there's a few things we wanna make sure of when we're putting it up there. We wanna make sure it's right-side up. So you should be able to read Thule on here, and that our bolts are roughly lined up with their bracket. Now when we get this up there, we're not gonna line up the bolt, put the bolts in first. We actually just gotta put it on these lips here at the very top. So we can do that now just by lifting it up and holding it at an angle, and dropping it down. Now you might need to reposition those bolts. But this whole process of putting on that ledge first is gonna help make this a little bit smoother. With that done, we're then gonna grab a flat washer. Then we're gonna grab a nut, and secure that down. We're just gonna be loosely installing this at the moment. And there we have it. There's two things we wanna think about, and that's how it's sitting on the end of our crossbars. If it's really not sitting on too much, we want more support. So we'll have to push this in. So it can kind of sit in the halfway point of this awning. I'd recommend pushing it a little bit further in, kind of like what we have on the side here, where it's almost being completely supported by it. Once you've done that, because everything should still be loose, we can push this forward some, because I don't win this much sticking out, because we are gonna have a minimum recommendation on the backside of it. You can find that in your instructions, but that's gonna be a little bit over 13 inches for the max. But that's also gonna depend on what size awning you're using. So if you're using the size awning we're using right now, it's actually gonna be a little bit over 17. So I can check that real quick by going to the end of our crossbar, or this bracket, and measuring back here. Right now I'm at 18, so I'll probably push it in a little bit more to about the 16 marker. Now this part can be a little bit confusing or vague in the instructions. I think the biggest takeaway here is just to make sure that your tailgate or your lift gate is gonna clear, and we're not gonna have any contact back here. Now we can get down the tighten everything down. What I recommend first though, is this one that we just installed. This is a few turns on here. Then we'll come down to these two bottom bolts, and we'll fully tighten this down. Now you are gonna have the recommended specs in your instruction. So I'd recommend going by that. Now we'll move our way up to the very top one. And to secure that down, again, recommended what's in the instructions for how tight it is. And once this one's done, we'll move to the one right below it that we started with. We're gonna move over to putting our end caps up. So let's start off for the lock cores, you're gonna have this master key. It's gonna be one by itself. It's gonna retract some of these, allowing us to put this into the unlocked position. Kinda have to line it up perfectly, so it goes in right. I'll try spinning it around. There you go. With that done, you won't be able to lock it. You'll have to remove this key. And with this one, these other keys, we can lock it. It's a good idea just to make sure it will lock into place before it get up on our roof. There we go. We put it into place just by lining it up with the contours here. And then with it roughly in place, we can grab our keys and lock it up. We're good to go. But with everything tightened down, you're gonna be good to go. And of course, if you guys have any other questions, please let us know here at etrailer. And again, I'm Matt, and thanks for watching.
Info for this part was:
At etrailer we provide the best information available about the products we sell. We take the quality of our information seriously so that you can get the right part the first time. Let us know if anything is missing or if you have any questions.


Thank you! Your comment has been submitted successfully. You should be able to view your question/comment here within a few days.
Error submitting comment. Please try again momentarily.