


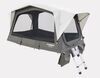
The Batwing 270 Freestanding Awning turns quick stops and long days outside into comfortable, usable space. With wraparound shade and a setup that adapts to changing weather, it helps you settle in instead of fighting sun, wind, or rain.
The Batwing 270 is designed around the idea that shade should give you space to actually use, not just a narrow strip to stand under. The wraparound design covers the driver's side and rear of your vehicle, creating room to cook, sit down, and relax without constantly chasing the sun. It works just as well for short stops as it does for long stays, giving you usable shade for lunch breaks or afternoons at camp. Because the canopy wraps around the vehicle, it fits naturally with how people park, letting you use the space along the doors and tailgate instead of worrying about perfect positioning.
The freestanding design makes it simple to open the awning for quick breaks and short stops in calm weather. When wind or rain moves in, the setup shifts the way you would expect it to. The built-in support poles give the canopy structure, and staking down the guy lines helps keep everything secure as conditions change. It's about managing weather realistically and having a setup that feels predictable and easier to control than loose tarps or pop-ups.
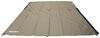
This awning is built with a heavy-duty polycotton canopy that's meant to stay out and be used, not babied. It handles long stretches of sun exposure and holds up when the rain shows up, making it a great fit for full days at camp or extended stops. The fabric feels substantial without being stiff, and the overall build is made for repeated setup and pack-down over time. When you're ready to hit the road, the awning packs back into its storage case to stay protected during travel and between trips.
If your needs grow beyond open shade, an optional wall kit (sold separately) is available to turn the awning into an enclosed shelter with added coverage, protection, and privacy. It's a simple way to adapt the setup for changing weather or camps where a little extra separation makes a difference.

California residents: click here
Videos are provided as a guide only. Refer to manufacturer installation instructions and specs for complete information.
Today, we're taking a look at the Rhino-Rack 270 Batwing Freestanding Awning. This is a huge awning with a lot of shade as well as a lot of features to it. The 270 Batwing design has been around for a while. I've seen it out in the wild and what always impresses me every single time is how quickly people set this up. And once we have it set up, you now have UV-resistant, heavy-duty polycotton, weather-resistant fabric protecting you from quick rainstorms as well as the sun, all in a matter of minutes. Use it with legs or without legs, as you can see from the rest of these arms.
Now, not everyone can use this awning because of its weight. So we're gonna focus in on if this is the right fit for you, your vehicle, and your adventures. So if you're curious, stick around. What is a 270 awning It is an awning that wraps around your vehicle. Now, the Rhino-Rack Batwing is available as a driver's side or passenger's side awnings.
So you have to pick which side of your vehicle do you want to start wrapping around. With this, you get a lot of shade and a lot of coverage, compared to your straight-out awnings. For those who want to create this entire campsite around their vehicle where you have spots for everything you may want to do, a 270 awning, like the Batwing, is the way to go. Awning attach to the roof, supported by six very heavy-duty struts. So these struts bring our awning out, have all that fabric out, and are creating all that shade.
So with that in mind, a lot of people start creating rooms, they have additional add-ons where they can create walls, and really start building out their campsite. Now, with this being freestanding, as you see here, no legs, but if it starts to get a little windy or maybe you want a little bit more structure, you can always bring these legs down and secure them to the ground. (leg snapping) Whether you're parked on turf, gravel, rocks, or dirt, this awning still works. Height of your awning, well, that's determined by the height of your vehicle. You do have a little bit adjustment, though.
You could put it in the lower position or the higher position on the brackets. I have it in the lower position because this is a tall vehicle and I am not. So being able to customize it for your own adventures is pretty nice. You can also customize the support, which we just talked about previously, and that, it can be done by the legs that start stored inside the struts. So if you find that you need a little bit more support, then you can always undo those straps holding those legs in, (Velcro crunching) (Velcro crunching) and then bring the legs down. You might notice that the freestanding awning does move a little bit as it freestands and it does taper down a bit because it's heavy. So when we talk about height, you can also make a little bit of adjustments to that height with the legs if you want it to angle a little bit upwards. With a quick twist, that leg is in place. You have plenty of guidelines with this awning. The guidelines have an S hook that you can tie up at the end in order to go around the straps of your awning. And then, you also have a tension adjuster on the other end. So you just put the adjuster on your guideline and then you hook the other end to a stake, stake down in the ground. So you just adjust by pulling that parallel and then this will then pull tight against your guideline. Wanna see one of my favorite campsite party tricks It's how quickly I can pack up and get out of there. (fingers snapping) So to do that, you start by stowing away the legs. Now, cut me a little slack. I already have all the guidelines packed up and I added some slack to the hooks. But the general process is still gonna be the same. With all your legs stowed away, you're gonna go over to the hooks in the front as well as the back. So let's start with the front. Getting up there and unhooking our awning, just like that. We can let this hang inside for a bit as I bring the rest of the awning towards the back. And let's go over to the back where we will see that there is yet another hook keeping that in place. Once you get that hook, that will be the last one. Then, we're going to a top view so you can see how those arms interact. Now, this is a little tricky on taller vehicles, but you want your front arms to go in first and to stow away. (awning rustling) Now, we do have the straps pinched behind there for now, but I'll fix that later. I do wanna show you how, with the front arms in place, you are then able to fold the back arms over it. There we go. I'm thinking strong thoughts. So from here, go ahead and grab your straps and that will hold those arms up tight against that cargo bag. The bottom part of the straps is underneath the awning fabric, so you do have to roll that fabric up. (awning rustling) Try to get it as flush and tight as you can while also supporting the awning strut arms. And then, the strap can be used to hold that more in place and also cinch down. (hand tapping) So do that for three straps. You saw how bunched up that was, but we're still able to close the zipper on our awning. (zipper zipping) (hand tapping) This is what it's gonna look like in the bag. We have this very thick material here. It is weatherproof, waterproof. As you can see, it goes off of the side of your vehicle so you have plenty of space on the rest of your bars for other items, except do consider that the Batwing 270 freestanding awning is heavy. So be mindful of your roof rack weight capacity when you are loading things up for your journey. Biggest roadblock that I found was finding the right vehicle that could carry this awning because of the limitations of the three crossbars or having a platform rack that was long enough so you didn't have too much overhang. So you can always give us a call here at etrailer. We'll help you through that process of looking at the custom fit roof racks for your vehicle and see if it is the right fit for you. Well, stick around and I'll show you how I got this installed on a truck. Going through the installation of your Batwing awning, the most important thing is making sure you have the proper roof rack system to be able to support this. What happens a lot is that you're gonna have to get a friend to help you hoist this onto your roof and you're gonna wanna leave it on there 'cause it's pretty heavy. So let's double check your roof rack first. You need to have at least three crossbars or a platform rack in order to carry your awning. We have three Vortex bars, but this will also work with your Rhino-Rack Sportz bars, your Reconn-Deck bars, or other brands' bars, as long as they have a channel in the middle. What we found to be the best experience for making sure that your heavy awning is supported is to have crossbars that are far enough apart. And Rhino-Rack recommends that the front and the rear crossbars are at least 47 1/4 inches apart. That way, more of the awning is supported, you have more support in the center too, and you don't have too much overhang. Now, me, I kind of struggled with looking in the parking lot for vehicles that would have the crossbar spacing to match that. So please double check your roof rack. If it's too short, you might not have enough support. These brackets go on your crossbars. And you have two options here. You can install this in the low position or you can install it in the high position. Since our truck is pretty tall, we're gonna do the low position, for sure. Now, depending on your crossbars, you have some different mounting plates here. For our Vortex bars, we're gonna be using these channel nuts. And then, if you had some Sportz bar or a Pioneer platform or a Reconn-Deck, you can use the really cool Zwifloc brackets instead. And then, you have these eye bolts, which will help keep down your brackets. And then, you also have all the other hardware to secure both the nuts as well as the awning. With the Vortex bars, we start by removing the end cap as well as removing the Vortex strips. We're then going to pop these two nuts through the channel. (nuts clinking) (nuts clinking) Then, put the end cap back on, (end cap snapping) just so that we have a sleek look there. And then, we're gonna attach our bracket in the low position. So line up with those two nuts that you just installed and then secure with your longer bolt. Use the included Torx key to tighten down all your bolts. On the opposite side of your roof rack, you're going to install two eye bolts. And you'll want this on the front and the second crossbar if you're using three crossbar set of bolts, like what we're doing today. So for the eye bolts, it's gonna consist of a plate, a washer, and then an eye bolt up top. That plate is gonna slide in, just like the hardware, for your brackets, and we're just going to loosely tighten that down. (plate clinking) Now, to get your awning set up for the bracket, you will have the side flaps that you're just gonna open up the hook and loop, and then you're going to slide your other plates in through. So you're gonna have six of these, two for each bracket. (plates swishing) (plates swishing) For this next step, I have Matt. And Matt's here to help out with getting the awning onto the roof. Now, you may need help yourself and a step ladder, or a way to get up there. but the focus here is getting the bolts in towards the bracket. You're gonna have to lift a bit higher, Matt. Thank you. And then, once the bolt lines up with one of the holes, oh, my goodness, there we go, then you can secure it with a nut. (nut clinking) And we're only finger tightening down these bolts because we also need to adjust the awning for where it best sits on the crossbars. You're gonna want to have no more than 20 inches from the bracket to the end of either side of the awning. So make your adjustments as needed before tightening down. Tighten down the nuts with a 13-millimeter ratcheting wrench. (wrench ratcheting) This is a heavy, freestanding awning, so it's very important that it's properly supported. So hopefully this video guided you through that process, seeing if this will work with your vehicle and how to make it work for your specific adventures and journeys. So if this video was helpful for you, I'd love to see how you use your Batwing 270 awning. Go on some big trips, big adventures, and maybe you'll inspire other people along the way with your cool setup. But today, this was a look at the Rhino-Rack BatWing 270 Freestanding Awning. My name's Evangeline and I hope you enjoyed the journey.
Do you have a question about this Car Awning?
Info for this part was:
At etrailer we provide the best information available about the products we sell. We take the quality of our information seriously so that you can get the right part the first time. Let us know if anything is missing or if you have any questions.


Thank you! Your comment has been submitted successfully. You should be able to view your question/comment here within a few days.
Error submitting comment. Please try again momentarily.