


To see if this custom-fit item will work for you please tell us what vehicle you'll use it with.
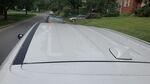
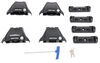
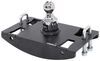
This custom fit kit lets you mount 4 Rhino-Rack 2500 legs to your vehicle with a naked roof. Clamps mount to legs with bolts. Includes 4 clamps and 4 pads.
Features:
Specs:

California residents: click here
Videos are provided as a guide only. Refer to manufacturer installation instructions and specs for complete information.
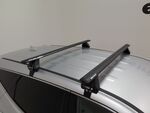
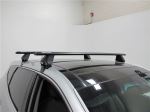
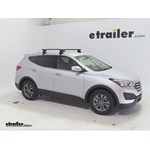
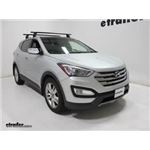
Speaker 1: Today on our 2018 Hyundai Santa Fe Sport, we're going to be test-fitting the Rhinorack Vortex Aero roof rack system, comprised of part numbers RRVA137B-2. These are the Vortex Aero crossbars, 54 inches long. These also come in silver as part number RRVA137S-2. We'll also be using part number RRRLKVA. These are the 2500 series legs for the Vortex Aero crossbars. Finally, part number DK360, and this is the custom fit kit for the Hyundai Santa Fe.The Rhinorack Vortex Aero roof rack system is great for carrying a wide variety of accessories on Hyundai Santa Fe, for freeing up space inside your vehicle.
These can carry anything from bike racks, to cargo baskets, to cargo boxes, to even ski and snowboard carriers. The bars do have an aerodynamic shape to them, and that coupled with the Vortex Aero strip as well as the strip that you put underneath, that's going to cut down the wind noise and drag while you drive, eliminating the need for any fairings that you might need for square or round bars. The end caps are lockable with this plastic tool, and once removed, you can see that you can use T-Track accessories with this by simply removing the strip to a point, cutting it to length, putting your T-Track accessory in place, and then replacing the strip itself.If you wanted to, you can replace this plastic piece at the end with a lock that is sold separately, and you can find this on etrailer.com. Our end caps are lockable, so these are secured to your roof once they're installed. A downside to that if you wanted to make these keyed alike with the accessories that you have, you would have to replace the lock that's already there with something else.
It's very easy to install. It just simply clamps into place with the screw up at the top and does come with the tools to do so.From the center of the roof to the top of our bar, that's going to be about four and a quarter inches tall. Also, the two bars combined have a carrying capacity of 165 pounds, but you always want to double-check with your vehicle's manual to make sure your roof can withstand those weights.Now that we've gone over some of the features of the roof rack system, let's go ahead and show you how we install it. We've already installed our front bar on to our vehicle. We have our rear bar partially assembled on our table, here.
In front, you'll see the 2500 series leg, the fit kit, the measuring strip for the bar, the two end caps for the bar, as well the keys to lock and unlock them, our included tightening tool, and the end cap, and end cap locking tool as well.Our first step is we're going to take our leg and install it on the other end here. First we'll flip. The bar upside down just makes it a little bit easier to install this. We'll take our leg, and this metal piece here on the top, that's going to slide into the track underneath, here, like so. For the measurement in between here, you'll find that in your instructions.
Then you'll take this strip, you'll cut it to length and put that in place and slide it up to the location and tighten it down. For demonstration purposes, we'll just measure it out because we don't want to cut this right now.We'll take our included tool, tighten the screw in the center here all the way until it's not going to move. Then, of course, you would cut your strip to length and put that in place as well. Next, we'll install our rubber footpad, making sure our number and the arrow are facing the proper direction. To do that, you just simply look in the instructions and it'll let you know. This just pushes into place, kind of a friction fit. Our final step is to install our clamp. We'll remove our screw here at the top, and we'll bring our clamp into place. We'll just loosely tighten this up because we just want to hold it in while we put this on our roof. Alright Finally, we can install our end cap here since we don't have to tighten anything else down, and secure that into place as well. Now we can set this on our roof.The reason why we installed our front bar first is you have to use that as a point of reference when you're measuring out your crossbar spread. So we assembled it just like you saw on the table, and then we measured back from the center of the door jamb to the center of the bar. Now, with our rear bar in place, we'll go from center to center there, and get it in it's proper position. We'll do this on both sides as well. We'll continue to tighten it down with our included tool, here, giving about five turns to each side until it's completely tightened down. With our tool here, you see it has a bend. Once that straightens out as you tighten it, that means it's torqued to its proper specification, like so.Our final step is to put our end caps into place and lock them in, and there you have it for the Rhinorack Vortex Aero roof rack system on our 2018 Hyundai Santa Fe Sport.


Do you have a question about this Accessories and Part?
Info for this part was:
At etrailer.com we provide the best information available about the products we sell. We take the quality of our information seriously so that you can get the right part the first time. Let us know if anything is missing or if you have any questions.


Thank you! Your comment has been submitted successfully. You should be able to view your question/comment here within a few days.
Error submitting comment. Please try again momentarily.