
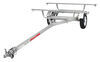
To see if this custom-fit item will work for you please tell us what vehicle you'll use it with.
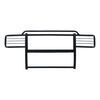
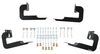
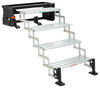
These robust, custom-fit running boards are made of 16-gauge steel with dimple-stamped top plates to provide maximum durability and safety. Low-profile design offers a rugged yet streamlined look. Hardware and mounting brackets included.
Features:
Specs:
California residents: click here
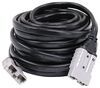
Videos are provided as a guide only. Refer to manufacturer installation instructions and specs for complete information.
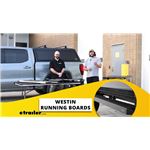
Hi, everyone. Aiden here with etrailer. Today we're gonna be taking a look at and later we'll be showing you how to install these Westin Outlaw running boards on our 2023 Toyota 4Runner. Now with this step, you're gonna get a 5-1/2 inch deep place to set your foot and that's gonna be really wide compared to most running boards out there. I know I mentioned earlier if you've got something like a roof platform or a roof rack, that it's gonna help you be able to reach it and this is going to be really great for that because of that wide step and because it runs the whole length of the vehicle, it gives us a nice place to step, say if we did have a full roof platform to reach something closer to the front of our vehicle and not have to open our door and dirty up the inside of our car. One of our videographers here, my good friend John, he has a 4Runner with a roof platform that we installed here at etrailer.
And a set of these boards would be great for him because with the taller vehicle it can be really difficult to load those accessories up there. And just bringing everything a little bit closer is a great way to make that process less of a headache. Now when you're getting in and outta your vehicle, like I mentioned before, it doesn't drop down that much lower than the actual threshold of your vehicle. So for me, I don't know that I would need the step per se, but it does make the whole process a little bit more comfortable by just reducing that distance you're gonna have to stretch your leg to get into your vehicle. If you've got someone like kids that have trouble getting into your 4Runner in the backseat, something like this would be really helpful because for the little ones it's going to just be tougher for them to get in on their own.
And as they start to grow up, you might not want to lift them up into their car seat every time. Now the top plate of that step is going to be stamped and have open holes that help give your boots and your shoes just a bit more traction when you are stepping up. And especially with that textured black powder coat, even in wet conditions, I imagine that these shouldn't feel too slippery, but still just be careful when you are stepping up in those bad weather conditions. And then the outer face of the step here is gonna be this round tube, two inch in diameter and I think it just helps round off the step and give it a nice complete look, especially as it tapers off towards the front and the rear. But overall, I really like these boards.
Aesthetically I think they look great on the 4Runner. Really they look like they belong, like they came from the factory to match with this vehicle. And functionally, I love how wide the step is and for me, knowing that a cameraman John has a roof platform, I could see him getting a ton of use out of this and anyone else that has rooftop accessories that they're using pretty often. So for me, I really like this option, but if you're looking at running boards to give you an easier step up into your vehicle, I think there could be better options out there for you that do drop down just a little bit closer to the ground and you can find plenty of those options on our website to find the right fit for you. Just plug your vehicle information into our fit guide and you can see all the kits that fit your year, make, model of 4Runner.
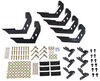
But if these are the ones you're looking for, you like how they fit and you wanna see how they install, just follow along. It's gonna be a no drill application and both sides are gonna install the exact same way. We'll walk you through what that install looks like on the passenger side and then all you gotta do is repeat it on the driver, but let's check that out. To start off your installation, I always like to lay everything out and make sure that I've got all my hardware, none of the brackets or the running boards are damaged and I've got all the tools I need. To start off with the tools, you're gonna want a torque wrench, a 16 millimeter wrench, a 16 millimeter socket, and the 13 and 12 millimeter socket plus an impact or a wrench to drive those. You're gonna have three brackets per side and they're all gonna be labeled. So this one here for example says PR, passenger side rear. You're gonna also have passenger side center, passenger side front, and then the same thing for the driver's side. So just get those two sides sorted out so you don't get them confused. And then for all your hardware, it's really just gonna be six pieces per side. So we're gonna have M8 bolts that get lock washers and flat washers and then some M10 bolts that get these washers with teeth facing towards the bolt and flange nuts that'll go on the other side. We'll get to that hardware in just a bit. But for now, go to your vehicle with your 12 millimeter socket. To find your mounting locations go to the rocker panel underneath your vehicle and you're gonna find some factory bolts. They're gonna be pretty close to the rear, some in the center and then some closer to the front that are a bit more spread out. On the rocker panel there those are really the only bolts present, so they should be pretty easy to find. With these, we're gonna use our 12 millimeter socket to remove them and just set them to the side. (drill grinding) And with these factory bolts, they're not gonna get reused so you can just toss them if you'd like. It's not a bad idea though at this point to just go back and check the threads and potentially clean them out. The 4Runner we have today is very new. Everything's very clean, so it's not super necessary for us today, but it's a good idea to check if yours is a bit older. But now we can take our brackets and that hardware we prepped earlier to the vehicle and just loosely install these in those factory holes. I'm gonna leave all this hardware pretty loose for now just because I want to have room for adjustment to level the board out and to just attach the board if we need a bit of tolerance. So just about like that should be good. And we'll repeat that for the remaining brackets. Each one getting two of those M8 bolts, lock washers and flat washers. With the center and rear brackets, they do have one hole that's gonna be slotted and open. So you are doing this on the ground it might be a little easier to get your first M8 bolt started in the top pretty loose and then be able to slide this bracket up in and it can kind of help hold it in place for you to align the one in the fixed hole at the bottom. But same thing, just leave these all pretty loose for now. But now we can grab our running boards. These are gonna be side specific, but it's pretty easy to tell which sides which. There will be a small Westin logo that goes towards the rear of the vehicle, but when you set this up here, it's only gonna line up with your brackets one way because this center one isn't exactly centered between the front and the rear, it's gonna be offset a little bit closer towards the rear. So as we do go to lift this in place and set it over top of our brackets there, we should see it lining up with all three of those mounting locations and there shouldn't be any real sizable gap in the middle here. If there is, then you've probably just got the wrong side. Now if you peek up inside the running board, you should see two holes and if we just put a little bit of upwards pressure on the board, those holes should align with our brackets pretty well. And here's where our M10 hardware will come in. So I'm gonna feed the bolt with the washer from the outside in because when we do go to tighten this, I wanna tighten the flange nut down with a socket and it's gonna be easier to reach in with a socket to this side of the bracket since it is kind of recessed back there. You can hold onto the bolt head side with a wrench. Just get this all loosely installed. Repeat for this one one more time and for the remaining two brackets for six pieces of hardware total. But with all hardware loosely installed, I'm gonna go back through first with my 16 millimeter wrench and socket and tighten up the board to the brackets. (drill grinding) And with this, I'm not gonna run it down too hard because I don't wanna overtighten it before I break out the torque wrench and actually torque it to spec. (drill grinding) Now when we go to tighten up the brackets to the vehicle, we left these pretty loose so there is a good amount of room for movement in those slotted holes. I'm gonna push up on the board making sure that it's level and as I go to tighten that hardware I'll make sure that it stays where I want it. (drill grinding) At this point you wanna go back through with your torque wrench and tighten down all that hardware to the specifications laid out in the instructions. The M8 and the M10 bolts will have different torque specs, so just be sure you check those. Now if you don't have a torque wrench, you can find those here at etrailer or you can typically check one out or rent one from a local auto parts store. Just go around the whole running board and repeat that process for the other hardware. But once you have all that hardware torqued down, that's it. These are probably some of the easiest running boards I've ever installed and I think they're gonna be a really solid fit on your 2023 Toyota 4Runner. My name's Aiden and thank you for watching.

Installed these on a 2025 GMC Sierra AT4X. They are heavy duty and feel very secure. Easy to mount using the pre-existing threaded holes.
The steps are actually 6" wide and stick out about 1" beyond the tires.
Info for this part was:
At etrailer.com we provide the best information available about the products we sell. We take the quality of our information seriously so that you can get the right part the first time. Let us know if anything is missing or if you have any questions.


Thank you! Your comment has been submitted successfully. You should be able to view your question/comment here within a few days.
Error submitting comment. Please try again momentarily.