
To see if this custom-fit item will work for you please tell us what vehicle you'll use it with.


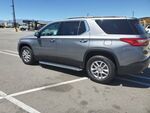
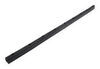
These 5" wide steps with rounded ends mount close to your Buick Enclave for a streamlined look. Full-length plastic pads create non-skid surfaces. Constructed of rustproof aluminum with polished stainless steel trim. Custom installation kit included.
Features:
Specs:

California residents: click here
Videos are provided as a guide only. Refer to manufacturer installation instructions and specs for complete information.
Howdy there, neighbors. Ian with etrailer here. Today we're gonna be looking at the Aries Aero running boards on our 2023 Chevy Traverse. Let's get into some features and then the install. These running boards are gonna feature a 76 inch length, which is gonna look nice and go under both front and rear doors, giving you the option to not only get in the vehicle, but if you've got something on the roof rack here, makes it very easy to be able to reach up and access anything you've got on there. Do feature a 500 pound weight capacity and then a five inch face for you to be able to get your foot on.
I've got 12 inch boots here that make it just a little bit easier to get back up into the vehicle here. And then we're gonna go ahead and get into that install for this. I did wanna mention this is stated as a custom fit kit. It does not necessarily fit the '23s the way it's supposed to. You will need to have to drill out a couple holes and kind of make things a little bit more comfortable for this fit.
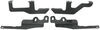
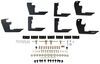
So if that's not something you're interested in, do look at our dealer locator option because somebody else can help you get this on if you just didn't wanna mess with it. But otherwise, probably hour, hour and a half of just tinkering in the garage will get it done. So let's take a look at that install. And we're starting with our front bracket here. It's gonna be the longest out of the three.
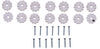
There's our middle one there and then the rear identifier is, it's gonna have this little piece of angle right here to kind of help you get that figured out. So your longest in the front, the same type of bracket in the middle, and then the one with the angle at the rear. But we want to come up to this front center hole. There's gonna be a little rubber grommet here that we're just gonna remove. And then our back hole's gonna be this one here, and we'll take our T bolts and get those apart.
They do come preassembled in the kit. Just pull that off of there and then that's gonna slide into the hole. You wanna be careful you don't knock it into the frame. It becomes very difficult to take them out if you do. And then we will take our flat washer and the lock washer behind that. You may have to use the bracket to keep a little pressure so it doesn't shift on you. Lock washer. And then the nut on top of that. And all of the hardware we're gonna leave loose till the very end. And so I wanted to make sure I mentioned that. And then we're gonna do the same with this hole that we removed the grommet from. And then we'll just kinda snug that up by hand again just to make sure we've got everything in place. Once we've got that little spring through, we're just gonna thread that onto the bolt with the plate attached and carefully work that all through there, and then shimmy that out the hole at the end. And we'll just leave that hanging until we get the bracket put up. We're gonna do the same exact thing we did for this front bracket here in the middle. There's gonna be two spots. We're gonna want the front one here. You can always double-check on the other side to make sure you're gonna be lining up with where you need to be. And then feed our spring through this over to the hole where we'll be able to get the bracket and the bolt through. And then again, we'll thread this onto our fish line, and then we'll gently pull that through, kind of working that bracket through up towards the top. And then once we've got that fished through the hole back there, we'll just drop it and leave it for the center bracket. Now that we've got the middle bracket on and just hanging there, we're gonna move to this back one. The back one we found the 2022s have this hole centered. The 2023s, like we've got here, do not have that centered hole. So we are gonna have to drill that out for our T bolt to sit in there. I've gone ahead and marked it with a paint pen. I just threw this assembly in here. It's just the same situation like we did with the 7/16 bolts. And the fish line goes up through this and then back down much easier than the other ones 'cause you got nice big holes to work with. But that'll help you get that center hole to be able to drill that out and throw in the T bolt. (drill buzzing) So once you've got that hole drilled out, you'll just put the T bolt in there the exact same way we did on the other slots. There's a hole on that backside like I showed you that you can just feed the pointy end of one of those fish wires through and have that bolt taped to it since they don't send you one that's specifically that size. But once we've got our brackets up and hanging there, we're gonna go ahead and put this step up. So we'll want to go through, loosen all these up almost to the very end. Sometimes you will have to go to the end 'cause those are gonna sit in these slots here. So we'll come back and then line the back ones up and I'll show you that momentarily. So what you want to do is, since those bolts on the bottom here are on a track, you'll just push those up ahead of the brackets. That way we can slide it all into place. And of course we're gonna adjust the centering once we've got these at least started. And then just go through all three here as far as these bracket mounts and get those hand-tied as well. And then we'll kind of work on centering out if we need to. So we do want these centered sitting on the brackets. What I used is just this kind of roll in the body line right here. I've got an inch from that to the edge of our of our rail. So that gives us a good measurement to be able to mock it up on the other side. We're gonna go through now, torque down all of the hardware to spec that's shown in the instructions. And then we're gonna repeat the same process for the rail on the other side. And that's gonna be a look at in the installation of our Aries Aero running boards on our 2023 Chevy Traverse. My name's Ian with etrailer. Thanks for watching.


Great value. Very quick delivery!
Very easy install6..arrived quickly.. looks amazing
These installed easily and look great!
Got both items put on car yesterday. Both fit great and look even better.
They were easy to install and look good too.
Do you have a question about this Nerf Bars - Running Board?
Info for this part was:
At etrailer.com we provide the best information available about the products we sell. We take the quality of our information seriously so that you can get the right part the first time. Let us know if anything is missing or if you have any questions.


Thank you! Your comment has been submitted successfully. You should be able to view your question/comment here within a few days.
Error submitting comment. Please try again momentarily.