
Bring your road bike and the chunky-tire bike on the same rack. Fits tires up to 5" wide with zero frame contact, so your paint stays safe. Tilt for hatch access, lock your bikes and the rack, and add an optional ramp for heavier bikes.
Bring your road bike and the chunky-tire bike on the same rack. Most racks make you choose - wide tires, heavy bikes, or frame-safe carrying - and hatch access can be a hassle. The Skaha Pro fits tires up to 5" wide with zero frame contact, so your paint stays safe.
Lock your bikes to the rack and the rack to your vehicle. And when you want to grab a drink from the cooler, the tilt gives you quick access to your hatch.
If lifting your bike onto a platform rack is the part you dread, the Skaha Pro works with Swagman's Ramp and Bridge (S59SR - sold separately). You can roll your bike up into the tray, then strap the wheels and clamp it down.
California residents: click here
Videos are provided as a guide only. Refer to manufacturer installation instructions and specs for complete information.
Hi, I'm Matt with etrailer. Today we're gonna be talking about the Swagman Skaha Pro bike rack on the back of our 2025 Mazda CX-5. Now, this can be a great rack because it can accommodate a lotta different bike styles and hitch styles. So let's start off by kinda focusing on how our bike is sitting on here at the moment. So right now, let's say you're on a really bumpy road, this is moving around quite a bit. You can tell we have plenty of room where we're not gonna be making contact with anything.
Now, at this point, I won't be able to open up my hatch, so the only way I can do that is by tilting this back. You will have this locking handle here. We'll just lift that up (rack clicking) and lower this down. And this is a pretty extreme tilt, perfect for our case today, where let's say you're driving around, you need to get back here because maybe you're doing some grocery shopping. You need to throw your stuff back here, you can do that.
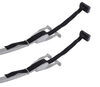
Or if you wanna take a seat, tie your shoes, get ready for that bike ride, any helmet, also great point. A lotta people will also get the ramp that comes with this, especially for those heavier bikes. This is a great point to really grab that now. Now, I'm not gonna be using that ramp today, 'cause I've just got a regular bike on here, but this does have a weight capacity of up to 60 pounds per bike. So the way that we can take this off is just by coming here to the back strap, (rack clicking) removing that.
And then the front is just gonna be front resting hook, by pressing down on here and up and down. And since I was only making contact with our tire, this is gonna be great for carbon frame bikes or alternative frame bikes. Now, when it comes to the cradles, you're gonna notice they're gonna be very wide, so they will work with a lotta different tire sizes. And it really doesn't take very long to put everything back up. All I have to do is come back over here, lift up on the hook itself, and this will actually just ratchet down by itself.
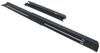
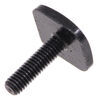
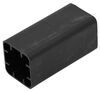
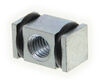
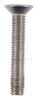
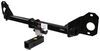
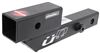
(rack clicking) Like that. And then I'll put this strap up too. Now, the next thing I'm gonna do is get a couple measurements. The first one I'm gonna get is gonna be ground clearance. This is great if you're going up any steep inclines, like a hill or a driveway. You wanna make sure you're not gonna bottom out. And this is gonna be sitting at 19 inches. That's pretty good. Even if you have some heavier bikes on here, you're not gonna hit the ground. Now, for the total distance away it sits, this is gonna be about 36 inches. So that's a little bit longer than some other two-bike carriers out there, but we can save space. All we gotta do is pull on that handle now and push up. (rack clicking) And now, we are only gonna be sitting just about 16 inches. So that's gonna save you a ton of room. Perfect if you're in a parking spot or garage. Now, for what it's gonna block on the back of the vehicle, we're mostly gonna block our license plate and our backup camera. So I'd recommend using your back window to look out or your mirrors. But your taillights won't be obstructed at all. And the way this is gonna install is we actually have a inch and 1/4 shank. And it's going into a two-inch hitch receiver. And this is why I say it can work with a couple different hitch designs. Because this comes with a two-inch sleeve adapter, so it will work with your two-inch receivers and your inch and 1/4 receivers. We're then gonna have an anti-rattle bolt that goes through, connects to a lock in order to give you that security and give you a really good hold in your receiver. And there is gonna be this block right here, and this is going to act as an alignment collar, so you don't have to worry about lining up that pin with the hole every single time. This will make it a lot easier to do that in the future. Now, in my opinion, I think this is gonna be a pretty good option for most people out there. Now, if you need something a little bit more heavy-duty, then I would recommend checking out another version of the Swagman, and that's gonna be the Escapee. With the Escapee, that's gonna have a weight capacity of 80 pounds per bike. Now, it's only gonna work with two-inch hitch receivers, so if you have a vehicle with an inch and 1/4 receiver, then this one might be a better one for you. But if you guys do decide to go with this, let us know how it's working for you in either a comment or review. And if you have any other questions, let us know here at etrailer. And again, I'm Matt. And thanks for watching.
Info for this part was:
At etrailer we provide the best information available about the products we sell. We take the quality of our information seriously so that you can get the right part the first time. Let us know if anything is missing or if you have any questions.


Thank you! Your comment has been submitted successfully. You should be able to view your question/comment here within a few days.
Error submitting comment. Please try again momentarily.