

 Arrives before Christmas
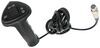
 Heavy-duty winch with 1.8-hp, permanent magnet motor and mechanical brake lets you quickly and safely recover a stuck UTV. Sealed motor, gearbox, and contactor protect winch from the elements. Hand-held remote and handlebar rocker switch included.
Features:
Specs:
This Powersports recovery winch is designed for heavy-duty work and recreational applications. It's perfect for your 300cc - 850cc UTV, ROV, or MOHUV. It includes a dashboard-mounted rocker switch so you can control the winch from the seat of your UTV and a hand-held remote with an 8' lead for safe operation from a distance. The motor, gearbox, and contactor are sealed so you can confidently run your UTV through mud and water. And it includes a mechanical brake, a wire rope and roller fairlead, and a universal mounting channel for installation.
This winch features a 1.8-horsepower, 12-volt DC motor with 4,000 lbs of line pull. The permanent magnet motor offers the same line-pulling power and speed as a series-wound motor of comparable size, but it's lighter and uses less current. The motor housing is sealed to keep water out. The motor is constructed of durable, corrosion-resistant materials including the powder coated housing, copper battery terminals, and zinc-plated steel hardware.
The contactor - or solenoid - transmits power from the UTV's battery to the winch motor. There is a 5' lead that runs from the vehicle's battery to the contactor and a 3' lead that runs from the contactor to the winch. These leads are interchangeable so you can mount the contactor in the most convenient location - typically on or near the UTV's battery box where it's easy to access. Simply match the longest cable set to the longest run and the shortest cable set to the shortest run to eliminate untidy cable runs.
The 250-amp contactor is sealed to meet IP67 specifications for water and weather resistance, and it has copper terminals and zinc-plated steel hardware that resist corrosion. There are also 6 rubber boots included that fit over the terminals on the contactor and battery to repel water and help prevent corrosion.
The free-spool clutch enables you to pull out the rope by hand. This saves battery power, prevents the brake from wearing down prematurely, reduces wear on the motor, and is much faster than waiting for the drum to power out the rope. To release the clutch for free-spooling, simply rotate the dial on the end of the gearbox to the "Freespool" position. To reengage the clutch, rotate the dial back to the "Engaged" position. The clutch positions are indicated on the face of the dial.
The clutch is driven by a 3-stage planetary gear train. This provides more speed than traditional worm gear drives or 1- or 2-stage gear trains.
The steel gearbox has a rust-resistant black powder coat finish, and it's sealed to keep out moisture. The clutch shifter is constructed of durable hard plastic.
The automatic mechanical brake securely holds a load and prevents unintentional payout (or creep). A large spring coil contracts when the winch is in gear and the drum is winding in. When the winch stops, the load starts to pull and the spring expands to press against the spring chamber. The pressure of the spring on the wall of the spring chamber creates resistance to stop the drum from rotating outward. At maximum pressure the brake holds 100 percent of the load.
The friction created when the spring is pressing against the spring chamber creates heat. That heat is quickly dispersed away from the motor shaft and through the gearbox. This prevents potentially damaging heat buildup near the motor.
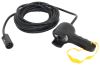
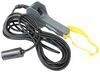
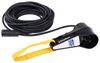
The hand-held remote has an in/out rocker switch and a 12' lead that allows you to operate your winch at a safe distance from your UTV. Simply connect the water-resistant, plastic remote to the remote port when you need to use it, and disconnect it to store it away when you aren't using it.
The remote port includes an 8' lead and mounting hardware so you can install it anywhere on your UTV. A common, easy-to-access mounting location is on the hood or grille of your UTV.
There is also a wireless remote kit (BDW21056 - sold separately) that lets you control the winch from up to 100' away.
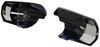
The rocker switch lets you operate the winch from the seat of your UTV. It can be mounted anywhere on your dashboard but will typically be mounted in one of the blank inserts on the front panel. It includes an 8' wiring harnesss with quick connects.
The wire rope is made of high-strength, aircraft-grade galvanized steel that is zinc-plated to resist abrasions and withstand harsh UV rays, chemicals, and extreme temperatures.
The rope winds around a solid steel drum. The mounting flanges are strong enough to resist bending or breaking if the rope wrap becomes uneven and excess stress is put on the drum.
A hand-saver strap is included to use in conjunction with work gloves (BDW20070 - sold separately) so that you can safely handle the rope and hook. A rock bag (BDW20048 - sold separately) is also recommended for added protection. The rock bag helps prevent a broken rope from snapping back if it breaks by forcing it to the ground.

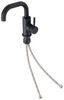
The removable clevis hook is constructed of high-strength forged alloy steel that is heavy duty and rust resistant. It has a spring-loaded safety latch for quick fastening and removal. The hook attaches to the steel thimble on the end of the wire rope.
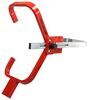
The roller fairlead has a thick steel frame with 4 steel rollers. The rollers reduce friction when you're pulling the rope in or paying it out, and they prevent the rope from becoming pinched when pulling at extreme angles. The rollers have a silver-zinc-plated finish that is tough and corrosion resistant.
Note: The roller fairlead does not mount directly to the winch - it typically mounts to the included channel or to tabs on a custom mounting plate (sold separately). Bulldog Winch mounting plates - as well as most other aftermarket mounts - include these tabs.
The winch is constructed of strong, durable materials that are able to withstand any weather condition or terrain. The motor housing, gearbox, and contactor are sealed to keep water out. The motor housing and gearbox are made of corrosion-resistant powder coated steel. The steel tie bars and side frame drum supports help to create a strong and rigid winch body.
To install the winch on the front of your vehicle you will need a suitable mounting location. The winch and fairlead may be bolted to the included mounting channel. This mounting channel is a basic L-channel and may not be compatible with your UTV. In most cases you will need to bolt a custom mounting plate (sold separately) to the front framework of your UTV in order to mount the winch and fairlead.
The contactor can mount anywhere on the UTV but will typically mount on or near the UTV's battery box where it's easy to access.
You can mount the rocker switch on your dashboard so you can control the winch while seated in your UTV. It can be mounted anywhere on your dashboard but will typically be mounted in one of the blank inserts on the front panel. To install you must first remove the mounting bracket on the switch. Then cut a hole in the dashboard panel, insert the switch, and secure it with the integrated locking tabs. Connect the 8' wiring harness to the contactor with the built-in quick connects.
The remote port includes an 8' wiring harnesss and mounting hardware so you can install it anywhere on your UTV. A common, easy-to-access mounting location is on your UTV's hood or grille. A 7/8" hole will need to be drilled into the hood or grille - or wherever you choose to mount the port - to feed the wiring harnesss through.
| Layers of Rope | Capacity (lbs) | Total Rope on Drum (ft) |
|---|---|---|
| 1st Layer | 4,000 | 13 |
| 2nd Layer | 3,520 | 28-3/16 |
| 3rd Layer | 3,098 | 46 |
| 4th Layer | 2,726 | 55 |
The line pull capacity of your winch is determined by the maximum load your winch can pull with a single layer of rope on the drum. As more layers of rope are wound onto the drum, pulling the same load requires more force, leading to a loss in winching power. With a 2nd layer of rope around the drum, your line pull capacity is reduced by approximately 14 percent. With 3 layers on the drum, the line pull capacity is reduced by approximately 23 percent, and with 4 layers on the drum it is reduced by approximately 35 percent.
Note: It is recommended that you begin any line pull with a minimum of 5 wraps and a maximum of 2 layers of rope on the drum.
Increase the pulling capacity of your winch by doubling up the rope with a pulley block (BDW20023 - sold separately). Secure the pulley block to a tree saver strap (BDW20051 - sold separately) with a bow shackle (BDW20006 - sold separately) to provide a strong anchor for your double-line pull. Or use the Bulldog Winch 7-piece rigging kit (BDW20034 - sold separately) that includes everything you need for heavy-duty recovery. Using double-line operation will approximately double your winch's pulling capacity.
California residents: click here
Videos are provided as a guide only. Refer to manufacturer installation instructions and specs for complete information.
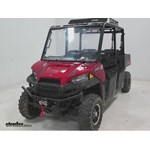
Today on our 2015 Polaris Ranger midsize, we're going to be taking a look at and showing you how to install the Bulldog Winch, 1.8 horsepower UTV and utility winch. This winch offers two switches, mounting channel and roller fairlead and a capacity of 4,000lbs. Part number is BDW15004. Whether we're out riding trails or maybe on a job sit like today, get a heavy comes through, makes stuff slick. Probably going to wind up stuck at one point or another. Having your bulldog winch on hand is the perfect solution to get you out of these sticky situations. Today we've got the 4,000lb winch installed, it's a 1.8 horsepower winch, gives us great line pull strength, we can really get these heavier UTV's, ATV's things like that out of the mud and back on the trail or back to work. With a simple press of our button that cables going to tighten right up and we'll be on our way.
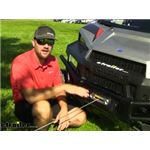
As a secondary operation mode we've got our remote switch, 15 feet of cable on this, this might keep us out of those bigger mudholes while we're trying to get our rig back on the way. All we have to do is hit the button and there we go. If we need to release any, just hit the out button. As you can see with our winch in free spool mode we can easily draw our cable out to make our connection. As you can see the hand saver strap does a good job of allowing us to draw our cable out of our winch without having to hang on to that wire rope or hook that might cause damage to our hands. We can hook our hook right back to our ATV and we'll be ready to make our pull. Once we've got our connection made, we'll turn our winch from free spool and engage our clutch and we'll be ready to pull out. With our snatch block in place you can really hear how much less work the winch is doing.
Pulling the same load through the same mud, it's not working nearly as hard. Here you can see out 55 feet of wire rope really allows us to reach out there and get to those good anchor points. You can see the small reinforcement cower here on our end loop, to help prevent any wear. Our winch is a mechanical brake. By design we've got the motor separated from the casing, and we've got a hollow drum in the middle. The mechanical drum located inside, any time we stop function on our winch, it locks our winch in position.
That allows us to, with our UTV sitting here in neutral, no foot on the brake, to maintain this angle, maintain our position on the hill. A lot of other winches you see out there use what's called a dynamic brake. It's really not a brake at all, what it uses is the resistance of the motor and the gears to keep it from pulling out. If we we're too heavy and if we overrode that resistance, we'd just go slipping right down the hill. The advantage of that mechanical brake can really save us a lot of time when we're working and also be much safer.
You can see no matter where we want to stop on our incline, our mechanical brake's going to hold us in that position. One of the first things that we're going to do for our installation is get the hood out of the way. It's not going to be required for the install but it's certainly going to make it a lot easier for you guys to see what we're doing here. If you decide to do it, you'll just let your hood rest forward. On the back of each light we're going to have an electrical connector. Pull those tabs out, we can slide it right out just like that. Do that on both sides. We'll have just a few plastic clips. Once we've got that off we'll let that rest up here out of the way, then we need to pull the two clips. We'll have one on each side. We can kind of support the hood while we push out the small pins. We can just set this somewhere safe until we need it to put it back on. We're going to remove the two bolts, you'll need a " socket. We've got two on each side. We're going to remove one completely and the other almost all the way. It's out, I'm going to put one of two threads back in there. That'll give us support while we get the rest of our bolts out. Do the same thing on the other side. If we look right underneath the front, we're going to have one, two and three right there that we'll remove. We'll hang on to our bumper, take out those other two bolts, and it'll come right off. We'll slide it forward just like that. We're going to take out the two torx bits. We're going to have one on each side. That's going to allow us to remove that covering there. We'll use a T40 bit. You'll want to hang on to that in case you ever remove the winch or return it to the customer if you're doing it for somebody else. For our application today we're going to be using the mounting plate from Bulldog Winch, this is BDW15165. That's for the midsize, so that's going to be your two by two. Where you sit one guy and one person. If you have the three-wide, or what they consider the full size where you can sit three people across the front, you're going to want to use BDW15174. What we want to do is take the L-port, the shorter section of that L-port, we want that to face down towards the bottom of our bumper. We're going to see not only are the holes that we just removed our screws from going to line up, but also the two holes right above it. For our upper hole locations, we're going to use one of the 5/16th by bolts, and one of the 5/16ths nylon lock nuts. Those are going to go through. We can also thread the factory bolts back in that we removed. We want to pull our mount plate all the way down towards the bottom of the bumper then we can simply tighten up our bolts. We'll get our side brackets installed, these are going to fit around the underside of the vertical bumper supports, you can see the holes are offset, we want that longer space to be toward the front of our machine. Just going to bring that down. We want to use our 1" by 5/16ths bolts. Come up through our plate. Lets get them started. For the outside plates we're going to take one of our 1" by 5/16ths bolts, that'll go through the slide plate, then we're going to slide on a flat washer and a nylon lock washer. We'll do the same thing for our other side. We'll grab our " wrenches again and tighten down our bolts. We'll grab our roller fairlead, we're going to place our two 8mm by 20mm bolts through it. We'll have two different sets of holes here to use for our fairlead mounting location. This is going to accept both the 122.5mm and the 151mm fairleads. Set it right down the inside holes. On the backside we need to put a flat washer, a lock washer and one of our nuts. We can get those bolts tightened down. We'll take our cable end, we're going to pass that through the roller fairlead here on the front and bring it right up and position it with the four holes on our bracket. We'll take our 8mm by 25mm bolts, we'll need to get those threaded in all four of those location. On those we'll have a flat washer, and also a lock washer. Lets get these tightened down. Just to prevent our cable from being pulled back in, we can add on our hook. What we've got there is just a pin, on the other side a cotter pin. That'll slide through and then each side will get bent. Kind of back just to hold that from slipping out. The winch mounting plate's going to work out well for several different types of winches. When we get into the larger winches we'll have the 6.6 on 3, so from center to center it's 6.6", from center to center here it's 3". We move into the next set, we've got the 4.9" so from center to center we're 4.9", still staying with the 3" center to center here. If we're using just a two-hole winch setup, we've got 3" out to about 3" that we can be able to bolt in there. You can see the elongated hole here on the top is going to give us just a little bit of flexibility there. It's a really nice bracket, it helps out with several different types of winches to get them mounted. We can replace our bumper, slide it right back on the brackets and it attach it here at the top. Just want to thread our bolts back into their original location. Lets also get the three started on the bottom then we can tighten it up. With the winch installed, lets go ahead and start making a few of our electrical connections. We're going to start with the 5 foot lengths of the 6 gauge red and black wire. As you can see their pre-crimped, they're going to have the connectors right there on the end. Red's going to go to the red stud that's on our winch. The black's going to go to the other one. You can see right here, there's going to be the stud. It's going to have two hex head nuts and have to flat washers, and then you can see that little red indicating that's our positive side. We want to take off the first nut and the first washer. Here both washers wanted to come off, that's not really a big deal. We'll put them back on. We'll take the end of our red cable. Once we've got that slid on, we're going to take our flat washer and slide that on then thread our hex nut back on. Use our wrench to get that nut tightened right down on there. Then what we'll want to do is take one of the supplied rubber boots, we're going to fit the big end over the cable then we're going to slide that all the way down so it'll cover those nuts up. There's what we'll wind up with, we'll have our positive cable running up, the boot protecting out connection. We just repeat the same process for our negative cable, sliding our washer over and putting our nut on. Something I like to do, it's not going to be required but, it's just to use some wire loom, or in this case a little bit of electrical tape, and put our wires together. The red and the black can really stand out running underneath the hood area here, and if you juts tape them up they can kind of blend in a little bit better. We're going to run our wire over to where we're mounting our contactor. In our case today we're going to be mounting it underneath the drivers seat bend, we want to keep it high, we want to keep it dry. I have my wires taped off. Just going to run these across the front compartment. A few things to avoid of course are going to be sharp edges, significant sources of heat, anything that we might be worried about causing damage to the wires themselves. I'm just going to go around the end of the radiator there, if you can see we're avoiding the axles here, we don't want to make contact with that. Don't want to make contact with the steering shaft so that should be a good line to follow. Use a few zip ties anywhere we can to get it anchored out. We'll route it, it's going to be the drivers side floorboard here we're going to right over that piece of hat channel. Back. And that's going to allow us to go into the side of our cubbie right here. It's time to take care of getting our switches mounted into place, or our switch mounted into place. In the instructions it gives you option one or option two. Option one is going to be the handle bar clamp. That's made bolt right onto the bracket. It's been added onto our pressure switch. As you can see it has protective fins on each side, so if you do handlebar mount it or mount it somewhere where it's easily accessible, you don't have to worry about accidental bumping. As a second option they offer the standard plug in. It's going to be like your more traditional winch control. We'll have an in, we've got an out. That's simply going to plug right in to make our connection. We can mount that permanently on our machine somewhere to where it'll be easily accessible so we can plug in our handle. As a third option, we can actually use both of these. We can have the ease of an end cab, easily accessible switch inside. We can also put our plug as a more external option. Bulldog has wired them as so, so if we look at the end of the plug style, and if we look at the end of our regular handlebar switch style, we can actually plug this one right into the other one and then plug this into our contactor. WE have a duel feed setup here. Of course we'll clean it up, put some electrical tape, make sure everything's nice and secure. This is a great way to have a double option as far as how to power the winch. The red wires on each of the plugs, these just need to go to an ignition source that comes on when the keys on. When we turn the key into the on position, we want these to be powered. That's going to tell our winch that it can go ahead and operate. Since we are doing this on the Polaris today, I'm going to take the housing off of this switch, just going to back up with bolts on each side. We'll want to hang onto those in case we ever want to change the setup. If you see here, I can separate that housing out, we've got a switch that has the locking tabs on the top and bottom, so we can slide it directly into our dashboard once we cut out a small hole to allow for it. We're going to start by getting our remote plug installed. The customer asked us if we could put it right in the center of this panel. I think it's a great spot, kind of recessed slightly so it's not going to stick out to much and it should be out of the way. Get our measurements there and find the center. Once we've got that center marked, we'll take our hole saw, we're using the " and get that hole drilled out. You do want to check behind to make sure we don't have any wires or anything like that. With that hole drilled out we'll take the end of our male side plug, just run that through that hole. We can go ahead and secure it just like that. Once we have it where we want it we need to mark both hole locations and we're going to use a 5/32" drill bit to make two small holes. We can take our supplied hardware, slide that through both of those holes and then we'll place our flat washer, lock washer and nut on the back side and get them tightened down. We can use a wrench or a socket, place it right over there to hold it in place and then tighten down our Phillips head screws here on the front side. These don't need to be overly tight, just want them tight enough to smash our lock washer. We're going to be using this small false plug here to mount that switch in. What I'm going to do is find the center of it. That's going to be our center point so lets get that marked and then we'll mark for the outline of our switch. We want to use a small straight edge and connect our lines. Using a paint marker like I'm going, we want to stay inside that, that way we don't have any marker showing outside. I'm always going to err on the side of cutting it a little bit small, then opening up a little larger rather than getting it too big to start and then having to backtrack. We'll put a couple holes in there to get our razor knife started. We'll run a little test fit, see if our switch is going to go in properly. If not we'll work it out a little bit more. All right, switch is mounted. We can pull the tag end of our wires out. What I'm going to with the one coming from our switch, you can see the red wire on that, it doesn't come out of the loom until a little bit further down. I want to trim that back, we're going to be making the connection right here on this wire. I'll trim it up to that spot, then I just tape the loom back up. If you are going to do this, be sure not to cut the wiring itself, just the housing on the outside. I'm also going to bring over the red wire from my plug in port. This wire, we'll just let these hang out for a minute. We'll use a little bit of tape, go over that allowing that red wire to separate out. I'm going to run the end of that right over here by my other black and green wire. You can see right here is the shifter linkage. That's what allows you to shift your gears. We want to make sure that's not going to come in contact with our wire. We can bring it back behind that and get it zip tied up. I'm going to use a little bit of tape in a few places along the way on these wires. Just to make them into one. I'm going to take the green wire from our switch, and we're going to plug it into the green wire from the plug. Put some tape on that, do the same thing for our black wire. With those taped up we'll be left with our single connection for the green wire and single connection for our black wire to plug into our contactor. We'll start right behind those two plugs and again with the tape, get everything together, make it look nice and neat. Now that we've got those joined into one wire, we're going to route that right down and right back along the same way we routed our winch cables. With some zip ties anywhere we have the opportunity, get our wiring secured and help up out of the way. Lets get some tape put on both of our red wires. Just try and gather them up, get them together. What I want to do is bring these two wires down to one wire. I'm going to trim them both off, strip each side back. And we'll twist these together and add on a heat shrink butt conenctor. Crimp that side down, we can take one of the links of red wire that we cut off, might as well strip both ends. We'll only be using one right now. Strip that one back about twice as far as normal and then bend that over just to give us a little bit more wire for our connector to bite onto, like that. That'll go on the other side. Give it a good pull, make sure you've got a nice connection made. We'll take our heat source, in this case we're going to use a lighter. You could also use a heat gun. If you're going to use a lighter, use the lower part, the blue part of the flame. That won't leave any of that black stuff on there that you can get sometimes. We'll let that cool just a second, we'll wrap that up with a little bit of tape as well. While we're waiting on that, this is going to be the wire that comes from the back of our ignition switch. One of these wires is going to come on when the key's turned on and it'll be off when it's off. Lets expose these, again, real gentle, don't want to cut any of the wires. As you can see, running through that loom is going to be 5 wires, we're going to take a normal test light, we can start just by testing the wires with the key off. See if any of them have power. It looks like that's a no. We'll turn the key on and run that same test. You can see that once we've got on the orange wire, as our key goes on, so does the power, when it goes off it goes off. We'll be tying that red wire right into that orange wire. Lets go ahead and separate that orange wire out, we'll snip it, we'll strip back both sides, we'll add our butt connector onto one side of that orange wire. We're not going to need near that much red wire. We'll take our red wire, wrap that around or twist it up with our orange wire. That'll go in the other side of our butt connector, then shrink it down. I'll use a little bit of electrical tape and wrap that factory harness back up and also our red wire coming in. That should take care of everything under the hood area here that we're going to have to do. We'll put our hood back on, and we're also going to replace our clips, remember, for our lights that we took off and also plug our plugs back in. We're going to be mounting our contactor inside the drivers seat storage area. We want to make a hole on each side to allow our cables to come through and our wires for our switches. I'm not sure exactly where we're going to mount the contactor, that just depends on the lengths of cable we have. We need to be kind of adaptive. I do know I want my wires to come in the front and go out of the back. Lets get these holes drilled again, " hole saw should do the job. Do that on both sides. Lets start making a few of our contactor connections. What we want to do is hook the winch side into the part that's closest to the mounting bracket, or into the two studs closest to the mounting bracket. They'll be away from the three screws. They're color coded. Red's red, black's black. We're going to make our connections. One thing that we've done, we just didn't have our contactor quite up high enough to keep it up and dry. Sometimes it gets water in it and stuff, so we've actually substituted a set of jumper cables for our cables, we've modified them slightly. Those are part number DRJC166 and we also have part number SWC57016. We needed four of those. Those are ring terminals to clamp on the end. On a two or three-seater version of the Ranger, or even a four-wheeler, you wouldn't really have to worry about it. With this being the dual-row, there's two rows of seats, it just poses a little but of problem in length. We always want to make sure we slide our covers over. Now that we've got those connected, here you can see we've got our 5 foot piece of wire, we're actually going to run this back to our battery. Got the boots in place here, these are going to go inside of our box, and then we'll have our bare terminals connected to the battery itself. This time we'll follow our color code. The red cable that will eventually connect to the battery, goes on the red stud. This is going to be the stud closest to the black and the green wire. Our black one is going to go on the black side. That'll give us a good idea of where we'll be mounting our contactor, lets get that marked. We'll just drill our holes out then we can slide our bolts through. We can go to the underside where we'll put on a flat washer, a lock washer and a nut, then we'll get it tightened up. We're ready to connect our wires from our switch. These are going to be green to green and black to black. We'll want to tape them up individually so they can't accidentally make contact with one another. We can take a couple of zip ties, just tidy our wires up in here. Want to be as nice and compact as possible so we have use of as much of our storage area as possible. For our forward hole location we're going to use some silicone and go around that and get that sealed up really well. The one on the back we're going to leave open, our customer's decided he wants to have his plugs in the box so moisture doesn't get in. We'll leave that back one open in case any moisture needs to get out. What we're going to do is take the end of our 5 foot leads, remember we used the 5 footers here on the back side so we had plenty of room to get to our battery. I've lift it right up by our relay box that's up here, just to take out any of the slack. Go ahead and get our negative to negative and positive to positive. We have removed the under-seat storage area just to make it a little bit easier for you to see. A lot easier for you to see, really. That'll complete our look at the Bulldog Winch, 1.8 horsepower UTV and utility winch, part number BDW15004 on our 2015 Polaris Ranger midsize.


excellent product
I bought this to use on my side by side. I could not have a better winch. I have had other winches and none compare to this. It is quit and really strong.
Next day delivery
It did everything that I wanted it for ,hasn't let me down. I recommend this product. The price was great the quality was also great. I really like the rope instead of the steel cable. Rolls up on the drum better. And not as stiff as the steel ones.
Great winch!! I installed it on my Popup Camper and its great!

Do you have a question about this Electric Winch?
Info for this part was:
At etrailer.com we provide the best information available about the products we sell. We take the quality of our information seriously so that you can get the right part the first time. Let us know if anything is missing or if you have any questions.


Thank you! Your comment has been submitted successfully. You should be able to view your question/comment here within a few days.
Error submitting comment. Please try again momentarily.