
Summer Starts Here - Save up to 70%
# 1
Rhino-Rack Road Warrior Rooftop Bike Carrier - Fork Mount
This bike carrier has a clean design and it assembled and attached to the roof rack easily. A locking front cover prevents it from being detached from the roof rack and the tray has a cut out in the front for a disc brake if my next bike has one. Once everything is snug, the bike feels solid and there's no slop.

Had the rack on the truck for a year No issues bat all Holds the bikes great, never bhad an issue with the bikes up on top
# 2
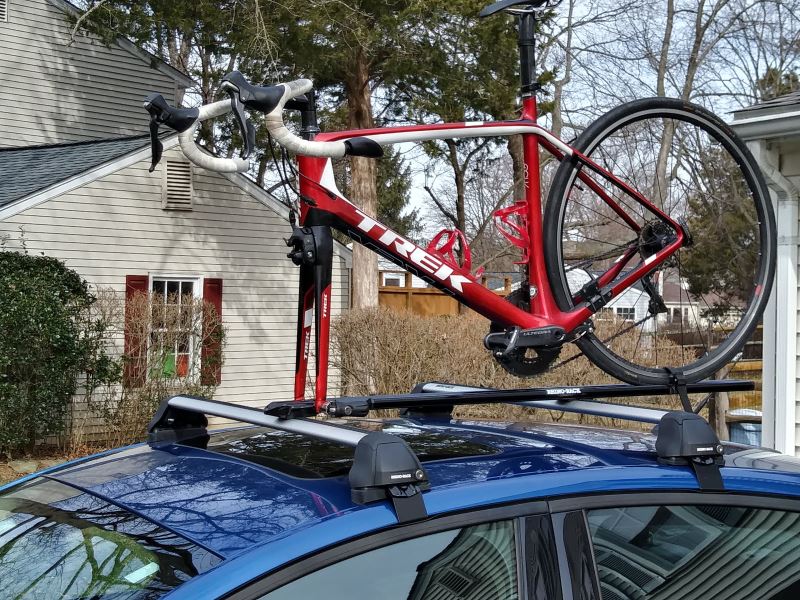
Kuat Trio Roof Bike Rack - Fork Mount - Clamp On - Aluminum - Black and Polished Chrome
Installed all products after having watched videos and read through pdf instructions. The Yakima JetStream roof rack system is outstanding (with one exception) - instructions and videos facilitated the installation. The Yakima system is the only one I could find for my car (Mercedes E450 Coupe), as the car's panorama roof glass extends to the edges near the fixed mounts. The Yakima system is quiet, thanks to the ability to modify the crossbar pitch angles, and has a high-quality appearance that complements my car. And it is rock solid. The Kuat Trio bike tray is an outstanding low-cost, simple solution - well-designed and well-executed and installs to the Yakima JetStream bars flawlessly. I would recommend that Kuat include a 12mm x 100mm thru-axle in the Trio kit, as I had to purchase that part separately. Only disappointment is in the Yakima Landing Pad Covers that ship with the Landing Pad 22 (LP 22) kit. The covers do not snap tightly into place, and appear as if they were designed for a different Landing Pad. In summary, my Yakima/Kuat bicycle roof rack system exceeds expectations (except for the LP 22 Covers), operates flawlessly, looks great, and stores easily. It has given me high confidence in Yakima, in Kuat and in etrailer.com. Well done.
Great rack easy to install, light weight and well made.
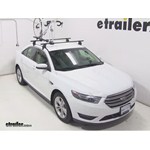
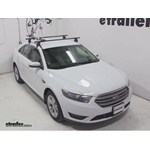
Yakima FrontLoader Roof Bike Rack Review - 2013 Ford Taurus
Today on our 2013 Ford Taurus, we are going to be test fitting the Yakima front loader, a wheel mount roof bike rack, part #Y02103. With our Yakima Q tower roof rack system already installed on our Taurus, we are going to begin our test fit by placing our back rack directly onto our cross bars. Here at the front, we'll bring the two portions of the clamp to the front side of our cross bar and the single portion of our clamp will go around the rear. We will then use the T-handle located in the front to tighten this down. With our front secure, we will now move to the rear. Here we're going to loosen the black T-nut, remove the T-bolt from the slot on the lower half of the clamp, bring our clamp around our bar, re-insert the T-bolt and tighten it down with the T-nut. With our rack secure, it is now time to load our bike. We'll first undo our wheel strap and move our front wheel cradle all the way to it's forward position. We'll now grab our bike, place it onto the rack, allow it to roll forward slowly, bringing up the smaller rear half of the front wheel cradle.
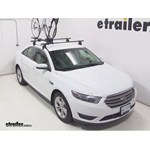
Yakima ForkLift Roof Mounted Bike Rack Review - 2013 Ford Taurus
Today on our 2013 Ford Taurus we'll be test-fitting the Yakima ForkLift, a fork mount, roof-mounted bike rack, part number Y02098. With the Yakima Q-Tower Roof Rack system already installed on the Taurus, we're going to begin our test fit by placing our bike rack directly onto our crossbars. The front, we'll remove the skewer. It is reverse thread. Slide back the black plastic cover. Then we can loosen the T handle to separate the lower half of our clamp.
Swagman Upright Roof Mounted Bike Rack Review - 2013 Ford Taurus

Today on our 2013 Ford Taurus, we're going to be test fitting the Swagman upright roof bike rack, part number S64720. With our Yakima Q tower roof rack system already installed on the Taurus, we'll begin our test fit by placing the bike rack directly on to our crossbars. Here at the front we'll bring two of the metal U-bolts around the underside of our bar, fit them through the head of the rack, and use two wingnuts to secure each one in place. With all four of our wingnuts in the front tight, we can now move to the rear. This time we're going to place the U-bolt down through the rack, around our bar, being sure that we have threads on both sides of our crossbar. We'll then bring the metal portion of the clamp up, place the U-bolt through it, and then we'll secure this in place using two of the wingnuts. With the rear secured it's now time to load our bike.
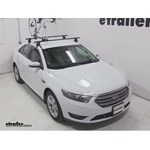
Swagman Fork Down Roof Bike Rack Review - 2013 Ford Taurus
Today on our 2013 Ford Taurus, we're going to be test fitting the Swagman Fork Down, the fork mount roof bike rack, part number S64710. With our Yakima Q Towers roof rack system installed on our vehicle, we're going to begin the test fit by placing the bike rack directly onto our crossbars. Here at the front, we'll bring one of the metal U-bolts around the underside of our bar, fit it through the head of the carrier, and secure it in place using 2 wing nuts. We'll repeat the same process on the other side of the front of the carrier here, and then secure down all 4 of our wing nuts. With our front secure, we'll move to the rear. Here at the rear, we're going to place one of the U-bolts down through the rack. We'll be sure that it comes down on both sides of our crossbar.
SportRack Roof Mounted Bike Rack Review - 2013 Ford Taurus
Today on our 2013 Ford Taurus, we're going to be test fitting the SportRack Roof Mount Bike Rack part number SR4622. With our Yakima Q Towers Roof Rack system already installed on the Taurus, we're going to begin our test fit by placing our bike rack directly on to our cross bars. At the front we'll bring one of the black rubber coated metal U-Bolts around the underside of our bar, fit it through the head of the carrier and hold it in place with two wing nuts. On the other side of the front we'll repeat that same process, then we can tighten all four wing nuts down to secure the front of our rack to our front bar. We'll now moved to the rear bar, where we're going to place two carriage bolts through the rack, being sure that they come out on both sides of our rear crossbar, we'll then place the black plastic portion of our clamp in between our rack and our load bar being sure that these carriage bolts go through it. Then we'll bring our metal portion of our clamp around the underside of our bar. We'll fit the two bolts through it and secure it and place using two wing nuts. With these two secure, it's now time to load our bike.
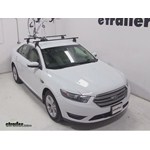
Kuat TRIO Roof Bike Rack Review - 2013 Ford Taurus
Today on our 2013 Ford Taurus we're going to be test fitting the Kuat Trio, a Fork Mount Roof Bike Rack with part number RU01. With our Yakima Q Towers Roof Rack system already installed on the Taurus we're going to begin our test fit by placing the Trio directly onto our crossbars. At the front we'll bring the black rubber-coated metal U bolt around the underside of our bar, through the head of the carrier and we'll secure it in place using two cylinder nuts. We'll repeat this same process for the other side of the front. Then we can take our provided tool and tighten all four of our cylinder nuts down. We'll move to the rear where we're going to remove one of our wing nuts. We'll bring our clamp around our bar, being sure that one of our bolts is coming down on both sides. We'll reinsert the bolt through the lower half of our clamp, put on our wing nut and then we'll tighten down both wing nuts to secure it.


What our customers are saying:
"I ordered a trailer hitch and a bike rack carrier the order was shipped with in three days. To put the hitch on only took about 30 mins. only had to drill two 1/2 holes. fit like a glove."