
To see if this custom-fit item will work for you please tell us what vehicle you'll use it with.


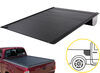
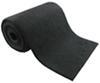
BedRug Impact truck bed liner upgrades your truck bed with a thick layer of polypropylene and a tough thermoplastic top layer. Provides a flat surface, prevents sliding loads, and cushions your cargo. Covers your bed floor and tailgate.
Features:
 Alternate Instructions
California residents: click here
Videos are provided as a guide only. Refer to manufacturer installation instructions and specs for complete information.
Hi, everyone. Bruce here at etrailer. Today we're gonna take a look at and install our BedRug Impact Truck Bed Liner on our 2024 GMC Canyon. A BedRug could be a great option to add to your pickup bed. This bed rug here, it is made out of thermoplastic. Inside the bed is 3/4 quarter inches thick and it does have padding and it's got a nice anti-skid surface.
The other nice thing about this is there is no drilling or anything. It's just got hook and loop fasteners you can take it on and off as you wish. And if you look at the bottom here, this is our polypropylene padding underneath, so it will make for better kneeling if you're kneeling inside your bed. Plus it gives some cushion if you drop anything inside there, it will help protect the bed. Another great feature of this BedRug is there's no screws to screw any of this down.
You can lift this up. (Velcro scratching) Like so and you can still access your tool compartment on your tailgate. As far as the installation goes on this, it is a very easy install. There is a little sanding required if you do have a spray in bed liner, but other than that, it is very simple. But if you feel like you can't handle that or you just don't want to handle it, check out our dealer locator on etrailer.com.
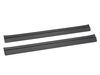
But for you DIYer's, stick around, I'll show you how it's installed. Before we begin our installation, I did lay out everything we have. Of course we have the bed liner, we've got two 36 inch long hook and loop fasteners, and then we've got the short ones. These are for the tailgate part, and then we've got the adhesive to lay down before we fasten those to the bed of the truck. First thing we're gonna go ahead and do, we did put this upside down.
Here's our hook and loop fasteners. We need to take our 36 inch long pieces and go ahead and attach those to the bed liner. You do have one on the other side as well, so you we're just gonna do the same thing. Make sure you push it down, get it in there so it's good connection and we'll just do the same to the other side. Now you may need to grab an extra set of hands as I did and we're gonna leave this upside down and we're gonna go all the way up to the bulkhead of the bed. We are gonna get that where we need it like that. That looks pretty, pretty good. Alright, now that we've got it fairly close, I am going to go ahead and mark where this hook and loop fastener is because we do, if you have a spray in bed liner, we do need to do some sanding under here. So I am gonna mark out here and here for the length of how far I actually need to sand. I'm gonna go ahead and mark that with tape as I stated before. I'm just gonna mark it here and then up towards the front. And basically I'm gonna sand from here to here on our bed liner. If we look up underneath here real quick, we're gonna determine which one we actually need to sand on and it's gonna be this one here and I'll just put a little mark there and we're gonna do the same to the other side. Now that we have where we need to sand marked, we can go ahead and remove our liner and get it out of the way for now. Now here are our tape marks for our hook and loop fastener that's gonna go from here all the way down to here. That's the only part we need to sand, and this is the little raised rail that we need to sand on. We're just gonna go ahead and sand that. (sandpaper scratching) Just scuffing it up so that adhesive will actually stick. Now that we do have that sanded down, we're gonna go ahead and take a wet cloth first and I'm gonna wipe that down and get all that residue or some of that residue up. If you notice how dirty that is. Now we're gonna come back by with some soapy water. We're just gonna spray that down and get that nice and clean. While this side is drying, we're gonna go ahead and do the same thing to the other side. We need to let that dry 'cause we do gotta come back over it with alcohol and clean it again. Once that soap and water is dry, we're gonna go ahead and come back by with some alcohol and clean the top of the rail as well. And again, you're gonna do this on both sides. Now we need to take this adhesive promoter and we need to go ahead and lay it down. Since we do have a spray in bed liner, this is required. If you don't have a spray in bed liner, you do not have to use this. We're gonna go ahead and wipe that rail down this whole length and then we do need to let this dry before we do anything else. Now that you have the rails prepped, we need to go ahead and reinstall the bed liner and grab a couple extra hands will make it much easier. We're gonna go ahead and get that where we need it. Once you do have the bed liner laid in here, make sure you've got it where you want it. And then we're going to go ahead and lift one side up and take that hook and loop off. We're gonna go ahead and peel the cover off the adhesive. Now we're gonna go ahead and lay that down. Now we're going to rub that in. Now that you do have the bed liner installed to where you want it, we need to go ahead and roll this back and peel off our adhesive on our hook and loop and then lay that down and go ahead and put pressure on it, up and down it so we get good adhesion. Once you have one side complete, you're just gonna do the same thing on the other side. Now that we've got the main portion of the bed liner in, we do need to do the tailgate. Now we've got smaller hook and loop fasteners. If you see it on the bottom side, I laid 'em out just like this. I'm gonna do the same thing to the top side. I'm just gonna line these up and put these on here. Now again, we do need to go ahead and sand each area down like we did inside the bed, but we'll get to that in a minute. We're gonna go ahead and take our sandpaper and we are going to go ahead and scuff up where each one of these are located just so we get good adhesion. (sandpaper scratching) Again, like on the inside of the bed here we're just gonna go ahead and clean this up after we sanded it down just like we did before. And we'll come back by and we'll do soap and water. And then once the soap and water dries, we're gonna go ahead and put the adhesive promoter on and let it dry and then we'll stick 'em down. This is our adhesive remover showing the adhesive remover going on. Now we go ahead and take our adhesive coverings off of our hook and loop. Now that you do have those removed, we're gonna go ahead and grab the tailgate part. We're gonna go ahead and stretch it out to where we need to be. Now this top portion here needs to stick here and we're just gonna do the same thing as we did with the bottom part of the tailgate. You're just gonna repeat that process. Now that we have the top of the tailgate all prepped, we can go ahead and peel off our sticky on our hook and loop. I'm gonna do the first two. Once you get those last pieces cinched down that does complete our installation of our BedRug Impact Truck Bed Liner on our 2024 GMC Canyon. I'm Bruce, thanks for watching.


Very good fit, good quality and seems to be durable after a year of use.
This is my 2nd bed rug and I love them. This newest one went in my 2025 ram 1500 with 6.5' bed
Great bedliner! Instuctions could use some work. Watch the Youtube vids, they are better
Info for this part was:
At etrailer we provide the best information available about the products we sell. We take the quality of our information seriously so that you can get the right part the first time. Let us know if anything is missing or if you have any questions.


Thank you! Your comment has been submitted successfully. You should be able to view your question/comment here within a few days.
Error submitting comment. Please try again momentarily.