
Thank you! Your comment has been submitted successfully. You should be able to view your question/comment here within a few days.
Error submitting comment. Please try again momentarily.


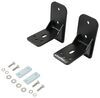
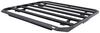
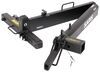
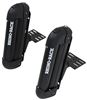
This kit allows you to attach a LED light bar to your Rhino-Rack Pioneer platform. Swivel-mount brackets secure to the sides of light bar and mount on front, side, or rear of platform. Includes 2 brackets and mounting hardware.
Features:
Specs:

California residents: click here
Videos are provided as a guide only. Refer to manufacturer installation instructions and specs for complete information.
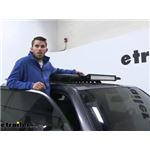
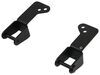
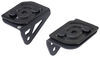
Colin: Hey, everyone. It's Colin here at each trailer, and today we're going to look at the LED Light Bar bracket for the Rhino-Rack Pioneer Platform rack. Now, with this bracket, you're going to be able to get your light bar mounted to the front or the side of your Pioneer Rack so that it has a really good hold on your light bar, and you'll have it for your off-road adventures. The brackets mount into the T-slot of the slats of your Pioneer Platform rack, and what's nice is that these are nice swivel brackets, so it's going to work for a wide variety of light bars, depending on your length. We do have three different adjustment holes in the top part of our bracket, and you can also slide it within each hole to be able to get the correct adjustment to make sure you had a good fit for your light bar.Now, the brackets are going to have a really nice and sturdy steel construction. They also have a black powder coat finish, it's going to help resist rust and corrosion, so it's going to be around just about as long as you're going to have your light bar.
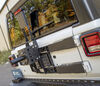
Now, what's nice about this light bar bracket kit, is that not only does it allow you to adjust depending on the size of your light bar, you can mount it to certain sides of your Pioneer rack, but it also mounts to the front of it. over top. It's not mounting to the top right here and taking away that space, so I have this storage space on top, and the light just looks a lot better sitting right in front of the Pioneer rack than it does sitting on top.Now you are going to get all the hardware you need to get the brackets installed on your Pioneer rack. You may need to mix and match what hardware you use when you touch it to your light bar. For instance, right here...
What's attaching our bracket to our light bar. This is the hardware that came with our LED Light Bar, but you do have other hardware included with your bracket kit in case you needed to get your light bar attached. Now with the light bar installed, you do have the ability to adjust it either up or down, but you want to make sure that you loosen up the hardware on the sides. We've gone ahead and done so a little bit so we can adjust it a little bit for you. You can see you can go down or up, but make sure that when you're about to travel, you get it in the desired location, and you tighten up your bolts.Another thing that's really nice about this light bracket kit is that it makes you avoid any type of possible drilling into your rooftop or onto your Pioneer rack.
It's just got a simple nut and bolt assembly. Once we get our light bar mounted, we're not going to have to worry about drilling. Now we'll go ahead and show you how to get it installed real quick. What we're going to do is take our little silver piece right here first and drop it into our channel. We've already measured out where we need to place our bracket.
To do that, you just want to measure your light or just throw your light bar up here and just have a little trial and error test to see where you need to mount it. We'll slide it all the way like that. Now we'll grab our bracket, and like I said, we already know we need to use the outside hole right here, so I'm going to hold it right there. Grab my bolts with a flat washer and a lock washer on it and just begin to thread on.Now don't forget you want to make sure you have a little bit of adjustability. See, I can move it back and forth. We'll go grab our light bar now. We just have it sitting against this bracket right here. We'll just thread our bolt that has a flat washer and a lock washer on it. Then we'll just let it set on the roof, and we'll come to the other side and do the same thing. Once we have all of our hardware loosely installed, we'll just go around and tighten everything up. Again, make sure you have your light bar adjusted to the angle you went to like to appear, and then we'll tighten it down, as well as the brackets up top. Well, thank you all for watching. I hope this information helped you out. That'll do it for today's look at the LED bar mounting brackets for the Rhino-Rack Pioneer rack.

Again, etrailer came through not only with a great product with exceptional customer service. These LED Light Bar mounting brackets are exactly what I was looking for to mount my light on my Pioneer Platform. Sturdy, thick metal, with a nice black finish ties in nicely, and easy to mount. Highly recommended for those that don’t want to drill into your side roof rails!
Fit my Rigid SR50 lightbar to my 36”x56” Rhino Rack pioneer platform. Very versatile, allows for a few different mounting configurations and makes a solid attachment.
Quick shipping!! Very nice light bar mounts for my pioneer rack. ETrailer always impressive with price, selection, and service!!
They were easy to install and look well built , heavy enough not to bend.

trusted quality
Do you have a question about this Accessories and Part?
Info for this part was:
At etrailer we provide the best information available about the products we sell. We take the quality of our information seriously so that you can get the right part the first time. Let us know if anything is missing or if you have any questions.


Brooke M.
11/16/2022
It looks like your experience with the product or with shopping at etrailer could have gone better. If you would like to add any comments to your review, I would be happy to assist you.