

How To Wire the Chevy Bowtie LED Lighted Vehicle Emblem Part # RP86618 on a 2012 Chevy Silverado
Updated 08/30/2017 | Published 08/29/2017
Products Featured in This Question


Question:
Were on the truck do you find the wires you need to hook up the emblem wires the didnt show were he got the wires from I know its the harness but were on the harness I dont want to cut up my harness any more than I have to thanks for your feed back
asked by: HUGH
Expert Reply:
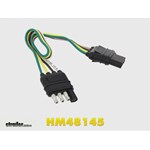
In order to install the Chevrolet Bowtie LED Lighted Vehicle Emblem part # RP86618 on your 2012 Chevy Silverado, our installers recommend using the Hopkins 4-Pole Loop part # HM48145 along with two packs of the 22-18 Gauge Butt Connectors part # 05730-5.
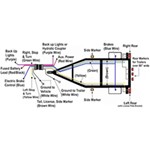
Once you have mounted the emblem to the vehicle and the wires are ran down and out of the tailgate, you will want to cut the 4-pole loop in half and strip back about 3/4" off of the white, brown, and yellow wires on the 4-way connector. You will not need to use the green wire. You can then strip 3/4" of wire jacket off each of the wires coming from the emblem. You will want to connect the brown wire from the emblem to the brown wire on the 4-way. The white wire from the emblem will need to be connected to the white wire on the 4-way and the red wire from the emblem will need to be connected to the yellow wire on the 4-way. You can use the butt connectors listed above to make these connections. Once completed I recommend wrapping the exposed wires in electrical tape.
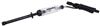
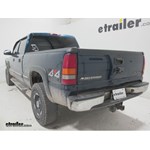
You can now begin to attach the other 4-way connector to the vehicle's factory wiring harness. To do this you will need to remove about 6" of the wire looms from the factory harness that goes to the trailer connector. If you do not have a factory trailer connector the wiring harness, you will need to splice into will be located behind either the driver or passenger side taillights. Once the harness is exposed you will want to have a friend sit in the vehicle while you use a circuit tester like part # PTW2993 to test each of the wires to determine which wire represents the stop and taillight functions. As your truck has brake and turn signal lights that are combined, you will not need to use the included converter box.
Once you have determined which wire goes to which circuit you can then remove 3/4" from the yellow, white, and brown wires located on the other piece of the 4-way connector. The yellow wire from the 4-way will need to be connected to the stop light circuit on the vehicle's wiring harness. The brown wire from the 4-way will need to be connected to the taillight circuit on the vehicle's wiring harness and the white wire will need to be grounded to a clean bare metal surface on the vehicle's frame. You can use the butt connectors mentioned above to make these connections. I also recommend taping all exposed wires with electrical tape in addition to the portion of the factory wiring harness that was removed for this installation. (The stop light wire will only have power while the brake pedal is depressed.)
If you have any other troubles while installing this emblem please let me know and I would be glad to help. I have also attached a few review videos for you to look at as well in addition to an installion video of this emblem on a similar 2002 Chevy Silverado.

Featured Help Information
Miscellaneous Media

Continue Researching
- Search Results: door hold
- Video: All You Need to Know About the T-Style Hook and Keeper Door Holder for Enclosed Trailer