
BedSlide Heavy-Duty Sliding Truck Bed Tray w/ T-Tracks - 5" Rails - 1,500 lbs
Item # BE76ER
Retail:$1,852.29
Our Price: $1,834.00
You Save: $18.29
Confirmed to Fit
2013 Dodge Ram Pickup
5-1/2 Foot Bed without Rambox
Will this fit?
To see if this custom-fit item will work for you please tell us what vehicle you'll use it with.


Need help with installation?
Locate installers near me- All Info
- Reviews (3)
- Q & A (0)
- Videos (1)
- Photos
2013 Dodge Ram Pickup - BedSlide Heavy-Duty Sliding Truck Bed Tray w/ T-Tracks - 5" Rails - 1,500 lbs
- BedSlide
- 75 Percent Extension
- 6 Main Rollers
- 1500 lbs
- 0 Side Rollers
- Steel
- Composite Deck
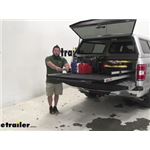
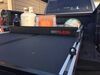
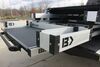
Sliding tray saves you from having to climb into your truck bed to reach heavy toolboxes, firewood, and other items stored at the front of the bed. Perfect for a truck with a tonneau cover or camper shell. Extends 48-3/4" past your tailgate.
Features:
- Heavy-duty tray slides out to provide easy access to gear stored in your truck bed
- Keeps you from having to climb into your bed to retrieve gear
- Perfect for a truck with a tonneau cover or camper shell
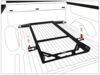
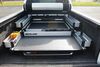
- Guard rails and deck rails along the sides and rear of the tray keep gear contained
- Guard rails prevent taller items from tipping over and spilling
- Deck rails prevent smaller items from sliding off the tray
- T-tracks in guard rails and deck rails provide attachment points for D-rings and accessories
- 4 D-rings can slide anywhere on T-tracks to provide anchor points for tie-down straps
- Deck dividers and BedBins (sold separately) keep hand tools and other items organized
- Large grab handle lets you safely slide tray with one hand
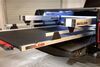
- Release lever secures tray in 4 positions - fully closed, fully extended, and 2 locations in between
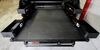
- Textured deck surface helps prevent gear from sliding around while driving
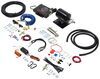
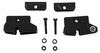
- Installation hardware included - requires drilling
- Durable steel construction with composite decking is weather and rust resistant
- Made in the USA
Specs:
- Weight capacity: 1,500 lbs
- Tray dimensions: 65" long x 48" wide x 4-1/2" thick
- Extension: 48-3/4" past tailgate (75% of tray length)
- Guard rail height: 5"
- Grab handle length: 30"
- Number of bearings: 6
- 2 Load bearings: 3,282-lb rating each
- 4 Ball-sealed roller bearings
- 5-Year limited warranty
- Limited lifetime warranty with product registration

The BedSlide Contractor sliding truck bed tray is perfect for handypersons who work out of their truck and need to transport heavy items. Instead of climbing into your truck bed or having to reach a long way, you can simply slide the items to you. It's much easier on your body and reduces the risk of injury from slipping, falling, or pulling a muscle. It also makes it easy to retrieve the items that you typically store in the front of your truck bed. The heavy-duty tray supports up to 1,500 pounds, so you can safely carry bags of concrete, paver stones, firewood, and other heavy items.
T-Tracks for Accessories

Deck rails and guard rails along the sides and in the back of the BedSlide keep your gear contained on the tray. The deck rails attach directly to the edges of the tray. They help prevent smaller items from sliding off and falling into your truck bed. The guard rails attach to the deck rails and sit 5" above the deck surface. They help prevent taller gear from tipping over or falling off the tray and crashing to the ground. T-tracks in the deck rails and the guard rails let you attach accessories for anchoring your gear and storing and organizing smaller items.
4 Included D-rings provide anchor points for tie-down straps, allowing you to easily secure stacks of bricks, lumber, and other items. Just insert the D-rings into the T-tracks on the guard rails or deck rails and slide them wherever you want. Extra D-rings (sold separately) are available if you need more than 4 tie-down points.

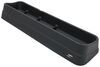
The available BedBins (sold separately) keep hand tools, gloves, and other smaller items organized. Just slide them to the most convenient location along the T-tracks and secure them with the included hardware.

You can also set a deck divider (sold separately) on the tray for easy cargo organization, or to create a make-shift storage bin. You can place groceries near the front of the tray so they're easy to grab when you get home, or keep buckets, spray cans, and other tall items upright so they don't fall over and spill or roll around. The deck divider sits loose on the BedSlide but has a non-skid pad on the bottom that prevents it from sliding around.

If you're going to haul smaller items and need more storage space than the BedSlide provides, you can add an upper tray (sold separately). This lets you store items over the BedSlide without losing access to valuable deck space. Mount it at the front of the BedSlide for easy access to items you will use regularly, or at the back for less-used items. Use the included hardware to mount it in the T-tracks on the side guard rails.
15-6548-CG BedSlide 1500 Contractor Truck Bed Slide Tray - 1,500 lbs - 65" x 48"


Video of BedSlide Heavy-Duty Sliding Truck Bed Tray w/ T-Tracks - 5" Rails - 1,500 lbs


Videos are provided as a guide only. Refer to manufacturer installation instructions and specs for complete information.

Video Transcript for BedSlide Contractor Siding Truck Bed Tray Review
What's up everybody It's AJ with etrailer.com. Today, we'll be checking out the BedSlide contractor. It's going to be a sliding bed tray for your truck. It's going to be a great option if, as you can see, we have a camper shell here. Maybe you have a tonneau cover, or maybe you just have hard time accessing stuff when it's pushed up to the front of your bed. This is going to prevent us from grabbing and unloading or loading from the side.
But we can slide this out now. And this heavy generator, I don't have to climb in all the way in there and go to the back, to wheel it out and lift it out. It actually comes to us when we pull the tray out. Let's check it out. Right away, it's a sliding bed tray.
Let's get to it and slide it in. I'm going to show you a different points. It stops automatically, that way you can use this part as a workbench. If you don't need it out this far, you don't have to bring out this far every time, it does have stoppers. I'm just going to pull on the handle right here.
I'll show you there. Like that, you just slide it in. It stops right there. That's one position. That way, maybe you don't need to get fully to the back, you just need to get right here.
Or there's something right here, you can do that. We'll go in a little bit more. Right there is another position. Again, you won't be able to get to the stuff in the far back, but if it is loaded all the way out to here, you can still grab this stuff easily here. And then the final position is gonna go right there. So, this is all the way pushed back. And let me shut the tailgate to show you how much room there still is. Look in there, there's plenty of room between the tailgate and the handle. So you don't have to worry about those two touching and scratching anything up. Something else I wanna show you, is that how it slopes up. So, let's fully extend it to see that. So, in this position, you can kind of see how it slopes upwards. Now, this can handle up to 1500 pounds. So, if you had a bunch of that weight here on the back, when it brings the truck down, this would still be level. And that way, it's not sagging down. Now, because it can handle up to 1500 pounds, you want to make sure it's strong enough to do that. And the construction is, you got this steel construction on the sides and the frame on the bottom. And then, you have the composite tacking here on the top, which is a nice textured finish. It's kind of like a spray-on bed liner that has a little bit of texture just to help you grip on those items in the back here. So they won't slide around as easily if it was just a smooth surface. Now, along the side, you still have railings too. Those are gonna help you tie down things and just keep things from falling off there. So, if this is pushed in there, you take a turn, you don't have to worry about everything sliding off the edge and falling in between the BedSlide and the wall. And then also over here, you have tie-down points. That you can just loosen and slide up and down the track wherever you need them. So, it keeps everything nice and tight here in the BedSlide. One of the benefits of the BedSlide is all the accessories you can get with it. So, you don't only just have this, but if you want to section things off, you can get a divider. It'll attach to the rails and then you can divide your work stuff from whatever the extra stuff is. Maybe you're just running to the store, and you want to throw some stuff in the back. You can keep that all up here. Plus, that divider just shove everything up there. You want to worry about it, sliding around it all when you're driving. You can also get bins that attach to the side. That'll be for more loose things like hardware or hand tools that don't really have a home. You can set them in those compartments on the side. You put those in there just to help organize that loose stuff that we all ended up just throwing in the back of our trucks anyway. Let's get a better idea of how much space you are working with here. I'll go ahead and measure it out. So, from side to side it's going to be a 45 and a half inches there. And then from front to back, it's going to be 69 and a quarter inches long. And then, let's get the height of the rail. Going to be a little bit right there at five inches. Now, with it back into place let's see how much room you have inside the bed of your truck. There you go, front to back. You have to hook it on the very end there. We come out to the edge of the handle. That's going to be 75 inches. And if we go from side to side. It's going to be 48 inches. Now, let's measure the height. We're going to go from the higher part of the bed to the top of the deck. And it looks like it's right there at four and a half inches. And that's important, just because if you have a tonneau cover or something lower than this camper shell, you want to know that before you start loading tubs and stuff in there. Or taller items like a generator and be able to still close that tonneau cover. When you're looking at sliding bed trays you do have a couple of options out there. One of the other ones is going to be CargoGlide. And either one of those you go with, they're going to have different weight capacities. So, you can get the one that's best for you, and how you're going to use it. Other than that though, the difference is there are going to be far more accessories for the BedSlide here. And that's going to be those bins I talked about or the divider. There's a lot of those accessories. That way you can customize this and let it work the way you want it to work. Or just organize it the way you want to organize it. And another one is how much of it slides out. So, you're going to get 75% of the tray slid out here on this one. And then the CargoGlide, it's going to come out a hundred percent. But the difference there is this one has that up-slope we talked about. So, it kind of goes up that way then you weigh this down, it'll still be level. The other one does not. The CargoGlide comes out straight here. So, if you weight it down, it wouldn't be level, if you put a lot of weight here at the end. Installation is going to be pretty much the same for both the different sliding bed trays. You're going to have to drill holes in the bed for both of them. It's not that bad, but I think the BedSlide has a advantage just because it has a better tool that it comes with for the rib nuts. It's going to be a more solid tool to use that makes it easier to do that part because that part is a little difficult. But again, just like drilling the holes, it's not that bad. Just follow along with us and you'll see how to do it. First up, we're going to come here to the ends. I'm going to unscrew this with an Allen key, and just loosen that screw that's down in there. That way we can remove the end and slide in our pieces. Just like that. You're gonna want to do that with the curved end facing down. That one slides in there like this. Just going to put two of those in there And then, we'll replace the end here. Coming to this end, I went ahead and removed the end cap, just like before I'm going to put these blocks in. Again, with the curved down, slide them along the track. We're going to put five of them in. Just like this. And then, replace the cap. Now, we're going to line up our corner bracket. What we're going to do is you're going to slide those blocks pretty easily along the track. You want to line those up with those holes on the bottom of this bracket. So, let's set it in place and see if we need to push this one in just a little bit more. Match up that hole. Looks like we need to come over right there. There we go. The holes are aligned there, and now we're going to install our screws. And then I'll come back and tighten down the rest of the way with the Allen wrench. So, after we got this corner installed we're going to stop there. We're not going to install the other corner just yet. You got to slide this rail in first. So, what we're going to do, just like on the sides, we're going to slide one of those plastic pieces in with the curved side down. And then, slide this into the corner bracket. You're going to line up those holes there. Make sure the rail is going to touch the end here. So, let me just slide this out just a little bit. I can move it into place there. All right, with that in place, you can come back with this bolt, and tighten it down. And then come back with a ratchet and tighten it down. After installing the first corner and the head rail, We're went over to the other side and did the same thing. Now we're coming back here on the side, and we're going to use the existing plates we put in there. So, I kinda got it lined up. What we're going to do. These are going to be for the D-rings here on the side. You're going to screw this in. And the two in the middle here are going to be for the side bracket, for the side rails. So, what we're going to do, is just set that in place like we did before. Line up those holes. Let's go ahead and line up this one first. Get it started. Once I got that on, I can move it on its own. Now onto that one. I'll come back in, loosely install this. You don't want to tighten this all the way just yet, but I'm going to get them a little bit tighter. Now, we'll go back with the D-rings and slowly screw those in. And we decided to put one on each side, of that side bracket. I'm going to leave those loose too, so you can moving them back and forth, for now. Now, we're going to install the upper rail. I'm going to put these blocks in real quick. Before we do that, same as we've done all the time, curved end down. With those slid in, now you can see that I just slid those in on the open side. I what that open side to go into the bracket. Just slide that into place there. And then, I can slide our side bracket down and we want at least six inches of space from the bracket to the end, for that nice clean look. So, I'll leave this loose and come back here in a second. I'm going to add the bolts in here to the plastic pieces we slid in. Now, I left that loose in the corner bracket, just to keep it in place. I'm going to do the same thing here. It's going to line up this side bracket with the plastic that we put in there. And get that hand-tightened. With everything in place where we want it, we can go back and tighten everything down. And then, we're going to repeat this whole process on the other side. Now, we're ready to lift up the BedSlide and put in a place. Now, you're going to need some extra set of hands because it's pretty heavy, especially towards the back. And when you go to set it in here, make sure you center it. We put a piece of cardboard here, so it doesn't scratch up the bed as we're lining it up. And you want an inch and a half from the front of the bed there. So, the extra set of hands. You're going to lift it, set in place. This is where the cardboard comes in handy, because we're going to slide it towards the front. So, we finally got it right, in the bed of the truck. Took a little bit of maneuvering back and forth. We measured from the wheel Wells, just to make sure that it was the same spacing on each side. Upfront is where we had the trouble of lining that up. So, what we've discovered is if we got two pieces of wood and put it there. They measured out an inch and a half, and we set that at the front of the truck bed and then push it up against it. That was far easier than trying to line up each corner. Because we kept going back and forth and we're having issues with that. So, we just put those wood up there, pushed up against there. Now it's even on both sides and it's set in place. Just going to reach up and slide this back to the first locking position. Right there. And then, go up and start drilling our holes. Now we're ready to check out and see where we're going to draw our holes. Now, we've slid it out just to expose those holes we can use. And each one has three spots, you can see there. It's going to be the best one, that has the most coverage on it, and the part that goes up on your bed. So, not this part of the , this would not be a good one to pick. So, we're not going to go with the middle one. This one has a little bit here on the raised side. This one has the most, so this is the one we're going to go with. So, what we do is we're gonna take our half inch drill bit. That's the one we're gonna drill our last hole out with. So, I'm we're just going to push down on there. Use that tip to make a point in the bed just so I can see where it's going to be. Now that I've made that mark, come back with the center punch, put in that same spot, and just push down. It's going to make an even more of a hole, so I can start my pilot hole. With that first pilot hole, we're gonna repeat that on the other holes. We're going to come back here. Now that we've got the pilot hole, and use our half inch bit to go and widen that up. With the hole enlarged, we can drop in our rib nut. I'm just going to apply a little bit pressure with my thumb. It'll go into place there. Now, we can get it to expand, and how we're going to do that is use this bolt and rib nut tool. That's something we found that was helpful. Because as you go to tighten this down you're going to drop this through use a wrench, another tool. And what that's going to do is that bolt's going to make the rib nut expand down there. And it kind of fights you a little bit, we found if you add a little bit of grease it makes it way easier. So, I'm just going to dab the on there. Just get a little bit of it, put it on the bolt itself and then a little bit on the tool here. So, that it can not get stuck on that bolt. So, just put a little bit there, drop that through. And now, we're going to tighten a little bit of it to get it started. That way I don't have to hold it up. We're gonna take our ratcheting wrench, set it in place. And I'm gonna put all the pressure down on this wrench and then put the Allen key in here too, and started to tighten it down. Now, we're going to come back and put a washer on our bolt. We did those before our rib nuts. I'm going to hand tighten, and then use the Allen key to fully tighten it down. Overall, I think it works really well. I was impressed with it. I think it's going to really help when you got all that cargo in here, and you want to easily access it but kind of keep it nice and neat. You don't have to climb all the way back there to the grab something if you need to. Slide out, grab whatever you need, and slide back in. Nice and neat. Well, then that does it. Thanks for hanging out and hope this helps..
Customer Reviews
BedSlide Heavy-Duty Sliding Truck Bed Tray w/ T-Tracks - 5" Rails - 1,500 lbs - BE76ER
Average Customer Rating: 5.0 out of 5 stars (3 Customer Reviews)
Sliding tray saves you from having to climb into your truck bed to reach heavy toolboxes, firewood, and other items stored at the front of the bed. Perfect for a truck with a tonneau cover or camper shell. Extends 48-3/4" past your tailgate.by: Lori 10/31/2023
This is an excellent bedslide. It’s handled a large amount of weight and various types of conditions and still slides in and out with ease. If there was one thing I could say was an issue it’s the latch to extend it. It’s very hard to pull without a lot of strength or when wearing heavy gloves. Otherwise I would recommend this bedslide to anyone looking for one.
by: Glenn 03/02/2023
Just two words......LOVE IT!
by: Steve 09/21/2022
3
3
See what our Experts say about this BedSlide Truck Bed Slide
Info for this part was:

Installed by:
Andrew K

Updated by:
Wilson B

Updated by:
Brian T

Written by:
Matthew S

Edited by:
Daron K

Video by:
Thomas T
At etrailer.com we provide the best information available about the products we sell. We take the quality of our information seriously so that you can get the right part the first time. Let us know if anything is missing or if you have any questions.
Product Experts Available Now!
Call 1-800-940-8924
Thank you! Your comment has been submitted successfully. You should be able to view your question/comment here within a few days.
Error submitting comment. Please try again momentarily.