
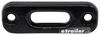
Bulldog Winch Powersports Series ATV Winch - Synthetic Rope - Hawse Fairlead - 2,500 lbs
(32 reviews)
Price: $314.99
Bulldog Winch Powersports Series ATV Winch - Synthetic Rope - Hawse Fairlead - 2,500 lbs
Item # BDW15014
Retail:$421.20
Our Price: $314.99
You Save: $106.21


- All Info
- Reviews (32)
- Q & A (0)
- Videos (3)
- Photos
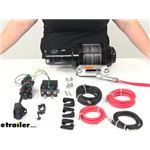
Bulldog Winch Electric Winch - BDW15014
- ATV - UTV Winch
- 2001 - 4000 lbs
- Synthetic Rope
- Plug-In Remote
- Bulldog Winch
- Medium - 5 to 9 fpm
- 1.0 HP
- 11 - 20 lbs
- 3-Stage Planetary Gear
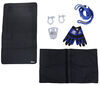
Standard-duty winch with 1-hp, permanent magnet motor and mechanical brake lets you quickly and safely recover a stuck ATV. Sealed motor, gearbox, and contactor protect winch from the elements. Hand-held remote and handlebar rocker switch included.
Features:
- Powersports ATV recovery winch is designed for recreation and standard-duty work applications
- Perfect for 350cc - 700cc utility quad 4x4s or sport quads
- Recommended for ATVs with a maximum GVW of 1,250 lbs
- 1-hp, Permanent magnet motor delivers powerful, fast, and safe line pulling
- Motor is lighter and uses less current than a series-wound motor
- Sealed to keep out water and prevent internal corrosion
- Sealed, 250-amp contactor transmits power from the vehicle's battery to the winch motor
- Water- and weather-resistant to IP67 specifications
- Mounts under ATV's front cover or hood with included hardware
- Automatic, mechanical brake holds 100 percent of the load while minimizing winch creep
- All-steel, 3-stage planetary gear train
- Provides increased drum speed when compared with worm drives and 1- or 2-stage planetary gear trains
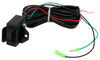
- Plastic, hand-held remote with 20' lead lets you operate winch from a safe distance
- Remote port with 8' lead mounts anywhere on ATV with included hardware
- Water-resistant switch powers the load in and out
- Wireless remote control (BDW20156 - sold separately) available
- Rocker switch lets you control the winch from the seat of your ATV
- Mounts to handlebar with included hardware
- Free-spooling clutch ensures fast rope payout and reduces wear on the motor
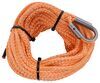
- 3/16" Diameter HMPE synthetic rope is strong as steel yet lightweight and safer to handle
- 50' Long with 6' woven polyester protective sleeve
- 1/4" Steel hook and nylon hand-saver strap included
- Heavy-duty, CNC machined billet aluminum hawse fairlead
- Rounded fairlead hole helps prevent friction damage to rope
- Black anodized finish resists corrosion
- Mounting channel with hardware included for winch and fairlead
- Custom mounting plate (sold separately) may be required to mount winch and fairlead to your ATV
- Durable, black powder coated steel body and motor resist corrosion
- Tie-bars and extra-thick side frames help to create a strong and rigid winch body
Specs:
- Rated line pull (with a single layer of synthetic rope around the drum): 2,500 lbs (static load)
- Maximum recommended ATV GVW: 1,250 lbs
- Motor: 12-volt DC
- Line pull at 0 lbs:
- Power draw: 15 amps
- Line speed: 24 FPM
- Line pull at 2,500 lbs:
- Power draw: 204 amps
- Line speed: 9 FPM
- Line pull at 0 lbs:
- Gear ratio: 136:1
- Duty cycle: 2 minutes on/15 minutes off
- Braking: 100-percent load-holding mechanical
- Battery lead wire: 5 gauge
- Battery lead length:
- Contactor to battery: 5'
- Contactor to winch: 3'
- Rope dimensions: 50' long x 3/16" (5.5 mm) diameter
- Rocker switch lead length: 9.5'
- Winch dimensions: 16-5/16" long x 4-1/2" wide x 4-5/8" tall
- Drum dimensions: 2" diameter x 2-15/16" long
- 4-Bolt mounting pattern (center to center): 4-15/16" x 3"
- Hawse fairlead thickness: 3/4"
- Distance between hawse fairlead mounting holes (center to center): 4-13/16"
- Winch weight (with synthetic rope installed): 16.9 lbs
- Recommended battery size (for maximum power): 650 CCA
- 2-Year limited warranty

This Powersports ATV recovery winch is designed for standard-duty work and recreational applications. It's perfect for your 350cc - 700cc utility quad 4x4 or sport quad with a maximum GVW of 1,250 lbs. It includes a handlebar-mounted rocker switch so you can control the winch from the seat of your ATV and a hand-held remote with an 8' lead for safe operation at a distance. The motor, gearbox, and contactor are sealed so you can confidently run your ATV through mud and water. And it includes a mechanical brake, a synthetic rope and hawse fairlead, and a universal mounting channel for installation.
Standard-Duty, 1-Horsepower Motor

This winch features a 1-horsepower, 12-volt DC motor with 2,500 lbs of line pull. The permanent magnet motor offers the same line-pulling power and speed as a series-wound motor of comparable size, but it's lighter and uses less current. The motor is sealed to keep out water, and it's constructed of durable, corrosion-resistant materials including the powder coated housing, copper battery terminals, and zinc-plated steel hardware.
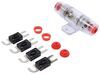
Sealed Contactor


The contactor - or solenoid - transmits power from the ATV's battery to the winch motor. There is a 5' lead that runs from the vehicle's battery to the contactor and a 3' lead that runs from the contactor to the winch. These leads are interchangeable so you can mount the contactor in the most convenient location - typically under the ATV's front cover or hood near the steering column where it's easy to access. Simply match the longest cable set to the longest run and the shortest cable set to the shortest run to eliminate untidy cable runs.
The 250-amp contactor is sealed to meet IP67 specifications for water and weather resistance, and it has copper terminals and zinc-plated steel hardware that resist corrosion. There are also 6 rubber boots included that fit over the terminals on the contactor and battery to repel water and help prevent corrosion.
Free-Spooling Clutch

The free-spool clutch enables you to pull out the rope by hand. This saves battery power, prevents the brake from wearing down prematurely, reduces wear on the motor, and is much faster than waiting for the drum to power out the rope. To release the clutch for free-spooling, simply rotate the dial on the end of the gearbox to the "Freespool" position. To reengage the clutch, rotate the dial back to the "Engaged" position. The clutch positions are indicated on the face of the dial.
The clutch is driven by a 3-stage planetary gear train. This provides more speed than traditional worm gear drives or 1- or 2-stage gear trains.
The steel gearbox has a rust-resistant black powder coat finish, and it's sealed to keep out moisture. The clutch shifter is constructed of durable hard plastic.
Automatic, Load-Holding Mechanical Brake

The automatic mechanical brake securely holds a load and prevents unintentional payout (or creep). A large spring coil contracts when the winch is in gear and the drum is winding in. When the winch stops, the load starts to pull and the spring expands to press against the spring chamber. The pressure of the spring on the wall of the spring chamber creates resistance to stop the drum from rotating outward. At maximum pressure the brake holds 100 percent of the load.
The friction created when the spring is pressing against the spring chamber creates heat. That heat is quickly dispersed away from the motor shaft and through the gearbox. This prevents potentially damaging heat buildup near the motor.
Hand-Held Remote

The hand-held remote has an in/out rocker switch and a 20' lead that allows you to operate your winch at a safe distance from your ATV. Simply connect the water-resistant, plastic remote to the remote port when you need to use it, and disconnect it to store it away when you aren't using it.

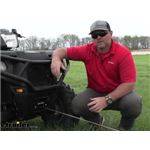
The remote port includes an 8' lead and mounting hardware so you can install it anywhere on your ATV. A common, easy-to-access mounting location is on the exterior of the right or left front fender beneath the handlebars.
There is also a wireless remote kit (BDW21056 - sold separately) that lets you control the winch from up to 100' away.
Handlebar-Mounted Rocker Switch

The handlebar-mounted rocker switch lets you operate the winch from the seat of your ATV. It includes mounting hardware and an 8' wiring harnesss with quick connects.
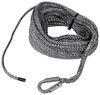
Synthetic Rope

The synthetic rope is made of HMPE fiber that is lightweight yet stronger than steel. This synthetic rope is safer to use than a steel rope because it generates less kinetic energy - and therefore less kickback - if a break occurs. It won't stretch - or creep - over time like steel rope can. And it's also less likely to fray and create sharp strands so it's easier to handle and easier to spool.
The rope winds around a solid steel drum. The mounting flanges are strong enough to resist bending or breaking if the rope wrap becomes uneven and excess stress is put on the drum.
A 6' woven polyester protective sleeve at the hook end of the rope provides extra protection for your hands. A hand-saver strap is also included to use in conjunction with work gloves (BDW20070 - sold separately) so that you can safely handle the rope and hook.

The removable clevis hook is made of high-strength forged alloy steel that is heavy duty and rust resistant. It has a spring-loaded safety latch for quick fastening and removal. The hook attaches to the steel thimble on the end of the synthetic rope.
Hawse Fairlead

This winch includes a CNC machine billet aluminum hawse fairlead that is designed to be used with synthetic rope. It helps guide the rope as it's winding in and out, and it has a rounded hole to help prevent wear. The 3/4" thick fairlead has a black anodized finish that resists corrosion, and it installs with zinc-plated hardware.
Note: The hawse fairlead does not mount directly to the winch - it typically mounts to the included channel or to tabs on a custom mounting plate (sold separately). Bulldog Winch mounting plates - as well as most other aftermarket mounts - include these tabs.
Rugged Construction
The winch is constructed of strong, durable materials that are able to withstand any weather condition or terrain. The motor housing, gearbox, and contactor are sealed to keep water out. The motor housing and gearbox are made of corrosion-resistant powder coated steel. The steel tie bars and side frame drum supports help to create a strong and rigid winch body.
Installation

To install the winch on the front of your vehicle you will need a suitable mounting location. The winch and fairlead may be bolted to the included mounting channel. This mounting channel is a basic L-channel and may not be compatible with your ATV. In most cases you will need to bolt a custom mounting plate (sold separately) to the front framework of your ATV in order to mount the winch and fairlead.

The contactor can mount anywhere on the ATV but will typically mount under the front cover or hood near the steering column so it's easy to access.

You can mount the rocker switch on either handlebar but it's typically mounted near the brake on the handlebar opposite the throttle. This allows you to control the winch and accelerate the ATV at the same time. It includes mounting hardware and an 8' wiring harnesss that connects to the contactor with built-in quick connects.

The remote port includes an 8' wiring harnesss and mounting hardware so you can install it anywhere on your ATV. A common, easy-to-access mounting location is on the exterior of the right or left front fender beneath the handlebars. A 7/8" hole will need to be drilled into the fender - or wherever you choose to mount the port - to feed the wiring harnesss through.
Winch Line Pull Capacity
| Layers of Rope | Capacity (lbs) | Total Rope on Drum (ft) |
|---|---|---|
| 1st Layer | 2,500 | 8-3/16 |
| 2nd Layer | 2,200 | 17-3/8 |
| 3rd Layer | 1,930 | 27-3/16 |
| 4th Layer | 1,700 | 37-11/16 |
| 5th Layer | 1,480 | 50 |
The line pull capacity of your winch is determined by the maximum load your winch can pull with a single layer of rope on the drum. As more layers of rope are wound onto the drum, pulling the same load requires more force, leading to a loss in winching power. With a 2nd layer of rope around the drum, your line pull capacity is reduced by approximately 14 percent. With 3 layers on the drum, the line pull capacity is reduced by approximately 23 percent, and with 4 layers on the drum it is reduced by approximately 35 percent.
Note: It is recommended that you begin any line pull with a minimum of 5 wraps and a maximum of 2 layers of rope on the drum.
Double-Line Pulling

Increase the pulling capacity of your winch by doubling up the rope with a pulley block (BDW20023 - sold separately). Secure the pulley block to a tree saver strap (BDW20051 - sold separately) with a bow shackle (BDW20006 - sold separately) to provide a strong anchor for your double-line pull. Or use the Bulldog Winch 7-piece rigging kit (BDW20034 - sold separately) that includes everything you need for heavy-duty recovery. Using double-line operation will approximately double your winch's pulling capacity.
15014 Bulldog Winch Powersports Series ATV Recovery Winch - Synthetic Rope - Hawse Fairlead - 2,500 lbs
California residents: click here


Video of Bulldog Winch Powersports Series ATV Winch - Synthetic Rope - Hawse Fairlead - 2,500 lbs


Videos are provided as a guide only. Refer to manufacturer installation instructions and specs for complete information.


Video Transcript for Bulldog Winch Powersports Series ATV Winch Installation - 2014 Polaris Sportsman
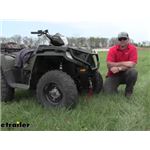
Hey everyone. Shane here with hr.com. Today I have a 2014 Polaris sportsman, 570 ATV. I'm going to walk through how to install the bulldog 2,500 pound winch and the bulldog custom installation bracket. Hanging a winch onto your ATV is going to give you a lot of different options. Maybe you like to go out four-wheeling with your friends with your friends and you found yourself stuck and you're depending on somebody else to get you out.
Having a winch on there is gonna allow you to take your winch strap, run it around a tree be able to pull yourself out or maybe you can pull one of your friends out. Maybe you use Rover around your farm and you've come across big logs in some of your trails. And you can't really move them by hand again adding winch on like this, you can wrap around the tree you can get it out of your path to make it a lot easier. So what our winch looks like when it's installed you can see it fits very nicely on the front of our ATV. This particular winch is going to have a three-stage planetary gear in it.
And when you compare that to like a wormhole gear Wormhole gear is just a single gear and it only goes one speed. Having a three-stage planetary gear allows your drum to move much faster. So whatever you're moving, maybe you're moving a tree or again, pulling yourself out you're gonna be able to move a little bit quicker. It's going to have an auto break in it. So let's say we're on a steep Hill.
We have our cable wrapped around a tree and obviously our vehicles a neutral. We don't want our vehicle to start backing up on us. So it's going to have an auto break in it that once we have that connected it's not going to allow the vehicle to move any farther. The watch itself is going to be fully in case. So the casing around it is not going to allow any water or anything to get inside and do any damage to any gears.
It's going to have an auto release or they say a free school. And it's a little lever over here on the side or a little knob on the side which we'll show you here in a little bit and allows you to pull the wire, pull the cable out freely. So for wanting to wrap it around something we can just grab onto it, pull it out get it wrapped around whatever we have lock it back into place and ready to go. It's going to come with the Hoss Fairlead it's going to have rounded edges because this particular winch is going to come with a synthetic rope. When you compare the synthetic rope to like the wired ones, the wire ones tend to rust over time. They splinter and even wearing gloves. They'll splinters can sometimes get through those gloves and they tear up your hands. Even if those wire ones get kinked they don't swell up anymore. We don't have to worry about that with the synthetic rope that synthetic rope is going to be 50 foot long. So we're going to have plenty of length to get out pull it out, get it around a tree, get it around, you know whatever we may be working with. It's also going to come with the hook and the strap. So we don't have to actually grab on to the synthetic rope itself. We can grab it right here on the strap to pull it out. This is going to be our knob for our free spool. All we're going to do is we're going to turn it. And that allows us again, to pull out our synthetic rope without having to hit our button. Once we get out to where we want lock it back in place and it locks the rope. It's also going to come with a switch, the switch. You can use it in two different ways. You use it. How we have it here where we have it mounted to the handlebars. It's going to come with the handlebar Mount or it's going to have an eight foot cable. Once it's connected to the solenoid, you can take it and tuck it in somewhere and you can use it while you're standing out away from the bike. It's really going to be up to you and how you want to use it. It is going to be a momentary in and out switch. Now this particular kit does have to be wired to an ignition source, which we have it wired directly to one of the wires coming off our ignition here so that it only comes on when our key is in the on position. Now it is recommended. Anytime you're winching something, you have your line out have a line break on it. Even though this is a synthetic rope, we still don't want. If that happens to break, we don't want any of that rope coming back and hitting us And you can see, as soon as I load up the switch, it's got again, the auto brake in it. It's not going to let us roll anywhere. Now, as far as our bracket that's mounting it to our vehicle. This is a custom bracket. It's also by bulldog. It doesn't come with a winch. However, you can find it here, at E Trailer. just by checking the fit guide for the bike that you have. The bracket itself as I mentioned is going to be custom fit. So we're not going to have to drill any holes or anything like that. It's going to Mount directly to factory holes that are already in the frame. As far as the installation process the winch and the bracket. If you decided to go with the bracket is going to come with all the necessary hardware to get them installed. The only trimming we had to do, and it was for this particular bike is this small panel right here was still on there. So we had to cut it out in order to install the winch. Other than that, it's pretty simple and straightforward. And wiring is very simple and straightforward. Now we've gone over some of the features. Let's walk through how to get it installed to start our installation. We need to remove this lower panel. If you have a guard, the way this one is set up this guard going to have to come off too. Well, two bolts up here, and then two down here we're going to use a half inch socket wrench or two sockets to remove thatOkay, we'll set this aside. Then we need to remove this bracket here. Nine millimeter socket. We'll remove it. And we're going to take a T 27 star bit. And we're gonna remove. You're going to have one bolt here. And one on the opposite side, we need to remove both of those. Take this. And we're going to pop this off and set it aside. Now, before we install this on the bracket, we need to make sure we cut our loop off. First. We're going to cut this zip tie We'll just unwind this one time leave a little bit hanging out. Then we can install it onto our bracket. You're going to have a bracket that looks like this. You'll notice that it's angled. We want this angle kind of see how it's facing down. We want that facing down. We're going to take this bracket, line it up there. We're going to slide our winch in like this. This bracket is gonna mount just like that. In your kit with your winch, you're going to get pack of bolts. We're going to use four of the longer ones. You're going to put on a lock washer And then a flat washer The winch is going to have threaded holes. We'll get one in each corner of our bracket. We'll take a half inch socket. We'll tighten them down. Or a wrench. Now we're gonna install our fair lead. I'm finding that the bolts are not quite sitting in there and it could be just paint. What I don't want to do is I don't want to strip out the bolts. So I'm going to take a drill bit. I'm just going to clean the holes out just a little bit. That's what you want to do. Now it's up to you. You can spray that whole. You take that paint off. I have a paint marker. So I'm just going to cover up that bare metal and help resist any rust or anything later on. Now we're going to take our fairlead. We're going to run our rope through it. We're going to line up with the holes we're gonna take our bolt. Grab it through each one of the holes And then on the under side we're going to put a flat washer a lock washer and nut on each one. Now we're going to use an 11/16 socket. 16 socket and a number eight Allen head or Allen wrench. And we're going to tighten those down. Next we're going to take our winch setup and we're going to get it mounted to our bike. On your bike there's a frame mount here. Your going to see two holes on each side. We're going to line these brackets up with those two holes. in your kit with the bracket you're going to have a couple of short bolts. You have to use these to mount the bracket. You're going to have hardware that comes with your winch. I suggest putting on a flat washer and a lock washer from the winch pack before you mount, or when you mount this to the actual bike. In the instructions they don't show the lock washer and flat washer on there. And we'll take a half inch socket. We'll tighten those down. Next we need to find a place to Mount our solenoid. They really want this mounted up high out of the elements. The problem is there's a compartment here. You want to mount it inside. You have open contact. So if you're throwing, you know straps or anything like that in there, they hit that. You could have an issue. The centerpiece underneath of this comes out to get to the radiator fluid. There's not really a whole lot of room in there. One thing you could do possibilities. You could buy a junction box, Mount that the junction box inside of this compartment here and then Mount this inside of it. It's going to take a lot of extra work getting all your wires ran up there. All of that. So what I think I'm going to do is this panel right here on the side, we're gonna remove it. Our frame rail went straight down, remove this panel. We're in mount a solenoid right to it. Our radiator is in a block anything for men that there this panel is going to block anything, coming from our wheels, from hitting it. We're gonna take our star bit. We're going to move this bolt here. should be a pushpin fastener on this backside but it doesn't look like they had one on there. Let's take this slide it out of the way. And then this is our frame rail I was talking about since our battery is right here it's going to make it easy to wrap everything up and away from anything hot or moving. So I think what want to do is I'm gonna Mount my solenoid right here. It'll be behind the panel. As I mentioned, it'll be behind the radiator. All my connections here will be protected. And then again, we have our front panel. We still need to put on. So we'll have plenty of coverage for it now we need to do is we need to drill holes into the bracket so we can get our hardware mounted. Now with our solenoid mounted. All I did was use some cell tappers. So a little bit of an odd angle to get a drill bit in there to drill holes. Again, I just use cell tappers. I use an extension on the drill and just went straight down on it so you to hold it in there pretty well. Next, I'm going to go ahead and get my switch wire routed down to my solenoid. I think I'm gonna Mount it right here on my handlebars. It does come with a handlebar bracket. I'm going to get these mounted. I'm going to run them back behind this panel down underneath and over my solenoid. And then we'll go from there. You're going to get two sets of wires two red and two blacks. One of the sets of black and red are going to be short. And the other set are going to be long depending on the winch you have. It's going to depend on whether you use the short ones from the winch to the solenoid or the long ones, our particular winch. We're going to be using the short ones. You're going to have boots that come in your kit. They're a little rubber boots. You're going to slide them right over your right over the ends of the cables. We're going, gonna go ahead and run these from our winch over to where we mounted our solenoid. Before I get that completely tight I'm going to get this routed over. How I'm routing It is where this bracket ties into the frame. There's a, there's a gap in there. I'm going to run it right straight through. Use a 10 millimeter socket. Once you get your wires routed to tighten them down you want to take that boot and you want to slide it over the top of your connectors. You're going, gonna notice on your solenoid. There's a black and green wire, but also a blue wire going into a negative post, the negative post and positive post on that end are they cables that are going over the connections that are going to go to the battery the opposite side, the two coming from the winch. So our wires that we just ran over you need to route them and connect them to these two posts. I think what I'm going to do is I'm going to run right underneath here and here they'll stay away from my radiator. There's a hole in my frame right there. I can run a zip tie around and it'll hold it up tight, right there. This is going to be my longer positive cable. That's going to go to my battery. This is how I mounted my switch. Again. It's going to come with the bracket. Just kind of determine where you want to put it and then tighten everything down. The cable is coming off That I routed, I took these two panels apart. It's just got three screws, at least this one does you have one in the front here, and then two here and then one here, and this will pop off. And you pretty much got a straight line straight down through there, right over to where the solenoid and battery are. You're going to have a red wire in this bundle. It needs to be connected to an ignition switch. We want to connect it to a wire that only is on when the power is on or when the keys in the on position. I determined that it's this red one with this black Stripe. You'll notice there's two of them. I tested all four of these and determined. This is the one I'm going to be using. I'll go ahead and test it again to show you. You can see we have no power. The key's in the on position. So that's the wire we want to tap into now. I am not going to cut the wire and splice this in what I'm going to use a quick splice connector. These do not come in your kit but you can pretty much find these anywhere you get that put back together there. And then get this put back on. Throw a zip tie on there. Keep it looking as factory as possible. The green and black wire coming from our switch. We're going to connect them to the green and black wires on our solenoid. What I'm going to do is once I connect them I'm going to go ahead and tape them up to make sure they stay connected. If you really want it to, you can cut these off and hardwire them, but if you ever have any problem with the solenoid or the switch you'd have to cut the wire and then re splice it. So it's really going to be up to you. Last thing we need to do is we needed to connect our power and ground from our solenoid to our battery. Once we get that connected, we'll test it all out make sure everything is working correctly. And then we can start putting everything back together. Now that we've got everything connected to our battery we'll go ahead and test it out. Turn our key on. Now that we know it's working correctly we can go ahead and start bundling up our wire getting our front panel back on keep in mind on this front panel we are going to have to trim a little bit. Yours may not. We're going to have to cut out this lower panel for our winch fairlead and our cable. So what I'm going to do is I'm going to cut it right along that line. I think I'm going to cut it from in here. You can kind of see where it has that lip there. Just going to follow that line, cut this out and then we can go from there. If we have to trim out anymore I'm just going to use a rotary tool with a cutting blade to get that done. Now that we've got everything put back on need to put our hook onto our ring I'm going to bend the Cotter pin and slide that pin out. I'm gonna reinstall it just like that. And of course, slide on our pull strap. We're ready to go. That's going to do it for a look at and installation on the bulldog 2,500 pound Lynch and custom installation bracket on a 2014, Polaris sportsman, 570 ATV..
Customer Reviews
Bulldog Winch Powersports Series ATV Winch - Synthetic Rope - Hawse Fairlead - 2,500 lbs - BDW15014
Average Customer Rating: 4.7 out of 5 stars (32 Customer Reviews)
Standard-duty winch with 1-hp, permanent magnet motor and mechanical brake lets you quickly and safely recover a stuck ATV. Sealed motor, gearbox, and contactor protect winch from the elements. Hand-held remote and handlebar rocker switch included.by: Joe 08/17/2023
I have never had a problem with e trailer co. Competent, kind professionals…unlike most , in this world of many pathetic (so called) businesses …
If I need something they sell, I order it from them. No shopping around needed.
Satisfaction guaranteed.
by: Tony 10/25/2022
use on pontoon. works great
by: Pete11/14/2018
Real decent winch. I just use it for the plow. Havent had any snow just yet so I can't say how reliable it is


by: Michael07/18/2023
It broke second time used it
by: Chris 11/15/2022
Great winch for my 2011 Polaris Sportsman 500. Easy to install and cable up. Delivered as promised. I have bought a few things from etrailer.com and always on time and still working.
by: Gary A02/18/2020
Pros:
Winch seems well made. Custom mounting bracket for my 2016 Polaris Sportsman 570 fit perfect. More than enough wire. etrailer installation video is excellent. Still winter so have not had a chance to give it a serious test.
Cons: Manufacturer instructions were worthless. Supplied connectors for the handlebar and remote switch were total junk. They must have saved 15 cents by supplying this junk.
by: Stewart02/28/2022
Works fine, very satisfied
by: Larry C04/21/2017
It did everything that I wanted it for ,hasn't let me down. I recommend this product. The price was great the quality was also great. I really like the rope instead of the steel cable. Rolls up on the drum better. And not as stiff as the steel ones.
by: David10/28/2018
I can't really rate the product yet because I just installed it, but it seems to be working just fine.
This five-star rating is for the customer service of the company though. I got a phone message on the Saturday following when I ordered it. The company called to let me know that the winch I ordered wasn't available but they had another, comparable one in stock they could send me. They followed up with an email. I responded to the email saying that I would like the replacement and go ahead and make the change. I got a response within a couple of hours and the product was in the mail Monday morning.
The winch is installed and it seems to work.
by: Steve A.06/19/2015
Found the exact winch i needed looking at the info on the website. Made one phone call to see if it could reach me in time, as I was totally amazed that I actually received the winch the next day!
Installed in very short time in my enclosed cargo trailer. It works great, as advertised.
Still scratching my head over ordering one day & by the next afternoon, in another state, I received & installed it.
by: Glenn 11/22/2019
I needed a replacement winch for my 2008 Arctic Cat 400 ATV. Etrailer promptly answered my request for assistance in selecting the correct model. The Bulldog 2500# winch arrived promptly and I had it installed in less than 2 hours. It perfectly fit the existing winch mount. Works flawlessly.
by: E. H.08/29/2019
Winch mount and winch kit for ATV, arrived as expected. Great customer service and communication, after order, during transport, and upon arrival. Haven’t mounted the winch yet but trust if there are any issues or questions, etrailer.com customer service will resolve. Good experience so far.
by: Chris 12/04/2019
Arrived quickly, fairly easy to install on my ATV. Have not HAD to use it yet, but it sure seems like it will do the trick. Main purpose for my snow plow. Definitely will be ordering from etrailer if a need arises in the future.
by: Ed B12/16/2020
Worked great for several uses with my plow.. but it doesn't appear to last for the long haul. Big storm right now, started to plow, it made some cracking sound and stopped working...now I can't plow my driveway and will have to pay someone. I bought this instead of going to Harbor Freight.
by: Justin01/08/2020
First time ordering from etrailor.com. Was very please with the product everything went great. Will definitely be ordering products from etrailer.com again
by: Michael11/03/2017
Great winch!! I installed it on my Popup Camper and its great!
by: Mark 01/06/2022
I bought this to use on my side by side. I could not have a better winch. I have had other winches and none compare to this. It is quit and really strong.
by: Ronald11/14/2019
just unpacked everything and its just what i ordered. all looks like well made and in good shape. will be installing it monday afternoon and will give an update then.
by: Joshua01/26/2022
Great setup on my quad for plowing snow!
by: Chris11/25/2020
Works like a champ!
by: Zach 08/22/2023
by: Todd 11/15/2023
by: Brian02/22/2022
by: Nathan09/17/2022
by: Brett 08/30/2022
25
32
Show More Reviews
See what our Experts say about this Bulldog Winch Electric Winch
- Does The Bulldog Winch Powersports Series ATV Winch BDW15014 Have An Inline FuseThe Bulldog Winch Powersports Series ATV Winch # BDW15014 you were looking has a sealed 250 amp contactor that acts as a solenoid, and you will use the included wiring to run from the battery of your 2014 John Deere Gator to the contactor, and then from the contactor to the winch. I included a video of the Bulldog # BDW15014 for you to take a look at.
view full answer... - Winch and Winch Mount that Fits 2012 Polaris XP800For a winch mount that fits your 2012 Polaris Ranger XP 800 you'd want the part # BDW15156 then for a plow that fits this that comes with a remote the Bulldog Winch Powersports Series part # BDW15014.
view full answer... - How to Remove Synthetic Rope on the Bulldog Winch Powersports Series ATV Winch # BDW15014I spoke with my contact at Bulldog Winch who said that removing the synthetic rope on the Bulldog Winch Powersports Series ATV Winch # BDW15014 is actually very easy. Simply run the rope all the way out and then there is a set screw that holds it in place. You can run the rope out via free-spool or the power but it would be much quicker to run it out with the free-spool feature. I'm not sure what your application is but you should be mindful that each time there is a layer of rope on...
view full answer... - Can an Electric Winch be Used on a 1987 Kawasaki KLF 300 Bayou 2x4There is not a custom winch mount for your model ATV, however if you have a 2 inch trailer hitch receiver like # C45006, you could use a Winch Receiver Mount like # BDW20155. With a mount combination like this, you could absolutely use an electric winch. My recommendation is the Bulldog Winch Powersports Series ATV Winch # BDW15014 which will work very well for your application and give you easy to use controls at your handlebars. I've attached a video to assist and you can see the prices...
view full answer...
Do you have a question about this Electric Winch?
Info for this part was:

Edited by:
Tyler C

Video Edited:
Jacob T

Video Edited:
Chris R

Installed by:
Kathleen M

Written by:
Lisa S

Updated by:
Wilson B

Updated by:
Matthew S

Test Fit:
Shane H

Video by:
Jonathan Y
At etrailer.com we provide the best information available about the products we sell. We take the quality of our information seriously so that you can get the right part the first time. Let us know if anything is missing or if you have any questions.
Thank you! Your comment has been submitted successfully. You should be able to view your question/comment here within a few days.
Error submitting comment. Please try again momentarily.