
# 1
Swagman Upright Bike Rack for 1 Bike - Roof Rack Crossbars - Frame Mount
Planning on bringing bikes while camping. I mounted 2 of the Swagman bike racks to my new Sportrack on my pop-up camper. The bikes fit perfectly. The racks seem sturdy enough. Not heavy duty, but for my needs they should be fine. Assembly was relatively fast and easy.

We have used the Swagman Roof Rack a number of times when we have needed the additional bike carrying capacity. It took a couple attempts to get the initial spacing of the bike rack properly balanced on the van’s roof rack as recommended by the instructions. But it was easy to do and once set was very easy and quick to put on and take off. The rack works great, the bike is easy to put into place and secure. The bike and rack are very stable and quiet and haven’t required any mid-trip adjustments. We always put the cheapest bike on the roof (lol) but do use a bit of duct tape to protect the finish just Incase. We are very satisfied with the rack and consider it quite a deal for the money.
Thule Domestique Roof Bike Rack Review - 2010 Ford Flex

Today on our 2010 Ford Flex, we'll be test fitting the Thule Domestique roof-mounted bike carrier, part number TH513. We'll begin our test fit by placing the carrier onto the vehicle's crossbars. We'll loosen up the Allen bolts on the rear bracket, as well as the Allen bolts at the head of the carrier, to bring both brackets around the underside of the front and rear crossbar. Once we've positioned the brackets over the crossbars, we'll use the Allen key to tighten down the Allen bolts to secure our Thule Domestique to our Ford Flex. Once everything's tightened down and secured, we're ready to load up our bike. We'll undo the tray strap at the rear of the carrier and double check to make sure the skewer's loose as well.
Swagman Fork Down Roof Bike Rack Review - 2010 Ford Flex
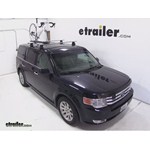
Today on our 2010 Ford Flex, we'll be test fitting the Swagman Fork Down roof-mounted bike carrier, part number S64710. We'll begin our test fit by placing the carrier onto the vehicle's load bars. We'll start at the head of the carrier and slide the silver brackets around the underside of the front load bar. We'll then use the black wing nuts to thread onto the bracket, securing the head of the carrier to the front load bar. We'll then move to the rear load bar. This time, we'll slide the silver bracket through the top of the carrier, down against the edges of the rear load bar.
RockyMounts TieRod Stretch Roof Bike Rack Review - 2010 Ford Flex

Today on our 2010 Ford Flex well be test fitting the RockyMounts Tierod Stretch Roof Mounted Bike Carrier, part number rky1011. Well begin our test fit by placing the carrier on to the vehicles crossbars. Well then remove the black plastic cover at the head of the carrier to bring the rubber-coated steel straps around the underside of the front crossbar. Well then loosen up the Allen bolts at the rear of the carrier to bring the rear bracket around the underside of the rear load bar. Well then tighten down the silver bolt at the head of the carrier tightening the straps to the front load bar. Well then tighten down the Allen bolts at the rear of the carrier for the rear bracket to secure the rear of the carrier to the rear load bar.


What our customers are saying:
"I ordered a bike rack for my trailer hitch. It is a great product, very reasonably priced on April 10th. I installed it on my car on the 14th in time for the weekend. How can you go wrong?"