

To see if this custom-fit item will work for you please tell us what vehicle you'll use it with.


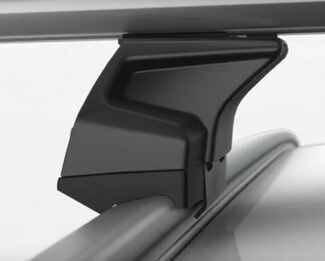
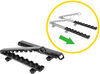
These custom clips and pads let you mount Thule Evo Flush Rail or Edge Flush Rail feet on your vehicle with flush, factory side rails. Clips attach to a mounting bolt in the foot assembly and tighten together. Includes 4 clips and 4 pads.
Features:
Specs:
Secure, Clamp-On Installation

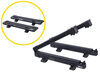
To complete installation, place the fully assembled rack on your flush rails and tighten the rack in place with the torque tool included with the feet. The inner and outer clips in each foot tighten with a single mounting bolt to ensure an even, secure grip on your rails. An audible click from the torque tool indicates the rack is secured properly.
Protection for Your Rails
The rubber-coated steel clips and molded rubber pads protect your side rails from scratches and abrasions. The pads easily slide onto the bottoms of each foot, and they're designed to fit the shape and contour of your vehicle's flush rails.

California residents: click here
Videos are provided as a guide only. Refer to manufacturer installation instructions and specs for complete information.
Hi everyone, Aiden here with etrailer. If you drive a 2023 Lincoln Aviator and you're looking to expand your cargo space, then I think a roof rack is a really great place to go. This option from Thule is gonna be their WingBar Evo roof rack, and it's gonna give you a really solid fit and excellent look on top of the vehicle and a lot of capability. So let's check it out. Now this style of roof rack is gonna have a little bit of what we call crossbar overhang. That's just this bit of bar that extends past the tower outside closer to the edge of the vehicle.
And honestly, this kit from Thule doesn't have much crossbar overhang, but some people don't love the look of this. If you've ever seen a factory roof rack, it's gonna have crossbars that end right at the towers and Thule does make a kit that will work like that. It's just gonna have slightly shorter bars and they'll just end in the towers here. For me, really it's more of a style preference because functionally you're gonna get the same bars, the same fit kit and just slightly different heights for the towers. And it also depends on what you're putting on your roof.
So if you're only putting a roof box up here, say for a long road trip and that's the only accessory you plan on using, you're not gonna need a whole lot of bar space. But if you do plan on putting like a basket or a bike rack and you want something to be a bit closer to the edge of the roof and easier to reach, then bars like this that have some overhang can be really helpful for that. When attaching those accessories, the most common method you're gonna probably use is a clamp. And these arrow bars are gonna be really friendly to pretty much any clamp on accessory. This bar style is super modern and most accessories are designed to work with it really well, but it does have the option to channel mount things up top.
You can flip open this door to access the channel and usually there's gonna be some weather strip here that you would just slide your accessories around. Ours is not on this set of bars because we keep these down in the shop and after many, many years of use they've just gotten lost. But that weather strip will keep wind noise down and channel mounting things is really nice if you plan on leaving the accessory on your roof for an extended period of time. It just gives you a really clean and secure look. But then also it allows you to move things all the way up to the very edge of the bar without having to worry about clamps sliding off or interfering with your tower at all because these towers are a little bit wider and all of this space they take up, take up is room where a clamp really wouldn't be able to interact very well.
Some measurements to keep in mind, from the center of your roof where it's tallest to the bottom of the bar, we're looking at two and three quarters of an inch. And from that same point to the top of the bar, we're looking at three and three quarters of an inch. Those are important to keep in mind because that space underneath the bar is where your clamps are gonna go. That should leave you plenty of room for accessories to not interfere with your roof. Although I would watch out for any sunroof operations. And if you've got a hand knob to tighten down some accessories, it should allow a decent amount of room for your hand to get under there. As for the overall height, it keeps things pretty low profile, but of course you wanna be mindful of any accessories you have on top of those bars, especially things like roof boxes. They can add up to 19 inches of height to the top of those bars and it might interfere with things like your garage or even a parking garage when you're traveling. Another measurement to watch out for is your crossbar spread. That's just the distance from one bar to another, and that's really important for picking out accessories or if you already own an accessory. They will have a certain crossbar spread range that they work with and you wanna make sure that your bars are set up in the right spot for 'em. Luckily with these rails, you can really set these wherever you want. So if you've got a certain accessory that works with a 30 inch crossbar spread, you can dial that distance in, tighten it down exactly there, and you don't have to worry about any fitment issues. As for your weight capacity, it's really gonna be limited by that of your roof. So always check your owner's manual, see what the roof is rated for, and that's probably going to be the lowest component. So just go by that and make sure you're not overloading anything. Always keep in mind the weight of your accessory and anything loaded up on that accessory. Now to begin your install, it's a really good idea to just lay all the parts for your roof rack out and make sure that nothing's missing. This kit does have a few more pieces than some other roof racks, but it shouldn't be too bad. Everything's pretty clearly labeled. So for your clamp pieces, there's gonna be a piece labeled A, B, and C. And with those pieces, there's going to be this small nut. For the towers, you're gonna have the tower itself as well as the end cap on the outside. You'll of course have your crossbars, two for the whole kit. One is already installed for us. And then a few things you want to have on hand is probably a tape measure and a flathead screwdriver. And then Thule will include a torque tool to tighten everything down properly. Assembling the clamp pieces to your tower is pretty straightforward. You've got a really big open section at the back right here and everything will assemble an alphabetical order. So take the A clamp with the A facing out, slide it over that stud and make sure that the cleats grab up top. On the bottom side of your tower, the fit kit pad labeled B will just line up with the shape of that tower and press into place. And you should see these little rubber tabs seat into some slots. And then your C clamp will hook over the A clamp. That middle hole should line up with the stud on the tower and we can very loosely thread in the nut here. We wanna leave it loose because that will allow the clamp to open up and grab around our rail on our roof. Now to get this attached, we're just going to flip our crossbar upside down so that we can see the end cap tab. Press it in and pull it out. You might have to just wiggle it back and forth here. Take your assembled tower, flip it upside down and just slide it into that slot there. Make sure it doesn't pull out. Pop the end cap back in and repeat that on the other side. Our whole assembled crossbar can then go up on the roof. It can be helpful to have an extra set of hands on the other side to receive the roof rack once you're setting it in place, but it's not entirely necessary. If you're comfortable with your reach, you should be able to set it in there at least somewhat decently. And from here, that's where the tape measure's gonna come in really handy because you wanna set your crossbar spread at this point I like going from the center of one bar to the center of the other, and right here we're sitting at around 32.5 inches. I'm gonna scoop this back just a little bit. 32 inches I think will be a pretty good sweet spot for us. And I of course wanna take that measurement on the other side to make sure that the bars are running parallel to one another. When you're setting up your first crossbar, I like just using some reference point on the vehicle to set your position. So for us on the rear crossbar, I just lined everything up with this seam between the rear door and the rear window, centered it up on both sides and that got us a really good position for this rear bar. When you're happy with the front to back, you can then adjust your side to side because the crossbar is still pretty loose at this time. I like to just eyeball this personally. You can break a tape measure out and get it really precise, but I find that with this, if you get it close enough, you're just fine. And right there's looking pretty good. So I'll go ahead and take my torque tool and start to tighten these clamps up. With these, it's going to pull the clamp tight and pull the bar tight to the tower at the same time and you don't really run the risk of tightening it unevenly like you do on some other roof racks. So you can just go ahead and run one side down all the way until you hear a click in that torque tool. That'll let you know that everything is properly tightened down and not overt tightened. And we can then just turn our attention to the underside of the bar, push this track all the way up to meet the tower, that'll close up this gap underneath and reduce any wind whistling that we might hear going down the road. Just repeat all this on the other side. And to button things all up, we'll just take those tower covers and place them over our hardware. It should click into place and you can use that flathead to twist the plastic core upright to the lock position. These do tend to get chewed up pretty easily though, so if you swap to the regular lock cores, you just swap those out and use your key to lock those up. But with all that done, all you gotta do is stand back and admire your work and just, I like to give things a good shake test, make sure that nothing is moving around or accidentally left loose on me. Luckily Thule makes this pretty easy because there's really only four bolts to tighten down and that will secure everything. So as long as you heard a click on all four corners, you should be good to go. But that'll do it for our look at and installation of the Thule WingBar Evo roof rack on our 2023 Lincoln Aviator. My name's Aiden and thank you for watching.

Do you have a question about this Accessories and Part?
Info for this part was:
At etrailer.com we provide the best information available about the products we sell. We take the quality of our information seriously so that you can get the right part the first time. Let us know if anything is missing or if you have any questions.


Thank you! Your comment has been submitted successfully. You should be able to view your question/comment here within a few days.
Error submitting comment. Please try again momentarily.