
To see if this custom-fit item will work for you please tell us what vehicle you'll use it with.

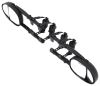
Let fresh air in while keeping bad weather out. These heavily tinted rain guards keep your interior dry, reduce wind noise, and help to keep temperatures down by promoting better air circulation in your vehicle.
Features:
Videos are provided as a guide only. Refer to manufacturer installation instructions and specs for complete information.
Speaker 1: Today on our 2018 Subaru Outback wagon, we're going to be taking a look at and showing you how to install the WeatherTech side window air deflectors with dark tinting for the front and rear. That's going to be part number WT82780, and it's also available in light tinting using part number WT72780. Now, you can also pick up the front only in both light and dark tinting as well as the back only in light and dark tinting.So here's what our window deflectors are going to look like once we have them installed on our Subaru. As you can see, it's going to be a really nice low-profile design. It's going to follow the lines of our window and blend in with the contours of our Subaru.Now, opposed to the older style where we used to have to put an adhesive onto our door sill or on the paint itself, these are going to go inside the window track and have a lot more of a sleek look to them and not have to worry about any kind of damage to our vehicle.Not only is this going to add a stylish look to our Subaru, but it's going to allow us to keep our window rolled down whether it's a hot sunny day and we've parked it or we're going down the road and it's raining. We're going to allow fresh air to come in and all that hot air to leave the vehicle without having to worry about any kind of debris or rain getting inside.Even on the back window, it's going to have that same low-profile design to give you that nice look and all the same features.
As you can see, with the dark tinted windows, our dark tinted deflector's going to blend in nicely. So it's not going to add an overall big look to it, but it's also not going to distract from the look of it either.Our window deflectors are going to be made out of 3-millimeter thick acrylic material, so they're going to be extra durable. And they are specifically designed for our Subaru, so let's go ahead and show you how to get it installed.To begin our installation, we're going to go ahead and roll our windows down about a third of the way, just enough so we can get to this top edge, and we're going to make sure that the window is nice and clean. So we can take some glass cleaner, and we're just going to wipe down that top edge of all the windows we're going to be working with.Now, we're going to have this little metal clip. It's kind of a U-shape or a J-shape, and it will be sitting just over the gasket here and resting over the edge, but before we put it in the final position, we're going to need to take the little clear piece of tape they provide us in our kit, and we need to remove the backing, and we're going to try to get this as close to center on this clip as we can.
So we're going to go right over the top and just fold it over until it reaches the other side.Now, the clip itself . Again, the small hook section is going to go behind that rubber weather stripping here and sit on top of the door sill, and we're going to slide it as far forward as we can so it butts up against this pillar right here.So since we're on the passenger side, you want to make sure you grab the correct one. An easy way to tell with the front ones is that the logo should be towards the back, and that bowed section should come out away from the vehicle. So we're going to bring our deflector in, and we're going to want to rest the bottom corner on that tab we just put in and just get that plastic piece started on the inside of the window channel.Again, you just want to make sure that that bottom piece is resting on the metal tab. Without getting too much on the front started, you're going to want to bow the back section in to where you can get back into the window channel here, but leave yourself a slight bit of a gap to the top.We're going to move towards the front.
You're going to grab the deflector and very gently kind of just start working, bending it so that we can start working from the front to the back getting it behind this weather stripping here, getting it into the window channel. So you're going to want to work your way front to back, doing a little bit at a time. Then you get down, so it goes into that channel. You may have to work it back and forth a little bit. Then once you have it all in, you're going to make sure that the weather stripping's in the correct position.
Again, just kind of working it back and forth, up and down. Kind of pushing up and pulling out very gently on it, making sure it's seated all the way in.After you have it in place, again, just kind of work it back and forth, pushing up and out to help set it in place. And we're going to roll the window up several times very slowly. Make sure it goes all the way up, then we'll roll it all the way back down, and do that several times. Now, if you hear any kind of popping noises or any little cracking sounds, that's all right. It's just having the deflector get pushed into the space it needs to go.And with this one in place, we can go ahead and put the back one on as well. For our back windows, again, you want to make sure that the glass is nice and clean, and we'll find the correct piece for our rear window. Now, this can be a little bit more difficult to figure out which one's the left and right, but if we come to the very corner, we'll notice that there's a slant cut. That cut you want to go towards the back side of the window, and if we hold it up, we can kind of see how it contours to our vehicle a little bit better rather than if it was the other way around.The rear windows are going to have these tape that's covering up some adhesive. So before we put it in, I want to make sure we've peeled all those off. Then just like the front, we're going to slide the front end, again leaving a slight gap. We'll bow the deflector going around that weather stripping, and we're going to slide the entire assembly up. Again, pushing up and kind of pulling at the same time to get it to seat in place. Then we can open up the door, roll the window up and down several times.Now that this side is in, we'll go ahead and do that for the other side as well. And once we have them all in place, you want to make sure that you leave your windows rolled up for at least 12 hours so they can settle.And that'll finish up your look at the WeatherTech side window air deflectors on our 2018 Subaru Outback wagon.
Ratings & Reviews

Info for this part was:
At etrailer we provide the best information available about the products we sell. We take the quality of our information seriously so that you can get the right part the first time. Let us know if anything is missing or if you have any questions.


Thank you! Your comment has been submitted successfully. You should be able to view your question/comment here within a few days.
Error submitting comment. Please try again momentarily.