
This oval vacuum mount gives your MoonShade awning a clip-in point on vehicle surfaces where a round mount may not get full contact. It locks in with a few pumps and moves easily when you shift your setup. Two mounts are required for one awning.
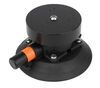
This vacuum mount creates a temporary anchor point on clean, smooth, and non-porous surfaces, with an oval footprint that helps it seat properly on roof ribs or narrow flat spots. When you're setting up, you'll need two to support your MoonShade. You can use the included eyebolt in any of the threaded holes to set the clip-in angle that works best for your setup, which helps you line up the canopy the way you want it. The plunger forms a solid seal when the surface is clean and flat, and it's easy to release when you're ready to move the anchor.
Once the surface is clean, moisten the rubber pad to help it form a solid seal. Press it against the surface and pump the plunger until the indicator line disappears. From there, you can clip your MoonShade to the eyebolt and check the seal as needed throughout the day. When it's time to move, press the release tabs to break the seal and lift the mount away. It's a quick process that's simple to run through once you've done it a few times.
Videos are provided as a guide only. Refer to manufacturer installation instructions and specs for complete information.
Hi, everybody. Andy here with etrailer.com. Let's take a quick look at this MoonMount Oval Vacuum Anchor with Eyelet. Now if you're looking for a secure way to set up your MoonShade awning, this oval moon mount vacuum cup is going to be just what you need. Now this is going to hold on to just about any non-porous surface, so you're not gonna have to worry about it budging while you're out exploring. This is designed with several multiple, several mounting holes, rather.
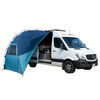
And this oval mount is going to make it easy to adapt to different setups. This does include this stainless steel threaded islet that's going to work seamlessly with the MoonShade integrated carabiner system. And I've got a photo there on your screen just showing you this cup, this vacuum mount in action. And so it does include that islet. It does include a smaller and a larger threaded insert with the hex wrenches here to get those tightened down into place.
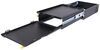
And just to give you some measurements here, looking at the overall length, we're sitting right at about five and seven eights inches long on that cup. And about three inches wide. The height of the cup itself, about two inches. And if you add the islet, about three and a half inches. And this is billed from anodize aluminum and rubber.
I'm really impressed with the build quality. Some of the other vacuum cups that I've seen from other manufacturers are typically all plastic, but immediately I was impressed with the anodized aluminum. So I think it's gonna hold up really well to the elements that it's gonna be constantly exposed to. It is lightweight, but it's strong enough to handle serious weight. Up to 176 pounds horizontally, and 132 pounds vertically.
And now this oval shape does solve a problem for certain vehicles. While the round four and a half inch MoonMount needs a wider, flatter surface, many SUVs and trucks have roof ridges or gutters that make that tricky. So if your roof space is less than four and three quarters inches wide, this oval MoonMount is going to be a better fit for you. However, if you are interested in checking out the round one, on your screen I am including our item number for that round one. You can take that number and pop it into search build of our website, and that will take you to the round one and you can add that to your order. So let me give you a brief demonstration. Typically what you wanna do is you wanna make sure that the surface and the the bottom of the pad here are both clean. You do wanna moisten it a little bit as well to give you a good, strong hold. I'm not gonna do that for our time together just to be quick, but I'm just gonna press down firmly and begin pumping this plunger until that white line disappears. And so I've got a firm hold here. So as you can see, I can pick that right up. And it's gonna be very easy to get that set into place. And you wanna check it every so often. And if that white line does happen to reappear, you'll just plunge that again, and then you can see that cup depressing. And so you'll be good to go. Now you probably saw it's very easy to remove. You've got a tab here, you're just gonna push against that. And then that's going to break that seal and allow you to easily remove that. So just a few tips to keep in mind. You don't wanna leave your MoonShade unattended while it's mounted. You wanna avoid using these mounts on vinyl wraps or decals, and you don't wanna leave them on painted surfaces for more than 48 hours. Just some things to keep in mind. This is also going to include this cap, and you might be tempted to throw this away after you get this, but you do wanna keep it because when you're not using the the vacuum cup here, that cap is going to keep this clean and keep it in good shape when it's in storage or when it's not in use. Now, if you happen to have any other questions about this or any of the other parts that we carry for Moon or anything else that we carry, don't hesitate to reach back out to us. We wanna make sure that you're getting exactly what you want and need. Well, that's gonna wrap up our look today. I do hope that it was helpful for you. Again, my name is Andy. Thank you for joining me.
Info for this part was:
At etrailer we provide the best information available about the products we sell. We take the quality of our information seriously so that you can get the right part the first time. Let us know if anything is missing or if you have any questions.


Thank you! Your comment has been submitted successfully. You should be able to view your question/comment here within a few days.
Error submitting comment. Please try again momentarily.