
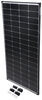
Enjoy a weekend off grid with this complete solar kit for your RV. Gives you 400 watts of solar power generation, an efficent MPPT solar controller, and a powerful pure sine wave inverter charger. A great kit if you plan to add more panels later on.
Features:
Individual Component Specs:
Solar panel
Solar controller
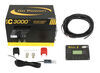
Inverter charger
Fuse block
This kit is perfect if you're looking for a strong foundation to add on to later. That's because the MPPT solar controller functions with greater efficiency than a PWM solar controller. Basically, a MPPT solar controller can convert excess voltage into amps, charging your battery bank faster.
MPPT controllers are great for large solar panel systems, but PWMs are more cost effective and work great for smaller systems. It's not worth investing in MPPT if you have modest energy generation.
Since the Go Power PowerTrack kits come with advanced components, you'll have a lot of room to grow. All you'll need is another Eclipse expansion panel (GP47MR). It includes all the hardware and branch connectors needed to add on another 200 watts of power per panel. With this kit, you can add on 4 more panels to get as much as 1,200 watts of solar capability.
California residents: click here
Videos are provided as a guide only. Refer to manufacturer installation instructions and specs for complete information.
Hey, everyone, Shane here with etrailer.com. Today we're going to be taking a look at the Go Power PowerTrak 400 Solar Kit. Like our neighbor today, if you've ever found yourself camping somewhere where they don't have shore power or hookups for your main power, that's where this kit is going to come in. What it's going to do, it's going to take your 12 volt power, it's going to convert it to, or invert it over to 110. So, you know, you can run your microwave or maybe you want to run a coffee pot, something like that, that you otherwise couldn't off a regular battery power. It's going to come with two solar panels that are 200 watts each.
It's going to come with your inverter, 3,000-watt inverter, 125-amp charger, and your automatic transfer switch. And what the transfer switch does is when you plug into shore power, it's automatically going to switch that over so you're getting the 120 or 110 power from the wall. When you unplug that, it's going to switch back, so it's taking your 12-volt power and changing it over to 110. The setup is going to work with all different battery types, gel, AGM, flooded, or lithium, like we have here today. The solar controller, it's going to have a automatic multi-stage smart charging system, which, depending on the battery you have installed and have set up, it's going to help maintain that life.
It's going to recognize what type of battery it is to help charge it the correct way, and it's going to extend the life of your battery. It's going to come with a touchscreen. It's going to show you your AC in and out, DC power being used, which, since we're using AC power we're not really using DC power 'cause we're plugged into the wall. If we unplug from the wall, you'll see our AC in and out go away. It's telling us that we're using our inverter.
You'll notice our second screen here, it is not going to come with the solar panel kit. However, our neighbor decided to add a 300-amp power Sun Cycle Lithium Battery, which is going to require a shunt to detect the power going in and out, or to show what is going in and out of the lithium battery. This screen is going to be strictly for the battery. Each one of your screens, if you have more than one, is going to do the same thing. This is going to allow you to set up your inverter.
You can set your time and date, charging system, screen settings. So depending on how you want to mount the screen, if you want to mount it straight up and down, rather than like this, it'll allow you to change the screen so it fits that. It's going to give you plenty of cable. So if you wanted to mount this farther away, you got up to 20 feet that you can mount this controller away from your batteries. Just keep in mind where you're going to have to route that. It is a camper. Walls we inchesre hard to get through. That's why we monitored 'em here. Our setups inside, underneath the bed, which is where our neighbor wanted it. The controllers here, they can see it from outside the door if they're standing outside, and they can monitor their inverter as well as their battery power. So as I mentioned before, this is going to come with two solar panels, 200 watt. They're going to be monocrystalline solar panels, they're weatherproof, impact-resistance, so they're going to hold up really well in all kinds of different elements. 200 watts each, 9.6-amps per panel. The dimensions are going to be 59 1/8-inch long by 26 and 5/16 wide, and 1 inch and 1/2 deep. So that kind of give you an idea of how maybe you want to set 'em up. You can kind of do your measurements before you get your kit in so you can get a head start on how you want to install it. As far as the installation goes, I'm not going to lie, it's trying, but if I did it, you can do it. I'd give yourself probably a good weekend to do it though, 'cause you're going to have some wires that need to be ran, some different plugs that need to be done. You're going to have to drill some holes, obviously, for your panels, your control screens, your controller, mounting your inverter, depending on the batteries you have, where you have those set up. And, of course, mounting your solar panels and then routing those wires down to get them connected to your controller and to your battery itself. Now we've got everything hooked up. If you look on the front of the inverter, you'll notice we have two green lights. So we have our connections made all correctly there. If you didn't, you'd have a red. That status light, the bottom green one, it'd be blinking red. It'd give you some different codes to figure out what's going on. Our controller for our solar panels, you'll see the three green lights. It's telling us we got solar power, or we got power coming in. We're connected correctly to our battery. We have our screens, one's for our inverter, the other one is going to be for our battery. We know those are working correctly. Go ahead and check our 12-volt power in the camper. We're not hooked up to shore power, so we're going to see what our inverters going to do for switching that 12-volt power over to 120 or 110. So you'll notice our 12-volt power is working through our inverter. (switch clicks) You'll notice here, microwave is working. So our inverter is switching everything over to the 110 power. I'm going to go ahead and kick on the AC fan (switch clicking) (fan whirring) so you can hear that running. The AC, you can run it off of that, however, it's going to drain your battery really fast. So I wouldn't suggest that. Fan in the bathroom, (switch clicking) (fan whirring) we know all that's working. That's going to do it for our look at the Go Power PowerTrak 400 Solar Kit.
Info for this part was:
At etrailer we provide the best information available about the products we sell. We take the quality of our information seriously so that you can get the right part the first time.


Thank you! Your comment has been submitted successfully. You should be able to view your question/comment here within a few days.
Error submitting comment. Please try again momentarily.