


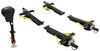
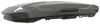
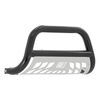
When the road disappears after dark, this Kuat light bar with 5 Diode Dynamics C2 Pro pods helps you take it back. It bolts to your 54-inch Kuat DEK platform with no drilling, keeps light off your hood, and includes wiring for a clean finish.
This driving beam throws a light down your lane and out toward the shoulders, with a reach rated up to 1,280 feet (about four football fields). It's brightest up close and gradually fades with distance, so you get strong light where you're driving and helpful visibility farther out. And because the beam is shaped to stay forward, you get that reach without lighting up your hood and washing out your view.
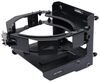
You want more light up top, not a weekend of measuring, drilling, and hoping you got it right. This light bar is made for a 54" wide Kuat DEK roof platform and bolts on without putting holes in your gear. Wiring is included, so you can run power cleanly and keep your platform looking like it came that way from day one.
 Alternate Instructions
California residents: click here
Videos are provided as a guide only. Refer to manufacturer installation instructions and specs for complete information.
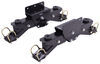
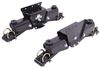
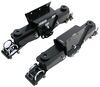
Hello neighbor, this is Curt with Etrailer and today we're gonna take a look at the light bar for your Kuat DEK platform rack. So when you're in your vehicle driving and maybe you're, you know, going offroading, you're overland or you're just driving around some of those, you know, tight country back roads, it might be winding around a little bit, at night out there, you know, there's no extra ambient light to really help you out with your visibility. So having a light bar set up like this can be crucial in order to help you drive safely, you know, to avoid anything like any obstacles or any ditches in the road or any wildlife as well, like a deer crossing over your path or anything like that. Having the kind of visibility that lets you see hundreds of meters in front of you can be an enormous help. So the light bar actually is a part of the platform rack and that you're gonna remove the nose of the existing DEK platform and you're gonna bolt it in through these two bolts right here. Basically just replacing the existing nose of the platform with this.
There's gonna be a wiring harness that'll come off of it on your passenger side and we'll show you how to route that soon. And what we've got here is gonna be five Diode Dynamics C2 Pro driving LED pods. They're in a custom placed housing and these are gonna be what helps you really be able to see out at night. They are basically, they're not adjustable, they're placed very specifically with a 30 degree horizontal view and a 10 degree vertical view. But with that 10 degree vertical view, what that essentially is going to do is ensure that it's not gonna be pointed down and glancing off of your hood creating unwanted glare.
Now there are two different light modes that you can get out of this light bar. First you can get is your bright white. This is gonna be angled straight out, helping you see way out into the distance as you're driving. So you could see some of those blind turns, down trees, big holes or ditches or ruts or anything that you might come across in the field or on one of those back roads as you're moving along, allowing you to navigate those safely. The other thing that we'll have is a setting for an amber backlight.
And while this doesn't have enough power output to really be usable in those low light dense fog type of conditions, it does create a really nice aesthetic. And the white version of this or the white light that you'll get out of it, that can give you up to 390 meters of visibility on flat terrain and without any obstruction. So in ideal conditions, almost 400 meters worth of visibility with this light setting. So as far as installation goes, it's actually pretty straightforward and simple. We are not doing a permanent install today on our vehicle.
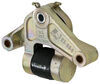
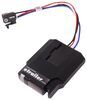
So I'm gonna walk you through a little bit, you know, what you're going to need to do. On the passenger side of the light kit, you're gonna find a wiring harness that you'll plug in and what you're gonna end up doing is routing this cable to whichever side of the vehicle that your battery is on. If it's on the passenger side, that makes it actually really, really easy because it's already on that side. You can run it right down your windshield under the hood and make your connections there. Your connections are going to be a red wire for the positive end of your battery terminal and a black wire for the negative end. We're just using the battery box today again 'cause we're not doing a permanent install. There is also a relay switch that you're gonna have to find someplace in your engine bay to mount safely and out of the way. And from there it's gonna run to your switch. Now the switch is this kind of round hole right here and what you're gonna want to do is route this through the firewall behind your engine into the cab behind the dash of your vehicle. Now there's probably a wiring harness, a factory wiring harness already running through there. So you could just follow that on through and then find yourself a good mounting location inside of the vehicle. Now you could be pretty free depending on what vehicle you have on where to put that. You can drill it into a space on the dash, into that center console. Or in my opinion, one of the better places to put it would be in with any of those empty knockouts that you might have in your dash. Now if you do have an existing auxiliary switch on the dash already of your vehicle, you'll be able to wire this into that as well through this harness here. The kit is also gonna provide you with this wire hider. And what this is, is just a thin kind of rubber tube. It's got an adhesive backing, and what it allows you to do is, whichever side of the windshield, whatever side your battery's on for the quickest route of your hookups, you can run it down that side of the windshield, run the wire through it, and it'll keep it hidden and outta the way and hold it in place so it doesn't end up being loose and sliding around anywhere. So if I had my battery on the passenger side, I would route it just like this, but if I have it over on the driver's side, I want to keep it clean and outta the way without too much loose wire. The best way to do it would be to unscrew these six screws on the back panel of the lighting. I'm sorry, it's seven screws actually on the back panel of the lighting kit here. And I would route my wire through that and out the other side. There is a cavity over on the other side as well, the driver's side that you'll be able to run the wire out of and then down the windshield and into the battery on the driver's side of your vehicle. So once you've got all your wires routed and you're hooked up into your battery, everything seems to be functioning well, you've got your switch routed to where you want it to go, you've drilled three-quarter inch hole, whether it's into your dash or your console or into the knockout that you're going to use. I'm gonna walk you through just how this switch functions and we're gonna kick the lights off too and we're gonna see how these lights work in a darker environment. Switch operation is very, very simple. You'll have your middle position here with the circle. That would be your off position. If you switch to the side with the one line shown on the bottom here, that would be your amber back light. You switch it back to the middle to turn it off. And if you switch to the side with the two lines, that'll be your bright white lighting. So if after watching that installation, if you're a bit nervous about hooking wires to and from your battery and routing them through your dash and all of those other things, make sure you visit our dealer locator on the website. That's gonna help to connect you with a local installer near you who can help you get all of this installed and functioning in time for your next adventure. So that is a look at the light bar for your 54 inch wide Kuat DEK platform rack. And if you have any questions about it or if you've purchased it and you've got some experience with it, please share those in the comments below. Sharing your questions and your experiences with other neighbors just like you can help them decide if this is the platform rack for them. Once again, this is Curt with Etrailer. Thanks for stopping by.
Info for this part was:
At etrailer we provide the best information available about the products we sell. We take the quality of our information seriously so that you can get the right part the first time. Let us know if anything is missing or if you have any questions.


Thank you! Your comment has been submitted successfully. You should be able to view your question/comment here within a few days.
Error submitting comment. Please try again momentarily.