
To see if this custom-fit item will work for you please tell us what vehicle you'll use it with.
These premium mud flaps are easy to install and digitally designed to fit your car or truck. Protect your vehicle and your trailer from road debris. Flaps are constructed of durable thermoplastic resin with stainless steel fasteners.
Features:
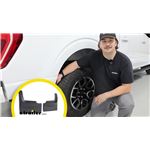
Precision fit, durable components and ease of installation make WeatherTech NoDrills your first choice in mud flaps. Installing mud flaps has never been this painless. Patent-pending QuickTurn stainless steel fasteners makes installation quick and easy - no drilling required.

Videos are provided as a guide only. Refer to manufacturer installation instructions and specs for complete information.
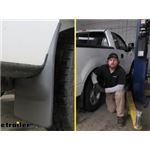
Hey everybody, Ryan here at etrailer. Today on our 2008 Ford F-150, we're gonna be checking out and showing you how to install the Weather Tech rear mud flaps. So when it comes to mud flaps, floor liners, bug guards, window visors, all those type of things, I feel like just about everyone has heard that Weather Tech name before and there's a reason why. It's cause they make good stuff and products that actually fit right and work really well. That definitely holds true with these. Since they're custom fit, they really kind of just go around your truck's body lines and look almost factory.
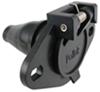
So good deal there and there are no drills. So they use existing holes that are already there to actually bolt up, which is cool. You're not gonna have to try to customize stuff and drill holes and everything else. Something I do wanna mention if you already happen to have factory mud flaps these are essentially a direct replacement and that's exactly what happened here today. One of them was missing already and the other one sounds like you backed over something and it cracked that factory one and just wasn't happy with how it looked and kind of tired of not having them.
So pick these up, put them right in. So if that's what you're wanting to do, if you already had the factory ones, you don't like how they look or they're broke, or missing, or whatever, you're still gonna be able to pop these on. It's a good idea on a truck too to have them. Honestly, they're not just for aesthetics and how they look. I mean, it definitely gives it more of a truck look in my opinion, but they actually use it for purpose.
Couple of them being, it's gonna help prevent stuff from flying up on your rear quarter here and not only on the outside, but on the inside too. So on these Fords that kinda loop around and you gotta ledge here and like this one. So this one didn't have the mud flap on it. I'll just reach up here real quick just caked full of wet mud. All right So that dries out, that sits up there, and then that promotes rust, and then you start losing your sheet metal here, and it's starting to rust away.
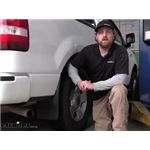
So the mud flap on there it covers that whole tire length and really helps stop that stuff from shooting up inside of there and potentially rusting everything. Something else I wanna mention too, is your tire size. Okay, so I can't speak for every single tire size that you have. In the back it shouldn't be that big of an issue as it would be in the front but if you have really large oversized tires or something like that, keep in mind they may make contact. To give you a reference, though, we'll see what our truck has. So these are a 255/70R17 and I got quite a bit of space there. I can essentially get my whole entire hand in between the tire and the mud flat. So the way that these are actually gonna attach, they give you some stainless steel hardware that uses existing holes and then up top here it kind of just pinches the wheel well edge there. So super straightforward and really nothing to it. I do wanna mention if you need just the back set, those are available. If you need just the fronts, you can grab those and you can also grab a complete set. So all four corners if you need them or just want to freshen things up. Whatever the case may be. Since these are the no drill type installation, super easy and really shouldn't give you any issues but if you'd like to see how that's done feel free to hang out. We'll go ahead and get this installed together now. To begin our installation, we're gonna be here behind our back tire and we just wanted to kind of prep the area before we get our mud flap on. So clean it off, wipe it down, spray it down, whatever you need to do. But then here in this area we need to apply a little piece of film and I guess it just helps keep it protected, the paint and stuff from our mud flap. So since it sticks on there I wanna make sure it sticks good. So I'm gonna take some rubbing alcohol to spray it down in that area and get it clean and dry. So once we verify that, here's our stickers. Since we're on the passenger side, we want to use the one that's labeled RHS. Assume that's right hand side. We'll just peel it off and do the best you can here to get it right along that edge. At this point, we can grab the appropriate side mud flap. They are labeled. We got right hand. Then if you look up here, there's a little mechanism deal. You want to make sure that it is facing the locked position and what this is gonna do when we put this on, this piece here is gonna kind of rest in between the mud flap and our fenders edge there. But then when you tighten it, it's gonna draw together and help hold the mud flap in place. I also wanna mention if your truck had factory mud flaps, ours actually did, and they just got busted apart, and took them off, but you may have some metal nut plates that are on here. You wanna get rid of those too. You just want these to be wide open holes. But we'll take this and kind of get it into position. It's sitting flat and then you're gonna take the included hardware, which is a bolt and a flat washer and push them through. Guys are gonna kinda hold in place. I can manage this here. If you're having trouble getting one of them started, might be worthwhile just to pull the other bolt out and try the one you're having an issue with which is what I did and it seemed to work out. So while we're holding this in place what I'm gonna do is just tighten this down. That'll kind of keep it held up where we want it so we can get to the backside of those other bolts. We get the hardware on that. So these are gonna come through to the underside and what we're gonna do is take the included flange nuts and get them started. So on the backside where our bolts are coming through we're gonna take the flange nuts that we talked about and get these started hand tight. Since these are flange nuts, hopefully, what the thought is, we can get these as tight as we can by hand and then come back to the head of the bolt and be able to tighten it down and hopefully the nuts will catch them. We don't have to come back here and hold them from spinning. That'd definitely make it a little bit easier but that's what we're gonna go for and we got a good feeling it's gonna work out. So get these started and come back and tighten them. Let's take our Philip's side bit and just turn it by hand. It feels like there's the nuts actually caught and gripped and then we'll just snuggle them down a little bit. You don't need to crank down on these things by any means. Does make it easier if you have a tool like this, where you can put that bit in just cause there's not a lot of room here or if you don't have one of these you can also grab just, kind of, your regular quarter inch socket wrench, put on a quarter inch socket and then this the bit will fit into that too. So it's another way you can do it. Let's go ahead and kinda snug these down a little bit. Once this is done, you're simply just gonna repeat that same exact process to get the driver's side on. That'll finish up our look at and our installation of the Weather Tech rear mud flaps on our 2008 Ford F-150..

Great
Do you have a question about this Mud Flap?
Info for this part was:
At etrailer we provide the best information available about the products we sell. We take the quality of our information seriously so that you can get the right part the first time. Let us know if anything is missing or if you have any questions.


Thank you! Your comment has been submitted successfully. You should be able to view your question/comment here within a few days.
Error submitting comment. Please try again momentarily.