

To see if this custom-fit item will work for you please tell us what vehicle you'll use it with.

You put thought into every upgrade on your vehicle. These covers reflect that, with a tailored fit and high-end vinyl that make your rear seats look and feel better. More than protection, they bring a sense of completion to the interior.
PRP's seat covers are built to match the exact shape of your rear seats, with precise cutouts for seat belts, headrests, and fold-down consoles. The materials stretch tight across every surface and hold their shape, with stitching that mirrors the factory layout down to the last seam. Once everything is installed, the covers stay put. They don't slide out of position or need constant fixing, no matter how many times people climb in and out. You also won't lose features you've already paid for, like seat heating and cooling. The design feels intentional from every angle, and that kind of fit makes it easier to take pride in keeping the rest of the interior looking sharp.
These covers protect against the wear and grime that builds up over daily use: sweat after the gym, coffee spills on the way to work, dog hair from your furry co-pilot, and all the other messes you can imagine. And if you get them dirty, just wipe them down with soap and water, no need for special cleaners.
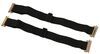
Everything you need is built into the covers. Zippers, stretch panels, and reinforced buckles let you install the seat covers without extra hardware. Just remove the headrests, slide the covers over the seat backs and cushions, tuck the drawstrings, zip the flaps, and put the headrests back in place. The console lid cover wraps in place and secures underneath with a hook-and-loop strap. The install can be done by one person and may require a Torx bit or screwdriver to remove trim or factory hardware, but no other tools are required.
California residents: click here
Videos are provided as a guide only. Refer to manufacturer installation instructions and specs for complete information.
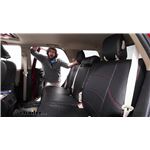
Hi, Matt with etrailer. Today we're gonna be talking about the PRP custom second row seat covers. Now this gonna be something that's gonna give you this kinda nice polished look to your seats and also gonna give them that extra protection and really contour to your needs in a 2015 Toyota 4Runner. If you have experience with these seat covers or if you plan on getting them after watching this, let us know what your experience is like, how they're holding up and what type of daily use you're putting them through. Just let us know in either a comment below or in a review what your experience is like. So what we're really gonna be focusing on today is gonna be how these covers are gonna fit in your 4Runner.
And we're gonna also at the very end of the video, show you how to install these because it can be a longer process. So having any way to help you out is gonna go a long way. But next up I'm just gonna remove one of these. They kind of show you what the difference is between these two, what it's gonna look like visually. And we can see how these two are really gonna compare.
So this is what kind of comes standard on your vehicle and this is what you're gonna get. So you can tell this is gonna be a lot more seamless. Just overall, I think just cleaner look. And if I move over a little bit, you can see we are retaining some of these same seams. We're actually adding some new ones.
But these are, I think, adding more of a aesthetic purpose. Now that red stitching is just a little bit more appealing. Now you can get the stitching in different colors if you find something that's just gonna match an interior vehicle a little bit better 'cause we're not gonna block anything important. We're not gonna block a buckle here. We're not gonna block this strap.
We're still gonna have access to our seat belts. And of course we're still gonna have access to adjusting our headrest too. And that's why it's good to try to match these covers to some of the accents in the interior of your vehicle 'cause it's just gonna make 'em look a little bit better. But really it's gonna be nice that you can customize this to fit your vehicle's needs. And next up I want to showcase what it's gonna be like to actually use these, that this isn't gonna block you or prevent you from using it in the folding features of your seats. You will notice a little bit of a difference though. That might be a little bit of resistance here just 'cause we have more material now. That's gonna be rubbing up against one another since it does kind of have that foam underneath there. And that's gonna give you more cushions, so it feels a little more comfortable. And putting it back into place. Sometimes you'll notice that this buckle right here will get in your way now. You just lift up on it a bit. Will slide back in. And every now and then, I'll notice there's a little bit of bubbling right here because there's two materials are making contact with one another and it's pushing up on it a little bit. But it's pretty minimal. You're not gonna notice it really for the most part. And I can actually now lower my seats completely. We can still fold our headrest down 'cause that lever is not gonna be blocked at all. And we're getting a really nice look. And you can even see the backside of this is giving this more of this fabric material and I just think it looks a little bit more natural back here. And you can take a close look at how all three of them are gonna lay down flat. You notice there's a little bit of them popping up around these edges here. That's just gonna be something that you find most times with these. It's just more receptive to coming up since we're gonna be moving around this area a lot when you are pushing these down or putting things on top of them. But after a few hot days or just laying heavier items on top of this, they'll start to learn to shape a little bit more. And this will also cover up this center armrest. Now of course these plastic sections are not gonna be covered up, so this is gonna retain their original color. So keep that in mind. But other than that we can kind of focus on how these feel and the material of them. So they're gonna be made of this very durable material. So like if you're someone who is pretty outdoorsy, you get into a lot of grime, dirt, water, whatever it is, this is gonna be able to withstand a little bit. It can really take a beating. So that also plays into maintaining these too. So you wanna make sure you're cleaning them off pretty regularly. And what's nice about these, they're relatively easy to clean. If I just come over here and let's say I just kind of step here, kinda leave a mark. When it comes to wiping these off, just with my finger right there, this wipes off relatively easy. If I came back with a rag or a wash cloth that's kind of wet, this would come up, no problem. Overall, I think this is gonna be a solid upgrade for your 4Runner, especially if you are someone who is pretty outdoorsy where you're gonna find a lot of grime that's getting inside your vehicle. You just wanna make sure it's maintaining, keeping its value and is also gonna still look good even when you're not going on those more outdoorsy trips. And of course you can get these on the front row seats as well. That's especially the way I'd recommend 'em. Just having the full kit. And then you can even get that center console cover too. I think if you have 'em all paired together, I think that's gonna look for a really nice look interior. Now when it comes to the installation, I will say that's gonna be something that's gonna take you a little bit longer. I would probably recommend setting aside a day to do that, especially on a warmer day. So you can let these covers kinda be a little bit more malleable. So a little easier to stretch around the seats. But we have plenty of tips and tricks that we're about to show you. So if you're curious about that process, just stay tuned, we'll walk you through it. So where we're gonna begin is by taking off these headrests. Just by pressing that button right up top. Comes off pretty easy. Now you wanna make sure you grab the right cover for the right headrest because we're gonna have these little levers on the side. And when I hold up the headrest here, there's a hole on the side. And the way you can tell that these are gonna match up to one another is 'cause that seeming will look pretty identical. Another thing that'll be an indicator will be the logo. That logo right here should be on the backside of your headrest. Now that we figured that out, we can put this on. And I'm gonna find this is gonna be a little bit tight. I'm gonna make sure I undo all that hook and loop that's holding it in place for the time being and just push that over. Something's gonna go a long way with this too is heating up all these seat covers prior to this. Now it's a cold day at etrailer, and I didn't have the opportunity to lay this out in the sun, so it could warm up and kind of loosen up a bit. But what you could do if you're in a similar situation is grab a heat gun and just lightly go over the top of this, so it's gonna be a little bit more pliable. Well, if you just kinda work with it some, you'll be able to get it over. Sometimes I'll pull down like that. if I don't wanna damage my seat or tear it up, I'll come over here to the floor and I'll use that as some resistance so I can get more leverage on it. And before I completely cinch this down, I'm gonna find this hole in the side. Push down on that and get this to wrap around that lever. It's gonna be something you just gotta take a little bit of time with, especially if it is a little bit cool or not loosened up all the way. We're gonna have to wrap that all the way around. And what I'm gonna do here is just use that trim tool to apply some tension on here. It might rip a little bit but this section here won't be visible anyways. And I'm not using a trim tool. You can actually find one of these on our website. Sometimes you could use a flathead screwdriver but if you're putting this much pressure on it, I wouldn't recommend it 'cause you're probably gonna tear something pretty bad. Here we go. There. You just tuck that underneath there. It looks pretty good. I'm liking the look of that. Again, this probably loosened up just a tad bit. I'm just gonna apply some tension to this and connect this hook and loop on the bottom. There we go. Make you to do it on the sides too. And if you still got a couple wrinkles on this, just try to pull this through, pull it tight, just work with material a little bit. Feel you get to a spot that you like. Now I'm just gonna put this away for right now because we wanna make sure this top section isn't gonna be in the way or we're not gonna have the headrest in our way. And this might be a little bit different for you at home. So what I'm gonna do next is pull on this little drawstring here, pull up on the seat. And here we're just gonna be double checking something. So I'm gonna also load this section down too. And you'll notice there's this little crack I have right here. And this is gonna be plenty enough room for my hand to get through here. If I find later on that this isn't enough room, what I'm gonna have to do is remove this paneling. All I have to do is get a flathead screwdriver, some type of trim tool that pry up on that or can even pull up with my hand. And there's gonna be this bolt right here where it's just gonna take a socket and wrench. Remove that, there's gonna be one on both sides. And then we can fully remove this paneling if it is in our way. And before as you get that cover on as you're gonna move this panel in here, if we scoot this inside, this will reveal a little screw right there. I'm just gonna take a Phillips screwdriver, get that out of here. There it is. I'm gonna make sure we don't lose that 'cause we're gonna need it later on. And usually just kind of pull that off. You might need a trim tool to kind of get off the rest of the way, but I'm just gonna lower it down here for now. And now I'm actually gonna lower this centerpiece. You're just gonna grab that little handle on the back of here. Right there. That'll be out of your way. And with all that prepped up, we can get the cover on the seat. And something I went back and did was actually raise the seats themselves up. And this is gonna give us more room to work now. And now with this cover you wanna make sure you have the correct one. And the way you can tell it's the correct one is if I flip over this way, you're gonna notice there's a hole right there. That hole is match up with this little tab or knob on your passenger seat like this. And we're also gonna unzip this. This is gonna be the zipper right here. You're gonna find right next to that hole, unzip that. We'll be ready to rock and roll then. All right, so what we're gonna do is also lower this down. It's gonna help us out a bit. Give us more room to work. And now I'm just gonna wrap this around. Yep. This is a good starting point. Now, I'm just gonna adjust it a little bit more so I have something that I think it's gonna be a little bit easier for us to work with. Good point though. Just make sure nothing's getting caught anywhere. Everything's kind of relatively flush. And something I want to point out too. Make sure you're in the right track. You wanna have these lined up as much as possible. You're gonna have these little pockets in your seats at the base and you wanna make sure that these openings on the cover are lining up with it. You're gonna have one on this side and you'll also have one right over here. Gonna try and get that to line up as much as possible right now. So I tried working with this a little bit and I did find that I am going to have to remove this panel in my case. You might not have to remove it for yours. So I'm gonna be using a 10 millimeter socket and wrench. Here we go. I'm gonna put that to the side. Make sure you keep that 'cause we will reinstall it at the very end. Now, because I've done it on both sides, I can remove this panel. Gonna flip it a little bit. It might have some clips holding in place and we can put this off to the side. And we'll make a few more adjustments. We wanna pull in the bottom of here. Might use some pliers to do that. You wanna make sure you're grabbing something that doesn't have a narrow edge, so something more flat. You don't want any needle nose because that might tear through here a lot easier. Kind of pull a little bit on each section. We start just by a little bit. Now what I'm gonna do now is go up top some because we wanna get this to the point where these can connect and sit back together. I'll pull their some too. There's gonna be a couple points that you can even use as reference points and make sure everything is in the correct location. So, if you look right here. That isn't perfectly lined up. It's pretty close. So I might even pull here some too. I got the top of the zipper kind of started. Now this is going to take a while. You're just gonna have to pull and yank on this until you can get that connection started and apply a lot of pressure as you pull on here. If you have a friend to help you out with this, it's gonna go a long way. I was able to do it by myself but it took a while. But from there the rest of this kind of just glides, goes right into place. I might have to grab one section and pull on it some. Something I wanted to point out was when I was using the pliers I pulled a little bit too much on one of the sections with the zipper. You just gotta watch out for that. Be careful 'cause now at this pod, we weren't able to get a good connection. I was able to go around it and reconnect it. But yeah, just be careful when you are pulling on this around the zipper. And finally get the top section of this completely secured down. What I'm gonna do is lift up on here. You are gonna have these little kind of padded sections. We're gonna remove that. That's gonna reveal the more sticky side of the hook and loop. What the goal is, is to connect this section to this section. Now I pulled on it earlier and look at that. We're still a little bit shy. I will connect but I'm not liking the way it is connecting. What we're gonna do instead is kind of pulling this a little more. This section you have a lot more leeway to kinda fall on it pretty tight. And really the tighter you get this is just gonna give you a better fit overall. So, this one I'm putting a little bit more force in. Still being mindful, I don't wanna tear anything. And now we're gonna make that connection. I might end use pliers a little to help me pull on this some, so we can get a good connection. Got down one section. And just go all the way around it. This corner piece might be a little bit difficult 'cause you got that little tab there. Gonna work around it. There we go. So this is outta the way. There we go. And we can put our seat up and see how this is looking. And this is looking pretty good. Now there is one spot we need to kind of fix up some. So up here at the top we're gonna have this section that's gonna wrap around these little tabs over your top. And really this should be lined up as long as we are aligning everything up along the way. So I'm really not having any issues getting that around. Applying pressure. And you're gonna have a third one right here too. This one might be a little bit tougher just since it's a little bit more low profile. Yep. And that's looking pretty good. And then just kind of come back through, make sure it feels nice and smooth. We don't have any bubble gaps. And then we can come back to the very top of it and secure this back into place. And now we're gonna move over to the center here. That's gonna be the next easiest point to do. We wanna just put that down and you're notice one of these cup holders is missing because to put the cover on here, we're gonna have to remove this centerpiece here. So you just remove that cup holder itself. It's gonna be this rubberized piece, just slides out. And there's gonna be a little screw in there. Just take a Phillips screwdriver, so you can remove that. That loosened up. Then I can put those off to the side. Make sure you keep 'em. And this should just slide right outta place. And with this we're just gonna open up this cover. Disconnect all that hook and loop and start installing it. And you can tell this is gonna be able to fit this 'cause just the overall contour of it. And what I'm gonna start off with is just this base here. The very bottom. You tell it has this hook in the loop right here. It has an opening on this side and still connect on this side. What I'm gonna do is just kinda shove that up underneath this crack here and push up 'cause this can be a little bit tricky sometimes. As I'm pushing up on that, I'll reach my other hand, grab it from the other side. And if you're not careful, there's gonna be two openings. There's gonna be one that's in between this arm rest and there's gonna be another opening that actually goes into this plastic reservoir. It'll be a little bit tricky sometimes, so take your time with it. I might even need to grab some pliers for this. Got the pliers out and I did start to get this to go through now, so I had to fight a little bit but we're getting it through now. Slowly but surely. There you go. Try to get that flat and opened up. I think this is relatively a good spot to be in, so I'm gonna reach over to the other side. Kind of already did on this side a little bit, but I'm just gonna take this edge here, slide that underneath the kind of frame me of this. This should kind of just go right into that groove. I might even pull up a little bit on this corner here. Get the grab around that edge. And I think that's gonna do wonders for us. And it went that like that. I'm gonna make this connection here in the center, pulling on it pretty tight. Yeah, lined up as much as you can. And before I completely cinch that down, I'm gonna go up to the front and pull this through. And this is gonna wrap around this opening right here. Now we're gonna take this strap and this is really the pulley. I'm gonna make sure I hold the back section 'cause if I lift this all the way up, that back end is gonna go back out the bottom. So we wanna make sure that strap comes through this opening. We're just gonna push that pulley strap through here from the inside. And it's gonna have this little cover there too, so you might have to scoot that out your way so you can get that out. Looking much better. And before you put this all the way up, I'm actually gonna connect the back end. This right here, this is what I was talking about earlier, making sure you have a hand on it 'cause if you try to lift this up, a lot of times this will go right back into place and reduce all your hard work to nothing. There you go. That's looking way better. And we're just gonna lift this up and make sure this looks good. I might kinda pull on this a little bit, kinda shift that a little bit if I can. 'Cause a lot of the issues you're probably gonna have are gonna be right here. So if you can try to get that to look smooth and this will make you look really nice. Yeah, but I think that looks good for now. And we can put on the cup holders back into place. Now it's something to watch out when you do put these cup holders back into place, there are these holes that are gonna have to be open. So just make sure this is lining up properly 'cause the tabs you are looking for, put it right here. This will be three of them. What I'll do sometimes is just have it grab on to the center of that. Kind of push forward and then down. Once that feels good and attached, then we can just check if those holes are lined up and screw it back into place. And we got this in place. Now you might have a few sections like this that are still showing through. The tips I'd have for you is maybe just to come back through with some pliers. Be careful when you are pulling on it. It could kind of scuff it up or rip even. Some tips that might help you is coming in with a heat gun. Warming this up a little bit at the front section and maybe even trying to shift this some. But just be careful you don't shift it too far back because then this section here might start to kind of pop out on you. And I'm gonna put on the bottom seats now. So I'm just gonna lift that up now and start putting this into place. Now the section that we want is gonna be that extra wide section. There's gonna be a little slit caught into one side of it like that. And from here I'm just gonna wrap this around. And I have it match up with the contours of your seat on all those corners. I like that. Just gonna apply some tensions to it. Make sure it gets pretty tight. You also wanna have that strap right here. And what you're gonna do is you're gonna lead that up to that opening here. There you go. Like that. Okay, you're gonna want access to this whenever you need to lift your seats back into place. And yeah, once you have this in a pretty good spot, we can move over to securing that string down. To do that, you're just gonna find a little strap at the bottom here. Oh, there it is. You are gonna run this string through there. Once that's through, just gonna pull it some. You can pull both ends tight. It will help you a lot too is if you have those pliers, I'll probably grab 'em here in a second. And then I'm gonna run the string through this other strap that's through that little cutout that I pointed out earlier right here. Lemme just run that string through there. There you go. Just like that. Now I'll go grab some pliers, make sure I can get this nice and snug. And if you got any special knots, you can tie it off like this. There you go. Trying to get mine through there. And something we found too, there was this little slit here and I think this actually wraps around this section here. And at first I thought that was gonna impede me from shutting this, but it actually does it. You can still shut this and it will latch into place. So, I'll shut it real quick. Something we'll notice, a lot of times when you go to shut this. Now I've noticed that this buckle, kind of push down a little bit. so if you just lift it up some, it'll slide a little bit easier. Now I typically hold my hand here, close this. It'll help prevent a lot of that from bubbling up 'cause they get this where there's no bubbling at all. It's kind of difficult. We're gonna have to get this extremely tight and right now I think this is gonna about as good as we can get it. Really, it's just a little bit loose here. And when you sit down on it, you're really not gonna notice this at all. But yet right now it is fully attached back into place. And now we can move over to the next side. And something I almost forgot is the backside of this middle section. And you're gonna have these little covers. I'll just go right over the top of that. So that's gonna have a little cutout, so it doesn't cover up anything important. You are gonna avoid that little edge of there. It'll secure this down via a hook and loop. Over to the last seat now. I'm just gonna pull this up, get that outta my way. Oh, put it back up. And lower this down. I find it's gonna be a little bit easier to lower down. I'll adjust this a little bit too. Rest on my knee. And we can put the last cover on. And I already do have this unzipped. It'll just make it easy to work with. I'm just gonna slide it over the top. Just matching it with the contours of your seat, kinda like we did before. And same thing as last time when we'll come to the bottom, kind of pull on this part that's part of your front, which is be pulling it underneath till we get into a good spot. We're still just kind of moving everything around until it's fully lined up the way we want it to be. So after a lot of struggling, we actually got this section here to zip up. Now you're gonna have a lot of issues with this area in particular. I recommend if you can get a heat done or a blower dryer, just a heat up this up because trying to get this zip up can be pretty difficult at times. But if you take your time, you'll be able to get it eventually. And now we'll move over to the base. That's gonna go on to the seat itself. And we're just gonna match this up to the contours. You want this white string to be up top. I just wanna match it up. I'd have to grab onto one edge, pull it through to the other side, Here we go. You might have to just shift it some. And we're gonna come up here to the top one that's in a good spot. Again, we're gonna have another one of these slits. And that's gonna be designed, so you can pull that strap through here. Once you get that to pop outta the way, just kinda give it a nice tug. And now we're gonna secure this the rest of the way down. So I'm gonna grab one side of my string, find a little loop at the bottom, click this right here. I'll pull that strap through that little hole. There it is. Yeah, pull on it some. And what I did here, this time I left a little knot. Push it through that knot. Pull on it. You can guess you get this pretty dang tight. I you can come back with the pliers. Stick that up a little bit more too. And it went back through and secured this a different way just to make sure it's tight all the way across. And I've tested this out a few times. And then we can just lower this down and make sure everything is still gonna be sitting flush. We're not getting any sort of bubbling. And really the last step is just gonna be taking off this headrest here. And we're gonna put on, well, head some. This one is also gonna have some holes on the bottom there. I'm just gonna line that up just like that. That lined up. Try pull it over the rest of the way. Try to make sure and none of these sections get tucked under because it'll be a little bit hard to get 'em out. And then finally just come back through and cinch it up with that hook and loop all the way across. You can go back through if there's any spots that you wanna just clean up a little bit. Makes it look a little bit nicer. It's gonna be pretty good there. And finally, this little side here too. And this is a good point where you can put the other headrest back on too. Push that all the way down. And then there you have it. You can admire your work now. And congratulations, you got the seat covers installed. But that was just our look at the installation and some of the features of the PRP custom seat covers in our 2015 Toyota 4Runner. I'm Matt, thanks for watching.
Info for this part was:
At etrailer we provide the best information available about the products we sell. We take the quality of our information seriously so that you can get the right part the first time. Let us know if anything is missing or if you have any questions.


Thank you! Your comment has been submitted successfully. You should be able to view your question/comment here within a few days.
Error submitting comment. Please try again momentarily.