
# 1
Brake Buddy Select 3 Portable Flat Tow Brake System - Proportional
 2003 Jeep Wrangler
It took me awhile to figure out how to set it up in my "Tiny Jeep" (TJ). I finally tried flipping the bracket for the brake pedal upside down, and that moved the connecting bracket forward just enough to where the shaft fit in the bracket. Used it once, about a month ago, and couldn't even tell the Jeep was connected to the motorhome. The tow vehicle is a 2023 Tiffin Wayfarer. The tow is a 2003 Jeep Wrangler TJ.
Had a problem with the connection to the unit but called etrailer and they sent me a new one after sending the other back to them. The hole process very painless and the the staff at etrailer was great to work with. Thank you etrailer for your great response.
# 2
Brake Buddy Classic 3 Portable Flat Tow Brake System - Preset
There is a design flaw with the connection cable. I pulled a tow car 10000 miles last year and had repeated disconnects from the brake buddy. I called for support and was told to use a small flat blade screw driver to spread the connection pins to keep the plugs in place. Im assuming this design flaw was known but put into production anyway by the answer given. This is my third break buddy and thy have made improvements but the old ones have worked flawless for me in the past.
2017 Jeep WranglerI purchased this BB Classic 3 in October 2020 after my old BB Classic that I purchased in 2008 failed to hold pressure for the piston. I bought this for my 2017 Jeep Wrangler but due to (1) the depth and unevenness of the driver's floor board, (2) the seat adjustment bar prevents BB Classic 3 from pushing against the seat and (3) the adjustable legs are not long enough to reach the seat and brake pedal properly, the BB Classic 3 fails the auto start test every time due to not being able to level. I talked to Hopkins MFG techs several times trying to resolve the issue (wiring checks, power cord checks, etc.) but to no avail. This situation makes the BB Classic 3 dangerous to have in service because not being level it will think something is wrong and keeps the brake applied (piston will not retract after applying the brake). So after talking to other Jeep Wrangler owners I determined that a platform was needed for the floor board on which the BB Classic 3 could rest. I constructed a platform that was approximately 3" off the floor board and rested on the floor board under the seat and on risers toward the brake pedal. This platform is level on the floor board both length-wise and width-wise. After placing the BB Classic 3 on the platform with clevis and power cord installed and legs in the lowest position, I tested the auto start and had 8 successful tests in a row!!! Also the brake away test was successful too. I still need to make a short drive test while in tow behind the motorhome. Hopkins really needs to advise customers that the Classic 3 will not work properly as is on a 2017 Jeep Wrangler due to the configuration of the driver's side floor board.
# 3
Brake Buddy Stealth Supplemental Braking System - Proportional
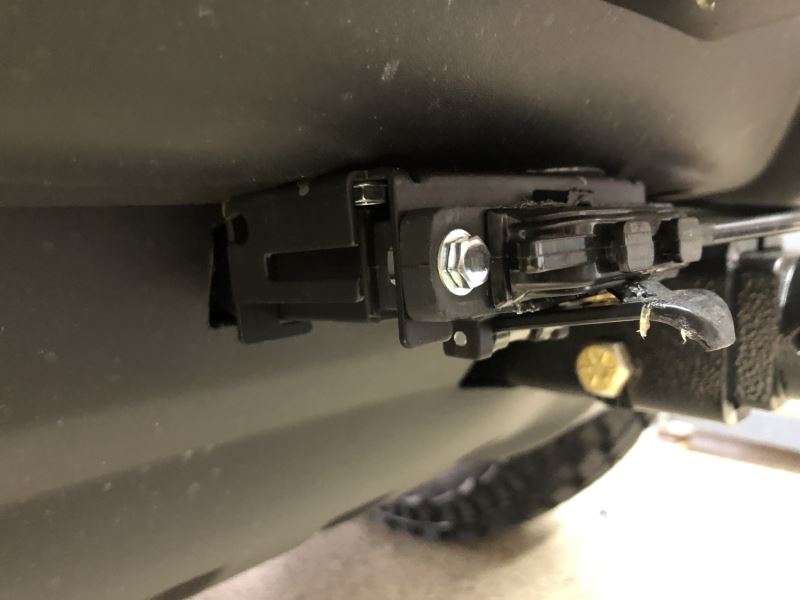
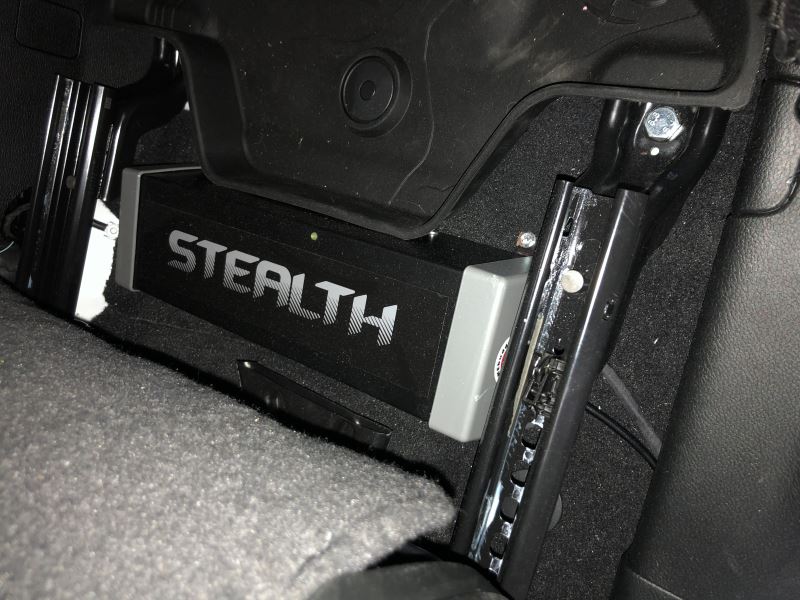
I am a proficient DIYer (and was an auto mechanic many years ago). The installation took a lot of time - perhaps 8-10 hours for the brake controller. The most special tool needed was a rotary cutter (e.g., a Dremel tool). A cordless impact driver was also very helpful, especially with the self tapping screws. Getting the pully in the perfect position under the brake pedal took some trial-and-error to get perfect. Also, the included bolts for the brake pedal bracket where too short to accommodate the width of the brake lever - easily remedied with slightly longer standard bolts. Be very mindful of what is on the other side of the sheet metal you are planning to drill into. The brake supplemental vacuum system was a bit of a challenge, as the instructions are very vague regarding how to mount, and the space I had to work with was surprisingly tight. I ended up creating a mount on the inside front fender, and bolting the pump to that. Also, tapping into the vacuum lines took a couple of tries to get a leak-free connection. Think ahead about this, and be prepared to get a few small parts like hose clamps or right-angle hose connectors. This would be a potential consideration for any vacuum boost added on any vacuum power-assist application with any controller. I mounted the Brakebuddy main unit under the rear seat - that was a perfect location, and much better than the often suggested location under the driver's seat. I was very pleased with the installation result. I paired this with a Nighthawk tow bar. Be warned that the tow bar's included cable will not be compatible with the Stealth, as the Brakebuddy uses a proprietary connection at the towed vehicle. The upside of this proprietary connector is that all connections are build in, including the brake away cable and the battery charging line. (I modified the Nighthawk by replacing the included cable with a 4-pin cable to power the lighting system on the bar. This is just for extra safety and cool looks - I could have just not used the tow bar's included cable). With 1,200 miles of towing behind us, I can say I am very pleased with the performance. I rarely notice any difference in braking effort or effectiveness - which is a big advantage for a proportional system. My favorite feature is the ease and speed of connecting or disconnecting the towed vehicle. I'd give this a 4.5 stars out of five if I could, because I did need to add a few parts and make a couple trips to the hardware store to complete the installation. However, the excellent performance and ease of use once installed more than makes up for the inconvenience during initial installation. Special appreciation to the people at eTrailer, especially Nicole T, who provided support and guidance from pre-sales to installation. Also, I called Brakebuddy's support line with a concern, and they immediately picked up the line, addressed my question, and offered to immediately ship any parts if needed.
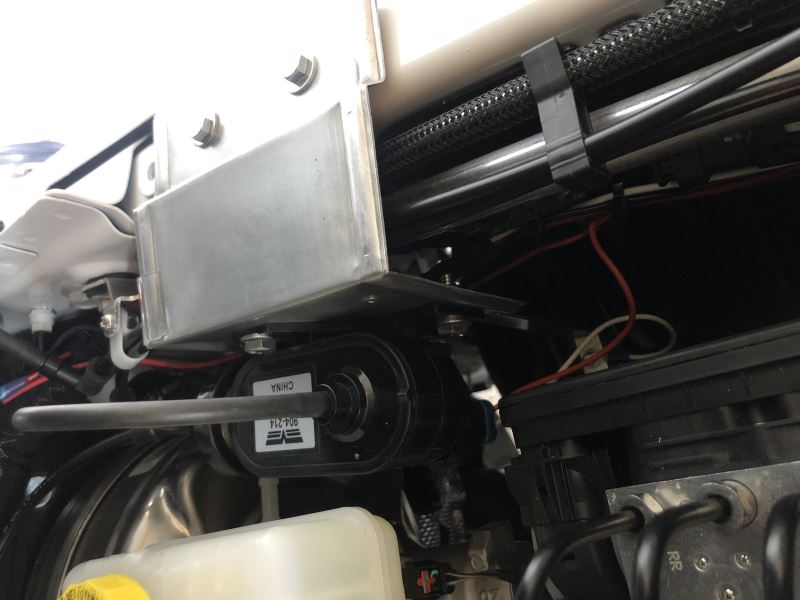
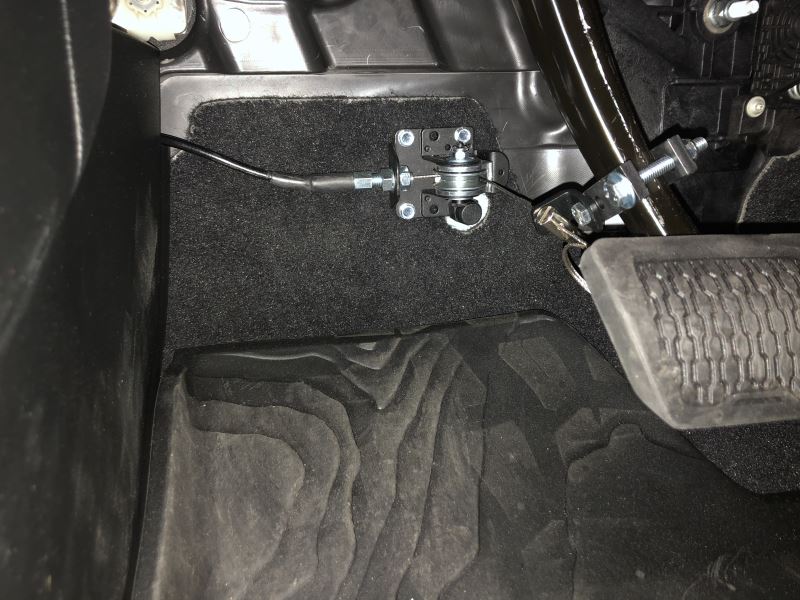
I choose the Brake Buddy Stealth for my 2021 Jeep Wrangler because I wanted a “stay in place” brake system and felt it would be a clean looking installation. I finished the toad side of the installation today and thought I’d leave some notes on what turned out to be a bigger project than I’d anticipated. Again, this is my experience on the 2021 Jeep Wrangler 2-door. Your experience on other vehicles may vary. I started this install after installing a Demco Tabless Base Plate. Right out of the blocks, there’s really no convenient location to mount the cable connector to the Demco baseplate. I chose to mount it to under side of the bumper on the driver’s side. To provide clearance and a route for the wires, I had to cut a notch into the plastic air dam. I used one of the already screw screw holes and used self tapping screws in the other three locations. For added strength I epoxied the connector to the bumper as well. Since the bumper would be unremovable if the connector were hardwired, I added a waterproof connector. The kit is stingy with wire lengths, so I substituted my own wire. The Stealth unit itself i mounted beneath the driver’s seat. Don’t be fooled into believing there is clearance when testing with the driver’s seat positioned for rear seat access. Once the seat is returned to normal operation it lowers a bit and the box keeps the seat from being move forehand aft. I solved the problem by installing 5/8” thick nylon washers under the rear end of the seat slides. I also cut away a bit of the carpet under the front, inboard corner of the box. You will need to remove the driver’s seat in order to attach the front screws of the box. Be sure to disconnect and isolate the neutral battery terminals to prevent inadvertent air bag discharge. After removing the interior trim from the A-pillar, the door sill, and the driver side foot well, The wiring and cable tucked nicely away along with the OEM wiring and wiring for my taillights. I mounted the pulley horizontally behind the brake pedal. Installing the vacuum pump was my biggest worry and challenge. Instructions are to zip tie it “somewhere”. That seemed pretty casual for a safety system. I chose, instead, to fabricate an aluminum bracket that attaches to the lip of the engine compartment and to the wheel well (this latter attachment point is necessary to keep the pump from vibrating). Finally, the kit comes with 3/8” fittings to tap into the brake booster vacuum lines. The Jeep, however, uses 8mm nylon tubing. Brake Buddy, via etrailer.com, stated that the tubing would stretch and all would be good. Again, this felt casual for a safety system. Instead, I purchased an 8mm check valve and a 8-6-8mm barbed tee through Another online retailer to do the job right. I had to heat the Jeep tubing to fit even the 8mm tee, so the is no way the larger 3/8” fittings would have worked. See photo of my finished vacuum line installation. Bottom line, it was a POA install, but looks great. Hopefully it will stop the Jeep when towing. I’ll find out soon. :D


What our customers are saying:
"very easy to shop"