
Summer Starts Here - Save up to 70%
# 1
Swagman Upright Bike Rack for 1 Bike - Roof Rack Crossbars - Frame Mount
Put the rack on my car and drove from NY to Maine and the rack worked perfect! My only complaint is the lock is a little hard to work, but you can't beat the price.
Great product. Worked great for taking the boys bike down to the beach. Also great around town going to the bike trail.
# 2
Rhino-Rack MountainTrail Rooftop Bike Carrier - Fork Mount
I mounted this on my 2011 Subaru Outback in about one hour. The instructions were in error as in Step 1 it has you put on the end-cap first. But then you have to take the end-cap off in order to thread on the Wheel Strap. I mounted the bike (29 inch hard-tail) and it seems sturdy and secure. So far so good. Will it keep the bike on in Wyoming cross winds? This remains to be seen.

I've had this bike roof rack for 1 year and I'm happy to say that it was the right product to purchase. I've had no problems at all with the racks. I bought a pair for my Subaru Outback and had my bicycle repair guy install it for me. I feel secure in that it locks the bikes in place and keeps them sturdy on the roof. I'm glad I got the one where you remove the front tire of the bike. The other style would make it much to hard to remove the bikes from the roof. I usually put the bikes up and remove them with my wife and the aid of a small step stool. It's been really great riding with our bikes to our favorite bike trails. Would highly recommend Rhino for making such a great product.
# 3
Swagman Fork Down Roof Mounted Bike Carrier - Fork Mount
Goes together quickly, appears that it will fit my needs in terms of being cross-compatible on a variety of vehicles. Fit on a Subaru Outback factory crossbar and transported bike locally with no issues when I got it out to set up and test (not quite warm enough to ride much yet where I live). Instructions are not super, but the assembly is pretty straightforward so that is not a problem. At the price point, if this rack indeed holds up to swapping onto multiple vehicles and lasts me a few years, I'll be thrilled with the purchase.
The rack was pretty much as should be expected at this price point. It works, but not great quality. For one, the paint easily chips off. Another, the rails are a bit flimsy and twist when you tighten the rear wheel firmly. The directions don't explain a number of small items (which make for a better installation) such as make sure the lever is positioned on the outside for easier installation of the bike, why is there one different bolt, whether the bikes should be mounted forward, backward or it doesn't matter, the rails have a right (and less right) way of going together, the strap for the rear tire "will" fall off of the rack if you forget to reinsert it after taking the bike off of the car. Despite these shortcomings, the rack works well at an inexpensive price...I think a pretty good value
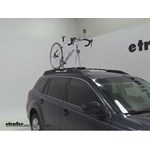
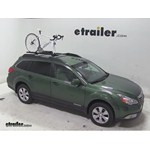
Thule Sprint Fork Mount Bike Rack Review - 2011 Subaru Outback Wagon
Today on our 2011 Subaru Outback were going to be test fitting the Thule Sprint. This is a fork mount style roof bike rack, part number TH528. With the factory roof rack already installed on our Subaru well begin our test fit by placing the bike rack right up onto our crossbars. As we do this were going to want to guide the black rubber coated metal straps around the underside of our crossbars. With those going around the underside were going to bring the front one around, were going to place it into the small indentions that are located here underneath the front head of the carrier. Then well tighten it down with the black lever located here behind our foot pack. For your initial tightening process you want that lever pointed straight out so it acts like a screw.
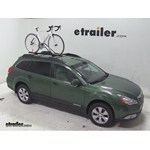
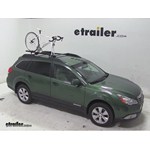
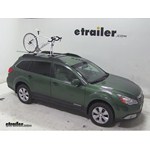
Rhino-Rack Mountain Trail Bike Rack Review - 2011 Subaru Outback Wagon
Today on our 2011 Subaru Outback Wagon, were going to be test fitting the Rhino-Rack Mountain Trail. This is a fork clamp style roof bike rack. Its part number is RBC2035. With the factory roof rack already on our Subaru, were going to begin our test fit by placing our bike rack directly up onto our crossbars. As we do this, we want to be sure that the two black rubber coated metal straps come around the underside of our crossbar. We can then remove the black plastic cover.
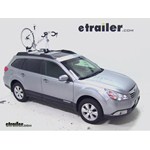
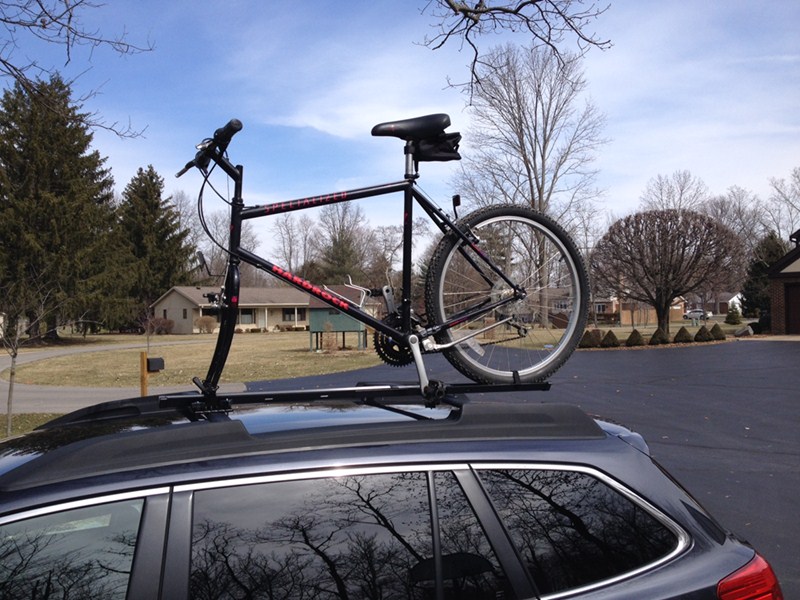
Swagman Upright Roof Mounted Bike Rack Review - 2011 Subaru Outback Wagon
Today on our 2011 Subaru Outback Wagon we'll be test fitting the Swagman upright roof-mounted bike rack, part number S64720. We'll begin our test fit by placing the bike rack onto the vehicle's crossbars. We'll bring out our hardware to go underneath the front bar into the pre-drilled holes in the front part of the bike rack. We'll then thread on our black wingnuts and secure the front part of the bike rack to the front crossbar. We'll then move to the rear where this time we'll slide the sliver bracket down through the pre-drilled holes taking the black plate up on the underside of the rear bar and threading on our black wingnuts. We'll then tighten everything down to secure the bike rack to the vehicle. Now with everything all tightened down and secured we're ready to load up our bike. We'll double check to make sure our jaws are lose and we'll undo the front and rear strap. We'll place our bike up onto the bike rack maneuvering the frame hook up around the sprocket. Quick tech tip, if you bike has a very large diameter downward portion of the frame, it may not fit into the jaws of the bike rack. With our bike in place we can tighten on the black knob to secure the claws up against the bottom portion of the frame. We can then secure the front and rear tire with the red straps. Now that our bike is all loaded up that will complete today's test fit for the Swagman upright roof-mounted bike rack, part number S64720 on our 2011 Subaru Outback Wagon. .
RockyMounts TieRod Roof Bike Rack Review - 2011 Subaru Outback Wagon

Today on our 2011 Subaru Outback Wagon we'll be test fitting the Rockymounts Tierod Roof Mounted Bike Rack, part number RKY1014. With the factory roof rack on our vehicle we'll begin our test fit by placing the bike rack onto the vehicles crossbars. We'll bring the rubber-coated steel straps around the underside of the front bar and move to the rear of the bike rack. We'll loosen up one of the Allen bolts to bring the rear bracket around the underside of the rear bar and using an Allen wrench tighten down the two bolts to secure the rear part of the bike rack to the rear bar. We'll now move back up to the front and remove the black plastic cover, taking the straps and hooking them into the connection points. We will then again use the included Allen wrench and turn the silver bolt to tighten down the straps up against the bar. With everything all tightened down and secured we're ready to load up our bike. We'll replace the black plastic cover and double check to make sure our skewer is loose. We'll undo the tray strap at the rear and place our bike up onto the bike rack. We'll slide the forks down onto the skewer, adjust the skewer and clamp it down and secure the back tire with the rear strap. With our bike all loaded up that will complete today's test fit for the Rockymounts Tierod Roof Mounted Bike Rack, part number RKY10104 on our 2011 Subaru Outback.
Yakima FrontLoader Roof Bike Rack Review - 2011 Subaru Outback Wagon

Today on our 2011 Subaru Outback Wagon we'll be test fitting the Yakima Frontloader roof mounted bike rack, part number y02103. We'll begin our test fit by first placing the bike rack up onto the vehicle's crossbars. We'll loosen up the black T handle at the front to position the front two brackets around the front bar. We'll then move to the rear, loosen up the black wing nut to allow us to bring the rear bracket around the under side of the rear bar. We'll insert our silver T bolt into the slot of the bottom portion of the bracket and turn the black wing nut to tighten it down. We'll then move back up to the front and tighten down the black T handle to secure the front part of the bike rack to the front crossbar. With everything all tightened down and secured, we're ready to load up our bike.
Yakima ForkLift Roof Mounted Bike Rack Review - 2011 Subaru Outback Wagon
Today on our 2011 Subaru Outback Wagon, we'll be test fitting the Yakima Forklift Roof Mounted Bike Rack, part number Y02098. We'll being our test fit by placing the bike rack up onto the vehicle's cross bars. We'll then adjust the front bracket, if necessary, to fit the thickness of the cross bar. We'll then loosen up the black wing nut and insert the silver t-bolt into the bottom portion of the bracket,turning the wing nut to tighten it down. We'll then move to the rear and adjust the rear bracket to fitthe thickness of the rear cross bar. We'll again loosen up the wing nut and insert the silvert-bolt into the slot of the rear bracket.
Swagman Fork Down Roof Bike Rack Review - 2011 Subaru Outback Wagon
Today, on our 2011 Subaru Outback Wagon, we'll be test-fitting the Swagman Fork Down Roof Mounted Bike Rack, part number S64710. With a factory roof rack on our Subaru Outback, we'll begin our test-fit by placing the bike rack up onto the vehicle's cross bars. We'll pull out our hardware, and take the silver brackets underneath the front bar and up through the pre-drilled holes of the bike rack. We'll thenthread on our black wing nuts to secure the front part of the bike rack to the front cross bar. We'll now move to the rear, and this time, bring the silver bracket down through the pre-drilled holes of the bike rack, taking the silver plate to rest on the underside of the rear bar. We'll then thread on the black wing nuts to tighten it down to secure the rear part of the carrier to the rear bar.
RockyMounts TieRod Stretch Roof Bike Rack Review - 2011 Subaru Outback Wagon
Today on our 2011 Subaru Outback Wagon, we'll be test fitting the Rockymounts Tierod Stretch roof mounted bike rack, part number rky1011. We'll begin our test fit by placing the bike rack up onto the vehicle's crossbars. We'll remove the black plastic cover at the front to bring the rubber coated steel straps around the under side of the front bar, we'll then hook them into the connection points and move to the rear of the bike rack. We'll loosen up one of the Allen bolts and bring the rear bracket around the under side of the rear bar using the included Allen wrench to tighten them down to secure the rear part of the bike rack to the rear bar. We'll now move back up to the front and again, using the included Allen wrench to turn the silver bolt to tighten down the straps up against the front bar. With everything all tightened down and secured, we're ready to load up our bike. We'll replace the black plastic cover at the front and double check to make sure our skewer is loose so our forks can slide down onto it.


What our customers are saying:
"great experience!!! I've been looking for a hitch. With the experience I just had with the bike rack, I;kk definitely come back and order the hitch when I have a little more $$$. delivery was quick! the product was awesome!!! Frank"