Polished Running Boards for a 2016 Toyota 4Runner Limited
Updated 11/13/2017 | Published 11/11/2017
Products Featured in This Question
Question:
I am not happy with the OEM running boards on my 2016 4runner limited as they are not functional at all. I like these DeeZee boards a lot. I found some pics and threads on a 4runner forum that pointed me to this page and want to try these as they look nice and from pics I have seen look much more functional but will they fit and will I be able to mount them easily?
asked by: Dottie S
Expert Reply:
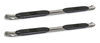
I do have a similar set of running board for your 2016 Toyota 4Runner Limited but the DeeZee NXc Running Boards w Custom Installation Kit part # DZ16202-16261 are only confirmed to fit models from 2010-2013. For a similar set of running boards that will fit your 4Runner, I recommend taking a look at the Westin PRO TRAXX Oval Nerf Bars part # 21-23580. Unfortunately, DeeZee does not make a set of running boards for your vehicle at this time.
In order to install these running boards you will want to follow the steps listed below.
1. Remove contents from box, verify if all parts listed are present and free from damage. Carefully read and understand all instructions before attempting installation.
2. Starting at the driver side front using the 12mm socket remove the two rocker panel bracket hex head cap screws. Note: These screws will not be re-installed. 2014+ SR5 and 2010+ Trail models do not have rocker panel brackets.
3. Follow the same steps to loosen the center rocker panel hex head cap screws and remove the rear rocker panel hex head cap screws. Note: On 2014+ SR5 and 2010+ Trail models do not need to loosen center cap screws.
4. Take the front driver side front mounting bracket and place it over the factory rocker panel bracket. Attach using (2) M8 hex head cap screws, (2) M8 lock washers, and (2) M8 flat washers. Do not fully tighten at this time. Note: The mounting bracket cradles should face the rear of the vehicle.
5. Move to the drivers side rear and attach the driver side rear mounting bracket over the factory rocker panel bracket the same way as the front bracket was done in step 4. Do not fully tighten at this time.
6. Take the driver's side step bar and place it on the mounting cradles and align the mounting holes. Attach using (4) M10 hex button head cap screws, (4) M10 toothed lock washers, and (4) M10 flat washers. Note: the Westin logo should face outward.
7. Align and adjust step bars as needed and tighten all hardware at this time. Torque all M8 fasteners to 15-20 ft-lbs and M10 fasteners to 20-25 ft-lbs. Make sure to re-tighten the center rocker panel hex head cap screws that you loosened in step 3.
8. Follow the same steps to install the passenger side mounting brackets and step bar.
I have attached a review video of these running board in addition to a list of all the running boards we have confirmed to fit your vehicle for you.