

 Arrives before Christmas
 Thank you! Your comment has been submitted successfully. You should be able to view your question/comment here within a few days.
Error submitting comment. Please try again momentarily.


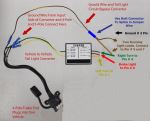
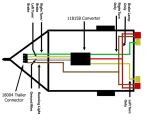
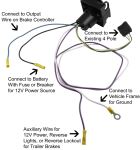
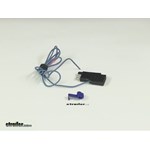
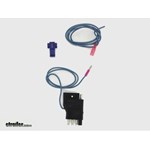
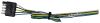
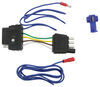
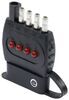
When faced with the challenge of adapting your 4-pole trailer wiring to a 5-pole setup, the Hopkins Adapter #47515 is your ready solution. This adapter effortlessly converts a 4-pole flat on your vehicle into a 5-pole flat, accommodating trailers with advanced braking systems, such as those with surge brakes. The key is the inclusion of a blue wire that splices into your vehicle's reverse light, enabling smooth braking and backing maneuvers.
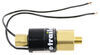
Enhance your trailer's safety and maneuverability with the blue wire integration feature of this adapter. By splicing the blue wire into your reverse light circuit, the adapter allows for the activation of brake lockouts when reversing, essential for trailers equipped with surge brakes. This precise adjustment prevents unnecessary brake engagement, ensuring smooth and controlled reverse gear operations.
Say goodbye to complicated wiring nightmares. The Hopkins Adapter includes a quick splice wire connector, simplifying installation for any vehicle's wiring setup. No advanced skills are necessary—just a straightforward splice into your reverse light wire, and you're ready to go. This feature saves time and minimizes frustration, letting you focus on the road ahead.
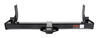
Designed with the versatility to fit a wider range of vehicles, the adapter is perfect for various types of tow set-ups. Whether you have a pickup, SUV, or a sedan with a trailer hitch, this adapter seamlessly bridges the gap between four and five pole connectors, keeping you worry-free on all types of journeys.
While wiring colors can vary by vehicle, the Hopkins Adapter's design recommends using a circuit tester to ensure the correct reverse light wire is connected. This tailored approach eliminates second-guessing and leads to a precise and secure installation, providing an efficient setup free from electrical mishaps.
One of the most practical features of this adapter is its detachable design, allowing you to unplug and stow it away neatly when the 5-pole functionality isn’t necessary. This feature not only keeps your vehicle's wiring organized but also prolongs the adapter's life by protecting it from unnecessary exposure to the elements.
California residents: click here
Videos are provided as a guide only. Refer to manufacturer installation instructions and specs for complete information.
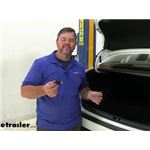
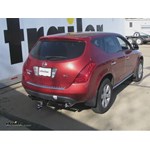
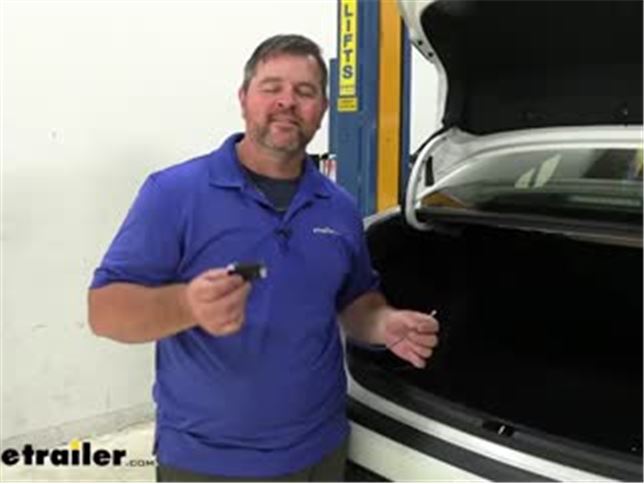
Hey everyone, Shane here with etrailer.com. Today I have a 2020 Toyota Corolla, and I'm gonna walk you through how to install the Hopkins 4-Pole to 5-Pole adaptor plug. What this is designed to do, is if you have a 4-pole plug on your vehicle, but your trailer has a 5-pole, this allows you to hook into your 4-pole plug on your vehicle, to give you that 5-pole end, if your trailer has a reverse light circuit. The blue wire coming off is gonna have a bullet connector on it, it's gonna come with the extension to connect to our reverse light circuit in the vehicle. This way your trailer, having that reverse light circuit, will allow anybody behind you, if you're backing up, to see what you're doing. What makes this nice is if we're not pulling a trailer with a 5-pole, we can take this adapter, we can throw it in our glove box, or with our other wiring.
When we're ready to use it, simply plug the two ends together. Take your bullet connector end, plug it in, and that allows you to adapt to a 5-pole plug, which has the reverse light circuit in it. As far as the installation process, pretty simple, straightforward. I will say, the end that connects to the reverse wire on the vehicle most likely will need to be extended, so just keep that in mind. You may want to have a little bit of extra wire handy when installing it.
Other than that, that's the only thing you're doing is connecting the 5-pole to the 4-pole on the vehicle, finding your reverse light circuit, and connecting the wire with the quick splice connector that comes in the kit. Now we've gone over some of the features, let's walk through how to get it installed. Now your installation, we're gonna open the trunk. We're gonna go ahead and remove our floor covering. We're gonna come to our threshold, we're gonna have a push pin fastener here and then one on the other side.
Can either put a pry tool in there, plastic trim panel tool, or if you can get your fingers right back here, they usually pop out pretty easy, that'll keep you from scratching anything. We'll pull each one of those out, and then we'll pop this up and out of the way. Pull up, and then we'll set that aside. On each side of the vehicle, this felt liner, you're gonna have two more fasteners. Take a trim panel tool, get in right behind it.
And we're gonna pop each one of those out, to release the lining. If it makes it easier, right down here on the bottom, you have another one. You can go ahead and remove that one as well. Now the reverse lights are actually in our trunk lid. This wire loom right here, we follow it back, to right here, pull off the wire loom, and we need to test the wires to determine which one we're gonna be using. This gray wire, is actually the one that's gonna give us our reverse light signal. What we're gonna do is we're gonna go ahead and test it again, and show you what to look for. So I'll have somebody in the vehicle, put on the brake, put it in reverse, take it out of reverse, put it in reverse. Now we're gonna take our 4- to 5-pole adapter. We're gonna plug it into our 4-pole plug on our vehicle. I kind of brought this line down like this, right around our 4-pole wiring, so we get to that plug. We're gonna take the other end of our blue cable, we're gonna plug them together. That's gonna tell us the length that we need. Go ahead and remove this. Then we can take this end from here, down into the vehicle. We are probably gonna have to extend it, this cable is not gonna be long enough. I just pulled out some extra wiring and threw a butt connector on it. Now what I'll do is I'll take this here, so that if it's not being used, they could pull the 5-pole plug off and then re-install it, and just plug them together when they need it. And that's where I take our quick splice connector, we're gonna slide it over our wire that we tested. We're gonna take our blue wire, and feed it right up in the end like that. I'm gonna simply take a pair of pliers, and press that center metal tab down. Once you get it crimped down, hold that over like that, take all this, take it back from here, and then re-install our panel. Now we can test out our reverse light circuit. I'll have somebody in the vehicle. And you can see we have our test light, to the reverse light circuit coming out of the 5-pole plug, into our ground. Then we'll test out our 4-pole side, brake lights, running lights, left turn, right turn. Once you've tested everything out, you're ready to go. That's gonna do it for look at and installation on the Hopkins 4-pole to 5-pole, flat trailer connector, on our 2020 Toyota Corolla..

Exactly as described.
Fit perfect.
As advertised
This adapter works great.
Excellent. Easy to install instructons. Fixed my problem easily.
Awesome service. The order, delivery, and confirmation process is outstanding...and priced very well.
I received this part in a timely manner and it matches my needs perfectly. I've purchased several parts from etrailer.com and will definitely be a returning customer.
Needed a reverse light. Simple installation. Works great. Wish it came with a rubber cover to keep the muck out...
Great Product!It was a very easy install. The blue wire is only long enough to go to a reverse light that is on the rear corner. I had to buy additional wire from the auto parts store to continue the connection up the side of my vehicle and through the back hatch. But it works great.
I Have been looking for this product for a long time. I did not know the part number or even that it existed, I just had a need. At etrailer.com I not only forund this product. I found a couple versions of the same solution. Plus etrailer showed me a video on how to install it. Great site
The adapter works great. The installation on a 2005 Subaru Outback is a bit more difficult because the backup lights are located on the liftgate.
Still only took about 1/2 hour. Now I just need to find a cover for the 5-Pole!
Al
Put this on an '05 Ford F150. Simple install and took only 5 minutes. Drivers side reverse tail light has two screws on the tailgte side. The hot wire for backup light was brown w/ a red stripe. Unfotunately, my package didn't have the wire splice connector inside as it was suppose to so I used stuff I had at home.
Works like a charm. Very clean looking with no extra wires dangling.
Should get 5 stars but the lack of connector bummed me out and I didn't have time to return it.
Cheers
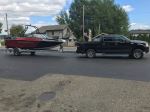
I had a 2 inch trailer hitch and 4 pole flat wire harness professionally installed on my 2001 Dodge Ram Pickup. When I bought my boat the trailer was wired for a 5 pole flat harness. Took my truck back to the installer to have the harness exchanged and was told that there was no 5 pole flat harness made for my 2001 truck. I asked about splicing a 5 pole flat harness to the 4 pole flat harness and was told by the installer that they don't do splicing and because the 4 pole harness was already installed I couldn't get a refund. So the search was on to fix this problem. Stumbled upon the etrailer E-commerce site and found what I was looking for. A 4 pole flat to 5 pole flat adapter. The price was right, the service was 5 Star and I received the adapter in 4 days which was perfect. I had time to install it, and get my boat on the water that weekend. Thanks George J. I will be using etrailer for all my trailer needs.

Instructions were great. Easy to install. No problems so far

Brooke M.
5/9/2025
Happy to hear that, Ron! I'm "amped" up for you.
Super quick delivery and great CS helping me make decision. Love you guys.

Danny

7/30/2024
Absolutely love it a year later…LOVE it! It is bullet proof.
This is the perfect product for when you already have 4-pole trailer wiring but simply want to add a 5th wire for powering the reverse lockout on surge brake trailers or just the backup lights on a truck bed converted into a trailer. It plugged right into the factory connector on my 2011 Ford Ranger. Only ONE splice was needed: the reverse light wire in the taillight. You also have an additional location for wiring in an aftermarket backup camera IF the vehicle's electrical system allows for the extra current. Only complaint is that it didn't come with its own connector cover, but I was able to get that off of etrailer too!

John M.
2/26/2019
Still in use, stays well protected with the connector cover, no problems to date!
This product is very well made. Instructions are a bit brief, but plenty of info online to get it installed. The reverse wire on my car was too small to work with the splice, but I connected them directly w/ a "T". Worked flawlessly with my trailer. The length of the wire on the adapter allows you to make the connection INSIDE the car which will surely extend the life of the connection. Overall great and simple design.

Bsm
9/27/2015
Still works but seems sporadic at times. Will investigate my hydraulic servo for the brakes to ensure they are locking out as required to reverse.
Arrived quickly. I didn’t need to wire the extra lead to my reverse lights because my trailer doesn’t have surge brakes or backup lights. Simply plug and play.
The five-to-four harness adapter was exactly what we needed to be able to tow our tent trailer with our car rather than our motorcycle. And it arrived so quickly! Thanks for helping us solve the problem so easily and economically.

Glenn
6/4/2020
Still working great! Thanks again for the perfect solution to our problem.
This item was bought for another individual and has worked out immensely! Kudos to the folks at eTrailer for having exactly what was needed and getting it to us so quickly. I have and will continue to sing their praises for any of your trailring needs!!!
Don M.
3/31/2022
This adapter is working perfectly after a year. I still highly recommend etrailer for all your towing needs!!!
I purchased this for my 2019 Subaru Outback, but I have not installed it yet because I have not had to pull the trailer that requires that adapter yet. However I did purchase one of these for my Toyota Highlander several years ago, and it worked perfectly. It takes the signal for the reverse light and uses it to deactivate the trailer brakes so that you can back up without physically going out to the trailer and locking out the brakes.
Perfect for converting 4 wire Ford Expedition trailer harness and boat trailer to 5 wire. The Expedition had a backup wire run to the area of the 4 wire plug so made the conversion easy.
Quality item. Great service. Love it. Keep up the great work.
I put this on my 2016 Kia Sorento. Do yourself a favor and watch this instructional video "Hopkins Trailer Wiring Adapter Installation - 2014 GMC Acadia". Another great tip for my application is to buy an extra 20 feet of 16 guage wire. I ran the wire from the tailgate on the inside of the weather stripping and snaked the wire into the utility tray in under the back flip up compartment. When I need to hook up the adapter - I just run it out of the tailgate and hook it up. This keeps the adapter out of the elements when not in use.
This adapter is wonderful! It continues to work like a charm, was easy to install, and the price was right. Needed it for hauling my boat trailer that has hydraulic brakes. It has made it through all kinds of Wisconsin and Minnesota weather on my Jeep Wrangler and will last like any other wiring part that is exposed to the elements. I highly recommend this to anyone looking to adapt 4 pole to 5 pole trailer wiring.

Do you have a question about this Custom Fit Vehicle Wiring?
Info for this part was:
At etrailer.com we provide the best information available about the products we sell. We take the quality of our information seriously so that you can get the right part the first time. Let us know if anything is missing or if you have any questions.


Hopkins S.
5/11/2017
Hello Terry, Thank you for purchasing our Wiring Adapter!! Hopkins appreciates your review and picture and looks forward to doing more business with you in the future. Enjoy your time on the water!!