

 Arrives before Christmas
 Thank you! Your comment has been submitted successfully. You should be able to view your question/comment here within a few days.
Error submitting comment. Please try again momentarily.
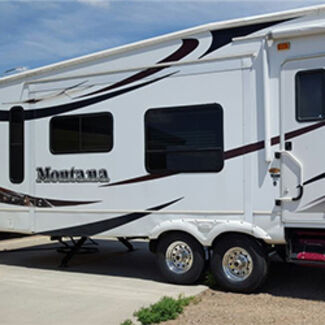
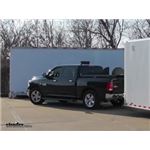
Restore stability and control in your ride so you can tow to the max capacity of your hitch. Self-adjusting, dual-cam system provides sway control. Customize with your own hitch ball and shank to suit your towing needs.
Features:
Specs:
Note: Dual-cam sway control cannot be used with surge-type trailer brakes and is designed for Class III and Class IV hitches only. Should not be used with aluminum trailer frames.
| Included w/ RP66074 | Required - Sold Separately | Optional Add-Ons |
|---|---|---|
|
| n/a |
Pro Tip: Before you invest in a weight distribution hitch, make sure your cargo is evenly loaded in your trailer to keep the weight balanced. If you still have a hard time even after balancing your tongue weight, a weight distribution hitch should help.
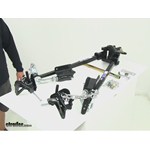
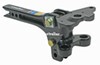
The Strait-Line system is a significant improvement over traditional friction-style controls, which help to correct sway only after it has already begun. Reese's specially designed system uses sliding devices called "cams" that suspend the spring bars of your weight-distribution system. One end of a cam bolts onto your trailer's frame, and the other end attaches to the lift bracket via the snap-up chain.
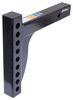
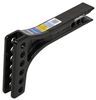
These specially designed bars have rounded, hooked ends, making them the only kind of spring bars that can function with Reese's active-style, dual-cam sway control. With a tapered design and hot rolled steel construction, these bars offer superior flex, ensuring a smooth, controlled ride for both your tow vehicle and your trailer.
When sway isn't an issue, the cams lock in place and hold the trailer steady by applying constant, consistent pressure to both sides, which keeps the trailer from swaying in crosswinds. When you go into a turn, the cams unlock and slide to allow a controlled, full-radius maneuver. If you swerve suddenly, the cams will give to accommodate the movement while still working to obtain a straight angle, thereby maintaining control of the trailer.
The easy-to-use, serrated washers on this system make adjusting the tilt of the weight distribution head a snap. This is a huge improvement over the standard pin-and-washer method, which involves piling washers onto a difficult-to-access pin. The serrated-washer system lets you easily loosen, adjust, and tighten a single washer and nut on either side of the head for simple, secure positioning.
Pro Tip: For a step-by-step guide on how to fully install the Strait-Line, check out our videos at the top of this page. Our installers even have some advice to offer on measuring your vehicle's squat.
Your tongue weight is the first thing you need to know when figuring out which weight distribution system you need. Most people think that if they get the highest-rated system possible, it'll be smooth sailing. But actually, this will create a rigid ride and a bouncing trailer. On the other hand, if the system isn't strong enough, it won't be able to distribute the weight properly, making it virtually useless.
Once you know your trailer's tongue weight, add it to the weight of the cargo behind the rear axle of your tow vehicle. Then just choose a weight distribution system rated for that combined tongue weight.
 Alternate Instructions
California residents: click here

Made a huge difference. I barely know I am towing 10000 lbs.
i pull a jayco 22fb with a 2007 toyota tacoma and have the dual cam trunion bar sway control system. it has been great! would highly recommend it.
The support ETrailer gives is amazing. I had a ton of questions on what hitch to buy. Then I had more when I installed it. They emailed and talked on the phone to support me. Great hitch and great company.
I just installed a Reese straight line hitch. Instalation was easy. It took me about 5 hours to install. The instructions included were easy to follow. Some tools needed are large and may need to be rented or borrowed. I'm looking forward to pulling my camper with this new hitch.
I currently own a WD system with round bars and sway control, which is about 15 years old. This newer system, with trunnion bars and cam sway control, is far superior. And etrailer.com offered the best web price, including free and quick shipping and excellent customer service. I gave been a customer of etrailer for many years!

Awesome weight hitch! I pull a 28" camper with this hitch and its really nice not having to stop and break down the hitch before backing up the camper. I have about 3k miles on this setup and absolutely love it. Its also easier to store when not in use because the chains stay attached to the cams on the a frame of the trailer and not attached to the bars. So the bars arent as heavy. Thanks again etrailer
Installed this on a 2016 Silverado 1500 2wd dbl cab pulling a 2016 northland 30ft travel trailer. I was having the typical sway issues with crosswinds and passing big rigs etc. I am very pleased that this hitch solved the problem. Good quality product. I installed it myself and I had to buy about $100 in larger wrenches and a good quality step drill bit.
This is a quality product from Etrailer.com.
It does everything they claim it is supposed to do. I have used it three times now since having it professionally installed by my local RV Dealer. It has eliminated the sway problems that I had been having at different times on different trips with my 31 foot Rockwood Ultralight 2701SS.
Very happy with this product and even more satisfied with the quick and outstanding service from etrailer.com. You wont go wrong with this combination.
I have been using this hitch for about 2 years now on my 20' flatbed trailer. It has been done everything I expected and excels at what it is designed to do. I have had my trailer loaded up to it's max weight (12k) on more than one occasion and this hitch keeps everything nice and level. I have never experienced any sway, but I am careful to load the weight on my trailer correctly. I had to use a drop shank #RP3344 since I have a 6" lift and 35" tires. My trailer sits perfectly level. etrailer is awesome - fast shipping and top notch customer service!!
This weight distribution hitch works s great. however make sure the people you have install it know what they are doing, once installed properly I have had ne issues with it.
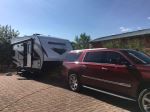
Here is my completed setup Everything went nice and smooth, thanks to your installation videos. Thank you!
Lauren was great from beginning to end. Extremely helpful explaining weight distribution hitches. I’m placing another order next week for storage slide out trays.
This hitch is the perfect hitch for my 32 foot travel trailer. It practically eliminates sway and of course distributes the tongue weight! I highly recommend this hitch of you are having sway. I tried a few others prior but they simply didn't do the job!
Was not what I hoped, did not take the sway out of my 2021 Grand Design travel trailer. The hitch is now for sale online at half the price I paid for it. I built and installed gooseneck on my trailer... It now pulls great! Too bad you can not order the trailer built that way!

Heather A.
3/16/2022
It is important to make sure the loaded tongue weight of the 2021 Grand Design Travel Trailer does not exceed the weight rating of the bars for this system which are rated for between 600 lbs to 1,200 lbs. Ideally you want the loaded tongue weight of the trailer to fall in the middle of that range to combat sway. I know that you ended up converting to a gooseneck but that is something to keep in mind for the future.
This is simply a very good hitch. Installation instructions produced a completely flat tow when the trailer settles on the truck. My rig is sway free there's no extra up and down movement. The hitch is quiet going forward and backwards. Just really pleased.

Jeff

4/7/2022
Very well. An excellent hitch.
Have towed 50' rowing shell trailer over 10000 miles so far with this system. Great stability, even better tracking capability. Was a little tricky to set up originally because of non -standard trailer. Got excellent help from trailer expert to get setup dialed in, have had no problems.

Roger P.
3/5/2018
25000 miles, still going strong
Roger P.
3/5/2018
25000 miles, still going strong
I use this product to pull my 6000 lb Arctic Fox trailer with a Dodge Ram 2500. I received an incredible amount of help from etrailer as to the set up and adjustment of this hitch. Without their expert advice I could never have done the set up correctly. The adjustments are critical to proper performance of the hitch. Etrailer was clearly more knowledgable and more willing to answer questions than was the manufacturer.
My trailer pulls perfectly. All is perfectly level, the truck steering is positive with front wheels firmly on the road, the anti sway feature is in great in windy conditions, the trailer tracks and follows my truck in nicely turns, and there is no "bounce" from the trailer loading down the truck.
This is a great hitch and etrailer is there to help - and you'll need it!
This product is an addition to peace of mind when I'm towing my camper. The installation was easy - although in all fairness I'm a toolmaker machinist and am well versed with these types of mechanical assemblies.
Very C.
7/27/2017
Very, very well. Ive had no problems with sway. Follow the setup instructions and youre on your way!
I don't really have anything to compare this weight-ditrubuting hitch to because it is my first one. I had it installed on a 2021 Forest River Puma 37' foot travel trailer. I pull it with my 11 F350. Before the hitch, I hated pulling the trailer in crosswinds but after the hitch install the winds, dont seem to bother me at all. The hitch allows for tight turns and does not limit any movement. The trailer is much easier to pull and at times, I forget it is back there.
I did not install myself even though I typically would but did not want to mess up. I paid a local RV mechanic $100 to install the hitch. They completed the task in about 2 hours.
First off I love etrailer and always check with them for pricing on all my towing needs. We used this hitch a few times in 2019. Once was for a trip from Ohio to Salt lake city. I bought it due to it was 1 of 2 that it stated you could back up with without causing damage. I can say it performed better than expected. We had switched from a 5th wheel camper to a pull behind and with this hitch our camper felt very stable even in a cross wind. In some cases I think there was less sway than our 5th wheel was. I would not hesitate to buy another one of these hitches.
My local installer didn't adjust the new hitch correctly. The hitch has to be "pointed down in the back" some to adjust the spring tension correctly (this is in the instructions...) Anyway, after readjusting this myself it's GREAT. Much more stable with the strait-line, the chain tensioners don't slide around on the trailer chassis and truck is level. I've recommended this hitch to several other trailer owners. Tundra 5.7L 4x4, Arctic Fox 25Y.
I got this to pull a trailer from Virginia, through Canada, to Alaska. After almost 6000 miles, I highly recommend this, in the appropriate weight rating of course, for anyone pulling a heavy load. My loaded trailer was right at 9000 lbs. I first visited the recommendation page and decided on this particular hitch. The route wasn't easy and mostly mountainous, and the Alaskan Highway is nothing to sneeze at. We hit several unmarked rough patches pretty fast. Never once did I have any issues. The truck rode perfectly level, and the trailer never swayed, not one bit. Set up wasn't the easiest, but just read through the instructions a couple times, then find a video covering it. Once you have it set up, hooking up takes just a minute or two longer than just hooking straight to the ball, but not any more difficult. Highly recommend.
Shipping was very fast, and well packaged. Pricing was great and free shipping for such a heavy product, was a big plus.
Won't get to install and try this until spring, will review product then.
Thanks for a great transaction.

Tim
2/16/2019
Works perfectly as described, i feel very comfortable while towing.
This is a great hitch! I pull a 35 foot travel trailer with it and I have a completely flat towing experience with this hitch. I have no sway while pulling and it is very easy when I hook up and go as well as store because the chains are attached to the trailer and not the bars. Very pleased with this hitch!
After just one avenger with it installed I would be scared to tow my camper with out it. It takes the bouncing up and down with every little hump in the road out. When a big truck goes flying by you the trailer stays put.If I Only give it 4.5 stars is because I didn't read all that came with it. It does not come with the receiver that everything hooks to. Yes another hundred buck but this part is not found local so I had to wait to finish the install until after we came back from our first trip with the new camper.

Do you have a question about this Weight Distribution Hitch?
Info for this part was:
At etrailer.com we provide the best information available about the products we sell. We take the quality of our information seriously so that you can get the right part the first time. Let us know if anything is missing or if you have any questions.


Kevin C.
3/29/2020
The hitch is working wonderfully holding up well after a year of decent use.