
To see if this custom-fit item will work for you please tell us what vehicle you'll use it with.


Quickly and easily install a 4-way trailer connector on your Buick Rendezvous with this custom harness. T-connector plugs directly into existing wiring - no cutting, splicing or tapping required.
Features:
Installation
This custom-fit T-connector plugs into your vehicle's wiring harness, which is located behind the driver's-side and passenger's-side tail lights. You will have to remove the tail light assemblies and some interior trim to access this harness.
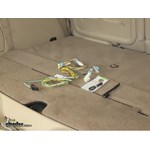
Once installation is complete, the 4-way connector will be stowed within the jack storage compartment of your rear cargo area.
It is recommended that you use a small amount of grease on all electrical connections - the plugs on your automobile and the 4-pole connector itself - to help prevent corrosion.

California residents: click here
Videos are provided as a guide only. Refer to manufacturer installation instructions and specs for complete information.
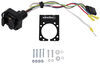
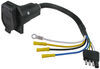
All right, today on this 2007 Buick Rendezvous we're going to show you the Curt T-connector vehicle wiring harness, part number C55383. With this part number, this is what you get, obviously your wire harness and two T-connectors. Yellow wire T-connector goes to driver side. Green wire T-connector goes over to the passenger side. You've got a nice long length of wire that will reach from one side to the other and this is our four pull flat. When a four pull is not being used it comes with a cover for it as well, plus, some zip ties and screw for the ground.
This is our ground wire right here with the ring terminal. This will be eventually installed on the passenger side. Not much to it. Let's go ahead and show how we install it. All right, first off to our install is to go ahead and remove the tail lights. We're looking at the drivers side here.
We'll go ahead and remove these two screws using a Philips head screw driver, number two size. We pull straight back on the tail light and pull away. Our T-connector will go in this location right here. We'll peel up on this lever and we can pull it apart. Let's go ahead and repeat the same process over on the passenger side.
Still on the passenger side here, let's go ahead and pull off this grommet where I can make a cut in it. I'm just using some tin snips because we're going to have to route our wires through the inside to the outside and they'll go through this slice right here. This is our passenger side. Let's do the same thing over on the driver's side. Since the wires are going to be routed from one side to the other, we need to go ahead and loosen up this threshold right here, then we'll go ahead and route our wires underneath. I'm just using a trim panel tool and you feel around for attaching points and just kind of pry up on them a little bit, just so you have some working room to route our wires underneath this edge right here. Now we're also going to need access behind these panels right here so go ahead and loosen up these tie down loops right here so we can easily pull the panel back.
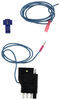
We'll use a ten millimeter socket on these guys. Pull back the rubber seal a little bit just enough to loosen it up. This is our driver's side, we're going to repeat the same process over on passenger side. Now I'm going to go ahead and start to work on our wire harness. We're going to start on the passenger side. With our green wire, we're going to route it through behind here and then out through the opening where the grommet was. There's a lot of wires and cables in that hole as well, so if you have to, use something to help fish it through like a piece of wire or something. Just fish out our white wire with the ring terminal as well. We'll pull out some slack, give us something to work with and then let's go ahead and put our grommet back into place. We'll put our wire through the slot and reinstall the grommet. Let's take our T connector, it will attach to the factory wiring on the vehicle, we'll line it up and push it together. Let this side alone for now, let's take a moment and ground our white wire to the sheet metal. We'll need to use a quarter inch nut driver. All right, let's go ahead and route our four pull wire here, when it's not being used it's going to stay in the jack storage compartment back here. We're going to take this four pull harness, route it behind the panel here. We'll open up our panel for our jack storage and pull out our excess. Next up, we'll go ahead and take our T connector with the yellow wire and we're going to hide that underneath the panels that we loosened up earlier, pry our panel a little bit and shove it in there. Make sure that this part stays away from the latch in the center and we're going to route it up and over the latch so it constantly wants to fall down towards the bottom and it will stay away from the latch and back up the other side. We'll peel back our panel one more time and route this T connector back to the outside just like we did on the passenger side. Let's make our connections as we did before. At this point, we'll go ahead and put our panels back in place and we can go ahead and reinstall the tail lights as well. Same thing as before, they just plug right in and then we install. Everything's finished, let's go ahead and put our cover on our four pull, then we'll go ahead and try it out. It's always a good idea to go ahead and try out your wire harness before you plug into your trailer to verify that it's working correctly. Let's take our tester and we'll connect it to the white wire, and then we'll test a brown wire for our running lights circuit. Yellow for left turn, green for right turn, then we'll look for a brake signal. It will be a constant signal on our green and yellow wires. All right, looks like everything works. When it's not being used, it can stay with the jack tools right here, that way when it's stored inside it's not being corroded by the elements anymore than it has too. If we need to use, we can just go ahead and open it up, pull out the wire harness, maybe just use only one of the locks, then we just pull this out to the outside and then we'll shut our hatch on it. When the door shuts, the door seals thick enough where it won't hurt the wire, just make sure you stay away from the latch in the center and we have more than enough to go down to our trailer. With that, that will finish it for the Curt T connector vehicle wiring harness with a four pull flat trailer connector, part number C55383 on our 2007 Buick Rendezvous. .
Average Customer Rating: 4.8 out of 5 stars (4 Customer Reviews)
Quickly and easily install a 4-way trailer connector on your vehicle with this custom harness. T-connector plugs directly into existing wiring - no cutting, splicing or tapping required.Great Product, instructions were clear and had a clean, no problems instalation in about a half hour.

Perfect
Info for this part was:
At etrailer.com we provide the best information available about the products we sell. We take the quality of our information seriously so that you can get the right part the first time. Let us know if anything is missing or if you have any questions.


Thank you! Your comment has been submitted successfully. You should be able to view your question/comment here within a few days.
Error submitting comment. Please try again momentarily.